Thursday, July 31, 2008

Steaming Vegetables

I don't know if it's the sultry heat, the high humidity or a general lack of inspiration, but I have found that I am steaming a lot of my vegetables this summer. To many, myself included, steaming is the "healthy" (read: boring) option for cooking vegetables - no added fat, no added salt, etc.

Steaming is simple. I use a steamer basket that looks a little like a flying saucer. What's nice about this style is I can put it in a saucepan or a skillet, depending on what I'm steaming. I set a little water to simmer in the bottom of the pot and put my vegetables into the basket.
I cover the pot or pan and check it intermittently (every 5 minutes or so - the beets took 15 minutes to get to fork-tender) to see how tender the vegetables have become.

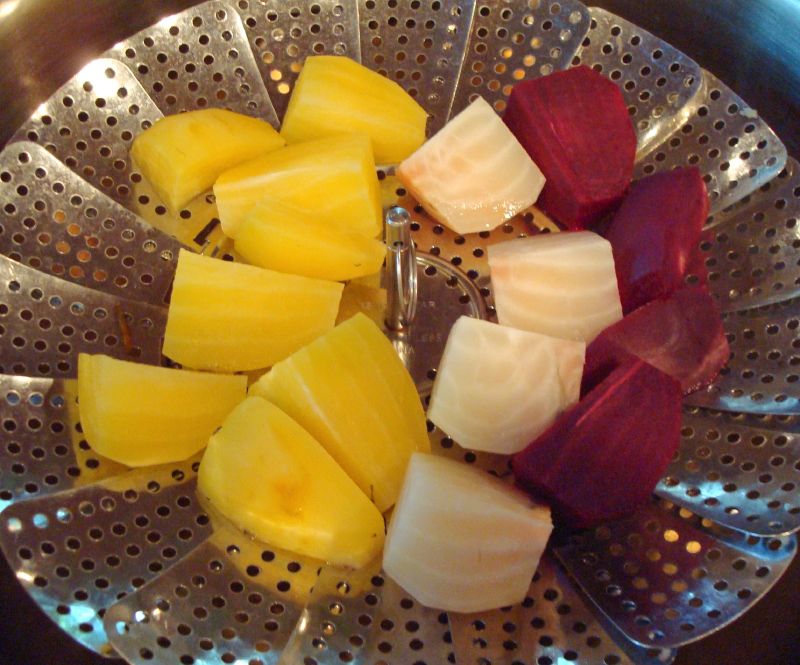
When the vegetables are as tender as you wish, remove them from the steamer. That's it! These pics are of some beets I cooked up the other night. Steaming is cooler than roasting and neater than boiling (see how clear the colors remained after cooking). Plus I cooked all three varieties of beet at the same time without the red ones bleeding all over everything else.

To add more flavor, what I do frequently is saute (in the same pan I used for steaming) the now-cooked vegetables quickly in some oil or butter with a little garlic, onion, herbs, etc. I get a more consistent result by pre-cooking the vegetables and then sauteing than by sauteing them to cook them through.

Monday, July 28, 2008

Kimchi Slaw

This is a super-easy, really refreshing slaw for summer. You don't need much of a recipe (although I'll give you one): It's pretty much shredded Napa cabbage tossed with chopped kimchi with salt and rice wine vinegar added to taste.

Kimchi can be found in Asian markets of course, but my local supermarkets (Shaw's and Stop & Shop) carry jars of it in the produce section. If you plan ahead, you could always make your own.

Kimchi Slaw
Serves 4-6 as a side dish
  • 8 cups shredded Napa cabbage
  • 1-2 cups finely sliced or shredded vegetables (a combination of any or all: carrots, cucumber, celery, zucchini, summer squash, onion, scallions, etc.)
  • 3/4 cup kimchi, chopped
  • salt to taste
  • rice wine vinegar to taste
Toss the cabbage, vegetables and kimchi together. Sprinkle with a little salt (about 1 teaspoon) and a little vinegar (about 1/4 cup). Let it sit while you make the rest of dinner; the cabbage will soften and everything will get a little watery. Stir before serving and taste for seasoning. Depending on your kimchi and personal taste, you may want to add more salt or vinegar.

Sunday, July 27, 2008

Week of July 27

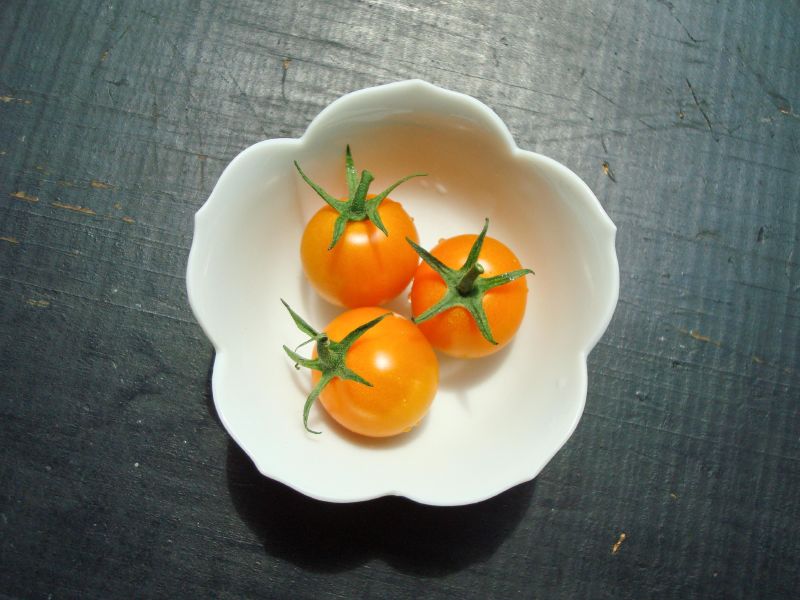
These are our first tomatoes of the season. They're Sun Gold cherry tomatoes, and yes, they are that orange - no photographic chicanery here. It's been a strange summer for tomatoes: really hot in June, and so very wet through most of July.

My tomato plants have finally gotten their collective act together and, acts of God, groundhog or chipmunk notwithstanding, a month-plus of great harvesting should start soon.

If you're paying close attention (which I don't expect you to be), you'll note a repeat from last week's menu (the shrimp). That's because I didn't make it last week and I wanted to keep it in rotation.

Menu for the Week
Sunday
Barbecued chicken (inspired by this post over at The Bitten Word)
Napa cabbage slaw
Corn on the cob
Buttermilk biscuits

Monday
Firecracker shrimp
Thai-spiced green beans
Rice noodles

Tuesday
Grilled fish with lemon and oregano (we'll see what's good at the market on Tuesday, I'm hoping for halibut)
Greek salad
Pita bread

Wednesday
Chickpea and sweet potato curry (inspired by Gastronomy Domine)
Grilled eggplant with lime and cilantro
Summer squash fritters with mustard seed
Cucumber raita
Basmati rice

Thursday
DCI Show: East Coast Classic, Picnic in the bleachers with Jim and Kristen
BLATTs (Bacon, lettuce, avocado, turkey and tomato sandwiches)
Carrot sticks
Potato chips
Blueberry hand pies (mini pies)

Friday
Cheeseburgers
Corn on the cob
Potato chips

Friday, July 25, 2008

Drink of the Week: Herbed Martinis

As the summer continues on, I try to find ways to use my bounty of fresh herbs in more and more dishes. Given my interest in mixology, it's only natural that I've tried using herbs in cocktails.

This martini method is very easy and fast and doesn't require that you do anything in advance (no infused syrups or liquors). All you do is take a few sprigs of herb, tear them up, put them in your mixing glass with the rest of ingredients and stir, stir, stir.

I suggest using vermouth in your martini (most "modern" martinis are vermouth-less); the vermouth smooths out the strong impact of gin (or vodka, if you must). It also makes for a gentler (read: weaker) drink, so you won't be staggering about after just one.

I used some of my "Sweet Dani" lemon basil from the backyard to make this Lemon Basil Martini. I have also used chervil, regular basil and bee balm (some know it as monarda). I think borage would be good (especially with Hendricks - to bring out the cucumber flavor) and thyme would be great in a sweet martini (use sweet vermouth instead of dry).

Give it a try and let me know what you think.

Herbed Martini

Put into an iced mixing glass:
  • A few sprigs of your herb of choice
  • 2 - 3 ounces gin (I like Plymouth, Miller's or Hendricks)
  • 1/2 - 1 ounce vermouth - dry or sweet or both, depending on your herb
Stir until the drink is well chilled. Give yourself at least 15-30 seconds of stirring time - this is what infuses the liquor with the herb's flavor. Strain into a cocktail glass - garnish with an herb leaf or blossom.

Thursday, July 24, 2008

The Milkmaid's Kitchen: Creme Fraiche

One of the easiest do-it-yourself dairy projects is making creme fraiche. For those who aren't familiar with this luscious creamy product: creme fraiche (French for "fresh cream") is similar to what Americans think of as sour cream. It's thick, creamy and tangy. Unlike sour cream, it can be whipped (like whipped cream) and used as a very-dairy dessert topping.

If you shop for creme fraiche (supermarkets usually carry it in their deli dairy section, and specialty markets usually have it) you will find that it is usually very expensive, sometimes shockingly so (I have seen 6 ounces for sale for as much as $6.00).

With 24 hours' notice, you can make your own creme fraiche for significantly less money. And, since you control the ingredients, you can use high-quality cream from the local dairy (or natural foods store), although I have had great results with Land O' Lakes and Garelick heavy cream.

Creme fraiche is made using a very simple formula: 1 tablespoon of cultured buttermilk to 1 cup of heavy cream. You can use sour cream in place of the buttermilk.

Creme Fraiche
makes about 1 cup, easily doubled, tripled or quadrupled
  • 1 tablespoon cultured buttermilk
  • 1 cup heavy cream
Place the ingredients in a clean glass jar. Cover tightly and shake to combine. Leave the jar at room temperature (around 65-70 degrees F) until lightly thickened and the creme fraiche tastes tangy. In my kitchen, this usually takes from 8-12 hours; it will thicken further once it's cold.

Refrigerate.

That's it! Now you have a great topping for fruit desserts (you can whip the creme fraiche or not, your choice), a luxe swirl-in to use as a soup garnish, a cream substitute to put in sauces, or a sinfully rich base for dips (The French Laundry uses creme fraiche as the base for their black truffle dip).

Monday, July 21, 2008

Watercress Pesto

... or Cress-to as Dave called it.

This week's Root Source Challenge ingredient was watercress. I use watercress in salads usually, but I've been thinking a lot about quick sauces like pesto. I thought watercress's pepperiness would make a nice pesto. The next Root Source is on tarragon - be sure to submit an entry!

I served the pesto over linguine. To make a main course servings out of it, I topped each serving with a poached egg and a little grated cheese.

This pesto would be nice over grilled salmon or scallops and would be great as a sandwich spread. I think it would be fabulous stirred into mayonnaise and served with cooked shrimp.

Watercress Pesto
makes about 1/2 cup
  • 1 small garlic clove, minced or pressed
  • 1 bunch watercress (about 2 packed cups - about 5 ounces)
  • 1/2 cup toasted pine nuts (I think this would be great with toasted walnuts too)
  • 1/2 cup finely grated parmesan (about 1/2 ounce)
  • 1/4 cup olive oil
  • salt and pepper to taste
In a food processor, pulse together the garlic, watercress and pine nuts. Pulse in the cheese and olive oil. You want a paste, not a puree. Add salt and pepper to taste.

Week of July 20

That out of focus thing is a really delicious lobster ("lobstah") roll. To my mind, lobster rolls are the most efficient way to consume lobster meat: no shell in the way, no dipping, no cutting, nothing but you and delicious lobster.

My recipe is basic: cooked lobster meat, a little Hellman's mayo, some herbs. In my neck of the woods you can buy "culls" which are lobsters that aren't picture perfect (and are cheaper as a result). They usually have claws of irregular size or only have one claw). My lobster guy will cook them for me, so it's really easy to call ahead and then pick up your cold, cooked lobster.

If lobster is prohibitively expensive for you, try making a shrimp salad and serving it lobster-roll-style, in a buttered, grilled hot dog bun. Wicked good.

Menu for the Week
Sunday
Lobster rolls
Local corn
Gently pickled beets
Potato salad

Monday
Linguine with watercress pesto and a poached egg

Tuesday
Chicken and sausage cacciatore (from the July issue of Bon Appetit)
Orzo salad

Wednesday
Chilled cream of broccoli soup
Goat cheese and roasted red pepper sandwich

Thursday
Firecracker shrimp (spicy, sorta Thai-style, grilled shrimp)
Rice noodles
Pan seared green beans
Squash salad

Friday
Turkey burgers
Vegetable slaw

Sunday, July 20, 2008

Whoo Hoo!

I won another Cookthink Root Source Challenge! What an honor. I hope it gets y'all to try these cookies.

If you want to enter the next Root Source Challenge (#23), the ingredient is Watercress and entries are due by Tuesday.

Friday, July 18, 2008

Drink of the Week: Sazerac and Variations

In honor of Tales of the Cocktail, this month's MxMo theme is New Orleans cocktails. Also, just this past week, the Sazerac was named the official cocktail of New Orleans.

Today, most Sazeracs are mixed with rye whiskey, but originally cognac was the base spirit. I thought it would be nice to try the original cognac version. In the spirit of scientific inquiry, we made a rye-based Sazerac for comparison. The Peychaud's bitters is an essential ingredient, Angostura will not do.

As you can see, the drinks don't look too different (the cognac one is on the left), but the difference in flavors was intriguing. I found the cognac version to be drier overall, but the sweetness of the simple syrup came through more distinctly in the first sip and highlighted the floral notes in the cognac. The rye version was simpler, cleaner and easier to drink. This could have been a result of the quality of the alcohol I used. The rye was Old Overholt (cheap) and the cognac was Courvoisier (not cheap).

After I drank half of each glass, I mixed them together to try a half cognac/half rye version. I liked this version best. The headiness of the cognac was tempered by the rye and made for a very delicious drink.

Note: Every Sazerac I have ever been served has been in a rocks glass (with no ice). I used my little cocktail glasses because I was making mini-drinks. Do try it in a rocks glass: the pastis fragrance comes through much better when you have room to smell it.

Sazerac Variations

All the Sazeracs are made the same way:
  • Pour a small splash of pastis or absinthe into the rocks glass and swirl it coat the glass with pastis. Pour out the pastis.
  • In an iced mixing glass, combine your drink ingredients. Stir until well chilled.
  • Strain into serving glass. Garnish with a lemon twist (an orange twist is a nice change).
Cognac Sazerac
  • Splash of pastis or absinthe
  • 2.5 ounces Cognac
  • 1 bar-spoon sugar syrup (or a 1/2 teaspoon of sugar dissolved in a little water)
  • 3 dashes Peychaud’s bitters
Rye Sazerac
  • Splash of pastis or absinthe
  • 2.5 ounces Rye
  • 1 bar-spoon sugar syrup (or a 1/2 teaspoon of sugar dissolved in a little water)
  • 3 dashes Peychaud’s bitters

Rye/Cognac Sazerac
  • Splash of pastis or absinthe
  • 1 ounce Cognac
  • 2 ounces Rye
  • 1 bar-spoon sugar syrup (or a 1/2 teaspoon of sugar dissolved in a little water)
  • 3 dashes Peychaud’s bitters

Thursday, July 17, 2008

Pastis-Marinated Shrimp

For the most recent Root Source Challenge (Pastis) I played with several recipes before deciding which to submit. I ended up sending in a recipe for Cornmeal and Pastis Cookies. But I think this shrimp recipe came out really well also. The pastis wasn't overpowering: there was just a hint of anise flavor. I amplified the flavors with ground anise and fennel seeds and some chopped fennel fronds.

I served it with grilled panisses. Panisses are made of chickpea flour, cooked with water (sort of like polenta) and seasoned with salt and olive oil. Typically, the cooked batter is poured into a flat sheet to cool and then cut into french-fry shapes. There were recently panisse discussions at David Lebovitz's blog here and here. I used his recipe for the panisse batter.

I decided to try treating panisses like polenta. After I cooked the batter I poured it into small loaf pans to cool. When cool and firm, I sliced, oiled and grilled. My dinner companions and I were happy with the results. The slices held together well and the grilling gave it a nice smoky flavor. I suggest you give both ways a try.

But that's not what this post is about ...

Pastis-Marinated Shrimp
2-4 servings, depending on what you're serving them with.

For the marinade:
  • 1/4 cup pastis (I used Ricard pastis. I think ouzo would work well too.)
  • juice of 1 lemon
  • 3 garlic cloves, minced or pressed
  • 1/2 cup olive oil
  • 1 teaspoon anise seed, crushed
  • 1 teaspoon fennel seed, crushed
  • 1/2 teaspoon salt
  • pinch of hot pepper flakes
  • 1 pound shell-on shrimp (my shrimp were large: 21-25s)
  • 2 tablespoons chopped fennel fronds for garnish (optional)
  • lemon wedges for garnish
Combine the marinade ingredients in a bowl or gallon-size Ziploc bag. Add the shrimp and rub the marinade into them. Let the shrimp rest in the marinade for 30 minutes to an hour.

Prepare your grill. Skewer the shrimp (you may use a grill basket instead of skewers) on bamboo or metal skewers.

Grill shrimp over medium-high heat until cooked through - about 5-7 minutes, depending on the size of your shrimp.

Serve on or off the skewers, sprinkled with fennel fronds and with lemon wedges on the side.

Sunday, July 13, 2008

Week of July 13

I went berry picking this week. A nearby farm, Smolak Farms, had pick-your-own currants and gooseberries (in addition to raspberries). I had never cooked with either fruit, but I was excited to try.

I packed up my water, my sunhat, and other berry-picking paraphenalia and headed on out. Here's my pickings. I would have picked more, but they were charging $6.00 per pint. Yeouch.

In my basket are Bianca (white) currants, red currants and gooseberries. The bushes are prolific: it took me barely 15 minutes to pick three pints. It would take two to three times as long to pick that many raspberries!

I ended up making two types of jam from the currants (using this easy method from David Lebovitz) and am still trying to figure out what to do with the gooseberries. Any thoughts?

Menu for the Week
Sunday
Pasta with tomato sauce
Salad

Monday
Vietnamese chicken and cabbage salad wrapped in rice paper (inspired by the September issue of Fine Cooking)
Green bean salad

Tuesday
Black bean burgers (also inspired by the September issue of Fine Cooking)
Corn bread
Avocado salsa

Wednesday
Grilled flank steak
Millet and roasted vegetable salad

Thursday
Capellini with lemon basil pesto and squash blossoms
Salad

Friday
Grilled pizzas

Friday, July 11, 2008

Drink of the Week: Sidecar

The Sidecar, like the Negroni, is one of the classic cocktails I ask for when I'm out. I only ask for a Sidecar, however, when I am certain the bar has fresh lemon juice (not sour mix) available for mixing.

Like the Negroni, it's an "equal parts" cocktail, so I don't have to do much explaining and I can be sure that the bartender will remember the recipe.

Sidecars are a simple drink, made of equal amounts of brandy or cognac, Cointreau and lemon juice; shaken and served up in a cocktail glass. Think of it as a super-classy margarita, made with brandy and lemon instead of lime and tequila.

Sidecar
In an iced cocktail shaker, combine:
  • 1 ounce brandy or cognac (the C4TW house brand is Christian Brothers. T'ain't French and t'ain't high end, but it mixes just fine, although if you have some Martell or Hennessey around, treat yourself to a "good" drink at least once)
  • 1 ounce Cointreau (I cheap out most of the time and use triple sec, do try one with Cointreau if you have a chance)
  • 1 ounce fresh-squeezed lemon juice
Shake until well chilled. Serve in a cocktail glass with a lemon twist. A traditional garnish calls for a sugared rim on the glass. I prefer mine sugar-free.

I Won a Root Source Challenge!

I just got news that my Yellow Squash Fritter recipe won Cookthink's Yellow Squash Root Source challenge!

If you haven't been to Cookthink yet, I recommend checking out their blog and their Cookthink application.

Cornmeal Cookies with Pastis Glaze

These cornmeal cookies are a staple on my list of "go-to" cookies. The original recipe comes from Martha Stewart Living and is flavored with lime zest. I've modified the recipe several times to use different citrus flavors and herbs. I've also changed the baking method to make it a slice and bake cookie (instead of rolling little balls of dough and squashin' them as the original recipe requested).

When Cookthink made Pastis the subject of a Root Source Challenge, I thought this cookie would be a good candidate for "pastis-ification."

I used freshly ground anise seed to pump up the pastis flavor without making the cookie too boozy. My tasters and I were pleased with the results. These would be great with fresh fruit or vanilla ice cream - or both!

Cornmeal and Pastis Cookies
Makes about three dozen cookies
  • 1 cup room-temperature butter (2 sticks)
  • 1 cup sugar
  • 1 large egg
  • 3 tablespoons pastis (I used Ricard Pastis)
  • 1/2 teaspoon ground anise seed
  • 1/4 teaspoon salt
  • 1 1/2 cups flour
  • 1 cup cornmeal
Glaze:
  • 1 cup sifted confectioner's sugar
  • 2-4 tablespoons pastis
  • crushed anise seed for sprinkling
Make the cookie dough:
With a hand mixer, cream together butter and sugar until light and fluffy. Blend in the egg, pastis and anise seed.

With the mixer on low speed, blend in the salt, flour and cornmeal.

Divide the dough into two portions and roll each into a log (about 1 1/2 to 2 inches) wrapped in parchment or wax paper. Chill in the refrigerator for several hours, preferably overnight (you can also wrap the dough and freeze it at this time).

Bake the cookies:
Preheat the oven to 350.

Slice the cookie dough into 1/4" slices. Lay them 1 1/2" apart on a parchment lined baking sheet. Bake 10-14 minutes, until the cookies are browned on the edges and bottom.

Let the cookies cool while you make the glaze.

Make the glaze:
Stir 2 tablespoons of pastis into the confectioner's sugar. Stir in more as needed to bring the glaze to a pourable consistency.

Spoon or drizzle the glaze over the cookies and sprinkle with crushed anise seed.

White Gazpacho

It's been really hot and uncomfortable here, by New England standards. 90 degrees and 90 percent humidity is just lousy cooking weather.

I heard a story on NPR over the weekend about a white gazpacho recipe and my interest was piqued. After some additional web research, I pulled together a version I wanted to try.

White Gazpacho, or Ajo Blanco ("White Garlic") is a soup from the Andalusia region of Spain. Traditionally it is made of bread, almonds, oil and garlic (raw) and is garnished with grapes and a drizzle of oil.

Since I wasn't sure how we'd like the soup, so I garnished very simply with toasted breadcrumbs, parsley and oil. The results were very successful. One one caveat: due to the raw garlic in the soup, our breath was horrific. Really garlicky. So this may not be a good first date or working lunch recipe. We each chewed a huge handful of parsley and that helped a bit.

I served it for dinner with a salad and hard boiled eggs topped with smoked trout and paprika (I was actually going to stuff the eggs, a la deviled eggs, but said "the hell with it" and went basic). The soup is more filling than you might expect, so we ate well.

A rough approximation of what I made is below. Look here, here, here and here for other versions. The really nice things about this soup (other than it being delicious) are that you can make it ahead, you never turn on the oven or stove (Look Ma, no heat!), and you can make it different every time with the garnishes you select.

White Gazpacho / Ajo Blanco
  • 2-4 cloves of garlic (I used 3 cloves, for us that was more than enough - will try fewer next time)
  • 2 cups of blanched almonds (Taste your almonds before you start this recipe - they should taste fresh and nutty. If they taste stale or rancid, take a pass on this recipe and make something else for dinner.)
  • 1 cup of fresh breadcrumbs
  • ~4 cups water
  • 4 tablespoons extra virgin olive oil
  • 2 teaspoons sherry vinegar
  • salt to taste
  • garnishes: toasted breadcrumbs, minced parsley, fruity olive oil, grapes (sliced in half), cubes of ripe melon, cubes of green apple, etc.
Put the garlic and almonds in a blender (better) or food processor with about 1/2 cup of water and whirl them about until you have a peanut-buttery (almond-buttery?) paste. Add the breadcrumbs, olive oil, vinegar and a little more water and spin everything again.

When you have a smooth liquidy paste, pour everything into a bowl. Whisk in more water to loosen the soup to the consistency you like. Add salt and more vinegar (if needed) to taste. (If in doubt, it's better to hold off on salt until the soup is cold. Before you serve it, check the salt and acid one more time.)

Chill until very cold (over night is best) and serve with garnishes of your choice.

Monday, July 7, 2008

Summer Squash Fritters with Herbs

These fritters are a nice way to use up some of the bounty of summer squash that's in every farmer's market and garden. They can be served hot or at room temperature and they reheat relatively well.

They are great on their own with a squeeze of lemon juice. If you are one of the lucky ones getting ripe local tomatoes, make a fresh tomato salsa to serve alongside.

This recipe is inspired by Laurie Colwin's fritter recipe (published in one of her Home Cooking collections) and by Greek zucchini fritters called kolokithakia keftedes (translation: "little zucchini meatballs". All names aside, they end up looking like little squash pancakes.

Summer Squash Fritters with Herbs
makes 10-18 fritters - depending on size
  • 2 summer squash (yellow squash, zucchini, etc.) - about 8 ounces
  • 1 egg, separated
  • 4 tablespoons of flour
  • 1/2 teaspoon baking powder
  • pinch of cayenne
  • about 1/4 cup (total) of chopped dill and mint
  • 1/4 cup milk
  • salt and pepper
  • oil for frying
Grate the squash on a box grater or on the grating disc of a food processor. Roll the grated squash in a clean dishtowel and squeeze out some of the liquid. The shreds don't need to be bone dry, but you want to get rid of some of the water.

Put the squash in a bowl with the egg yolk. Stir in the flour, baking powder, cayenne, herbs and some salt and pepper to taste. Add in the milk and stir to combine. The squash mixture will look like rather dry pancake batter.

In a separate bowl, beat the egg white until it forms stiff peaks. Fold the egg white into the squash mixture. Now the squash mixture will look like damp pancake batter.

In a large skillet, heat about 1/4" of oil until hot and shimmering. Drop spoonfuls of fritter batter into the oil. Fry on both sides until golden brown - this will take 3-5 minutes a side, depending on how well-done you like your fritters

Drain on paper towels and serve with a sprinkle of salt and some lemon wedges.

Note: Ths is recipe is very adaptable. Use fresh corn kernels or cooked chopped spinach in place of the zucchini - just adjust the amount of milk depending on how damp your ingredients are. Try adding some grated hard cheese (like cheddar or parmesan) to the batter. If you make the fritters very small (drop teaspoons of batter in the oil), you can use them like blini and top them with a dollop of tomato salad or shreds of ham or pulled pork.

Week of July 6

Is July to early to be called the dog days of summer? All I know is we'll be cranking up the air conditioning for the second time this summer.

High heat and humidity mean that I'll be putting the grill into heavy rotation. I also heard a story on NPR yesterday about garlic, and the interviewee described a cold garlic soup. Sounds great for a 90-degree day, doesn't it?

Menu for the Week
Sunday
Ethiopian Dinner inspired by the April 2008 issue of Saveur
Doro Wot - Chicken Stew
Misr Wot - Red Lentil Stew
Ayib be Gomen - Greens with Cottage Cheese
Injera - Grilled Flatbread

Monday
Chicken meatballs with mint
Tsatziki (garlic-cucumber sauce: like you get on Gyro sandwiches)
Squash fritters
Zuke/cuke salad
Beet salad

Tuesday
Cold almond soup (Ajo Blanco)
Hardboiled eggs with smoked trout
Green salad

Wednesday
Grilled pastis-marinated shrimp
Grilled eggplant
Cherry tomato salad
Grilled feta
Garlic toasts

Thursday
Seared gnocchi salad with vegetables

Friday
Hot dogs
Baked beans
Cole slaw

Friday, July 4, 2008

Drink of the Week: Frozen Watermelon Margarita

Happy Independence Day to all!

A holiday like the Fourth calls out for a festive summer beverage and is a great opportunity to break out the blender. If you've been reading my Drink of the Week posts for any period of time, you know that I'm usually a gin/bourbon/straight-up cocktail kind of gal. However, a holiday weekend like this one is a great time to make a blender drink.

I'm usually not a fan of blended drinks because of all the ice that gets thrown into them: if the drink base isn't fairly sweet, the drink tastes very icy to me. This version works well because the watermelon *is* the ice. I freeze 1.5" cubes of watermelon and then build the drink using them. The happy result is that you can still taste tequila (in a good way) and the drink is refreshing, not overly filling. Plus it's a great way to use up the rest of that watermelon you bought for the barbecue.

Frozen Watermelon Margarita

For each drink:

  • 1 rounded cup of frozen watermelon cubes*
  • 1 to 1.5 ounces tequila
  • .5 to 1 ounce of triple sec
  • squeeze of lime juice
  • simple syrup, grenadine or sugar, if needed
Put the watermelon cubes in a blender and add the rest of the ingredients (except the sweetener). Blend until smooth (you may need to add a few tablespoons of water to keep things swirling). Taste and see if your watermelon was sweet enough - if not, add a little sweetener and reblend.

Serve in a margarita glass (or a plastic Solo cup) with or without a salted rim.

* The watermelon doesn't have to frozen solid but it should be cold as it is the sole chilling agent here.

Wednesday, July 2, 2008

Zucchini Pasta with Fresh Ricotta

This dish was totally inspired by Deb's Zucchini Stand Pasta over at Smitten Kitchen. Of course, she was inspired by Michael Chiarello, so we're all just passing along a good thing for every one to enjoy.

Small changes I made to Deb's adaptation: I had fresh chive oil in the refrigerator (who doesn't?) so I used that and I also thought it would be pretty snappy to steam some chive strands and let them mingle through the pasta (they're in there, I swear, but I'm still working on my food styling skills). Finally, I had some home made ricotta, and I thought it would be pretty wonderful to drop a dollop on top.

Zucchini Pasta with Fresh Ricotta
serves two
  • 8 ounces whole wheat spaghetti (I like Bionature brand)
  • 8 ounces zucchini
  • handful of chives
  • 3-4 tablespoons of chive oil (or another flavored oil - see below)
  • 1/4 cup fresh ricotta cheese
Cut the zucchini into julienne strips. This is easiest if you have a mandoline, but you can do it by hand if you don't.

Boil the pasta in heavily salted water. After about 6 minutes, place the zucchini and chives in a steamer basket and steam them over the boiling pasta (alternatively, steam them in a separate pot for about 2-3 minutes). Drain the pasta, reserving a little cooking water, when it's cooked al dente and toss with the zucchini, chives and chive oil. Add up to 1/2 cup of cooking water to make the dish saucier, if necessary.

Serve in individual bowls, topped with a spoonful of ricotta. Twirl a little ricotta into each bite as you eat the pasta or stir the ricotta into your bowl instead.

Chive Oil
  • 1/2 cup grapeseed, canola or some other mild-flavored oil
  • 1/4 cup chopped chives
Put the chives into a blender and add the oil. Puree until the oil looks smooth. You can strain this to make it very smooth and silky or just leave it as is. Store in the refrigerator for up to 3 or 4 days before using. The oil may separate, if so, just shake or stir the oil to reblend.

Tuesday, July 1, 2008

The Milkmaid's Kitchen: Ricotta

Cheesemaking at home sounds scary and/or exotic to many people. I am not going to tell you that it's easy to produce an English farmhouse cheddar in your kitchen (although you could do it if you wanted to), but there are many simple projects that you can tackle without too much (if any) special equipment. This is one of them.

Cheesemaking is a fairly basic process: milk is heated to a specific temperature and a coagulant or starter is added to cause the milk to form curds and whey (remember Little Miss Muffet?). What kind of cheese you end up with depends on the type of milk, the type of starter, the temperature(s) you use and whether you use the curd or whey.

Ricotta was traditionally made as a way to use up the whey that is produced when other cheeses (like mozzarella or parmesan) are made. Cheesemaking is a great way to use up excess milk, but you will end up with more whey than curds. (See the picture below to see how much ricotta I got vs. how much whey I was left with.) A whole group of whey-based cheeses was developed to use up all that whey. Take a look at the supermarket dairy case sometime: any mozzarella manufacturer (Dragone, Polly-O, Sargento, etc.) also produces ricotta. That's not just because they want to be your one-stop-shop for lasagna ingredients.

Now for those of us who are working on a smaller scale, like you and me, ricotta is best made from milk, not whey (because you need a lot of whey to get any useful yield). So, technically, what we are making in this recipe is more like queso fresco or fresh paneer. But, it looks like ricotta, behaves like ricotta, and tastes like ricotta. So there. You wanna call it something else, that's fine with me.

Now, finally, the recipe (totally lifted from Heidi at 101 Cookbooks). To make more, just double, triple, quadruple the recipe - the technique is the same, the only major differences will be the length of time is takes to come up to temp and to drain sufficiently. The only special pieces of equipment you need are a thermometer (deep frying or candy thermometer are fine) and cheesecloth or a very fine-mesh strainer.

Homemade Ricotta Cheese
Yields about 2 cups of ricotta and 6-7 cups of whey
  • One-half gallon milk (Use good quality milk - there isn't much else providing flavor to this cheese, so it's worth paying extra for local, fresh milk. I have used both whole milk and 2% milk, you could try skim or 1% if you want, but I can't vouch for the results)
  • 2 cups buttermilk
  • salt to taste
Put the milk and buttermilk in a pot large enough to hold them. Heat over a medium heat. You will see curds start to form. Occasionally, gently stir the pot, making sure the milk isn't scorching on the bottom of the pot.

When the milk reaches 175 degrees (this takes about 15 minutes), you will see the curds floating in the whey (you'll know it when you see it - no worries). Turn off the heat and let the milk sit for a few minutes.

Now you need to drain the ricotta: Moisten your cheesecloth and lay it into a colander or strainer over a bowl (if you want to use the whey - see below) or in the sink (if you don't want to use the whey). Gently ladle the contents of the pot into the cheesecloth lined strainer. Tie the cheesecloth into a bag and let the ricotta drain. Do not squeeze the bag to speed things up. You'll just squeeze your beautiful ricotta through the cloth. If you have a super-fine strainer (the kind that looks like cloth made of metal strands), just ladle the curds directly into it and let them drain.

I like a drier ricotta, so I let mine drain off for at least 30 minutes, although 15 minutes should give you a nice, creamy ricotta. Add salt to taste. Leave it unsalted if you're going to use it for sweet dessert like cheesecake or cannoli.

This whole process, not counting draining time, takes about 20 minutes and most of that is watching your milk. Easy and delicious.

Now, what to do with all that whey?

You can just throw it out (I will confess to doing that myself), but you can also use it in a few ways:
  • Use it in place of water in yeasted bread recipes.
  • Use it in cold soups (this whey tastes a bit like buttermilk) like a cucumber soup or a vichyssoise.
  • Water your patio plants (there's a calcium in there - tomato plants like calcium).
  • Use it as a buttermilk replacement for pancakes or quick breads.
Blog Widget by LinkWithin