Tuesday, December 30, 2008

A Delicious Treat from the Mediterranean Coast

This is a pan of farinata (if you're on the Ligurian coast) or socca (if you're in Nice). It's basically a crepe made of chickpea flour, salt, water and a touch of olive oil. This was part of an Italian dinner that also included sauteed escarole and a few slices of salami and mortadella.

I was introduced to socca through Julia Child (one of her cookbooks of course: From Julia's Kitchen) and still use her basic proportions to make the batter. I baked mine in a very hot oven, but for a more authentic flavor you can make your farinata on a very hot grill or in your fireplace: in Liguria, we saw huge wood burning pizza ovens that were used to make farinata. There farinata is sold by weight, in huge slices scraped up from the enormous pans (30 inches across, at least) it's baked in.

I had the good fortune to dine at Rose Pistola restaurant in San Francisco several times. Rose Pistola specializes in Ligurian cuisine. The chef, Reed Hearon, prepares a traditional farinata and versions with additional flavors. I took inspiration from him for this batch and added torn oil-cured olives and chopped marjoram.

Farinata is insanely easy to make. The most challenging part of the process is finding the essential chickpea flour. Your local Italian market may have it and Indian markets definitely do. (In Indian markets it may be labeled besan flour).

Farinata
Serves 2-4 (in our house this serves two as a main-course side dish)
  • 2/3 cup chickpea flour, sifted if lumpy
  • 1 cup water
  • 1/2 teaspoon salt
  • 2 tablespoons olive oil, plus more for the pan(s)
  • additional flavorings (optional): no more than two of: chopped herbs, cut or torn olives, anchovies, shredded radicchio, etc.
Make the batter: Place the flour in a bowl (be sure to sift it if it's really lumpy). Slowly whisk in the water, making sure to whisk out any lumps. If you add the water slowly, whisking well after each addition, you should end up with a smooth (very thin) batter. Whisk in the salt and olive oil. Set the batter aside until you're ready to cook the farinata. You can make the batter as far a day ahead - store it in the refrigerator if you're making it more than half an hour ahead of time.

About 30-45 minutes before baking the farinata, select your pan(s): This quantity of batter will make a thin 12" crepe or two 8" crepes, or a thicker 10" crepe. I prefer thinner crepes, but thicker seems to be more traditional. Cast iron or steel are best, do NOT use non-stick.

Now that you've made your pan selection, heat that sucker up: Put it in a 400-degree oven and let it heat for about 30 minutes.

Pull the hot pan out of the oven and drizzle a little olive oil into the pan. Pour the batter into the pan, if necessary, swirl the pan to cover the bottom with the batter. Scatter the flavorings over the top, if you're using them. Put the pan into the oven and bake until the farinata is set, about 5 minutes. Turn on the broiler and broil until the farinata is golden brown in spots and a little burned in others, about 3 minutes (depending on your broiler).

Remove the pan from the oven and sprinkle the farniata with salt. Serve the farinata in rough slices: use a spatula or scraper to pull the slices off the pan (they shouldn't stick) - this will not be a graceful presenation.
Sunday, December 21, 2008

Scurvy-Fighting Slaw for a Snow Day

I haven't been able to make it to the supermarket in about a week. At this stage of the game, the larder is pretty bare and the produce supply is rather meager. Fortunately, several of my vegetable pantry staples were still in attendance.

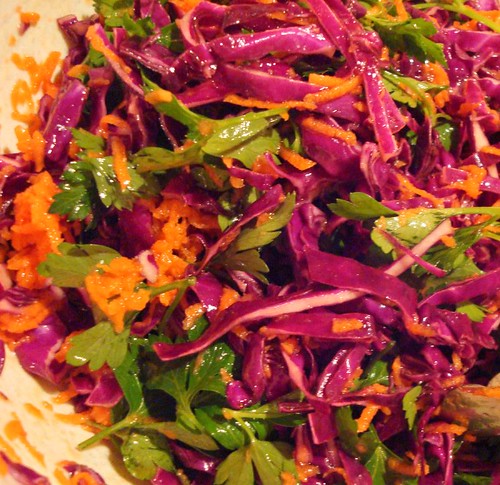
When I'm craving salad, but am out of greens, I turn to some variation on a slaw. Tonight's version was a colorful concoction of red cabbage, carrots and parsley.

Scurvy-Fighting Slaw for a Snow Day
serves about 4
  • 1 quarter of a head of red cabbage, sliced thin or shredded
  • 3 carrots, peeled and grated
  • 3 large handfuls of parsley leaves, large stems removed
  • 1 orange
  • olive oil
  • red wine vinegar
  • salt and pepper
Toss the vegetables together. Squeeze the orange over the salad and toss to combine. Drizzle olive oil over (about two-three circular passes over the bowl) and toss. Taste and add vinegar (if needed) and salt and pepper to taste.

Delicious, easy and healthful. A great companion to the corn and clam chowder we had for supper. Were I to serve this salad to "company" I would slightly increase the fussy factor and shred the cabbage very fine and pulled all the parsley into individual leaflets.

Snowbound

Been snowing for about 48 hours straight (ergo the French Toast Warning in the sidebar).

It's amazing how much you can accomplish when you can't leave the house:
  • Did three loads of laundry
  • Wrapped of all our Christmas gifts
  • Reorganized my salt collection (seriously)
  • Made a batch of no-knead bread
  • Made a batch of baguettes (still in process, technically)
  • Made a batch of brandy-soaked dried fruit
  • Simmered up a batch of corn chowder for dinner (thank heaven for a well stocked freezer)

Wednesday, December 17, 2008

Little Nibbles of Cheddary Goodness

If you still are looking for something to give to that person who has everything, may I recommend Cheez-Thats? Technically, they're just cheese crackers, but if you push the dough through your cookie press, you get little "Cheez-It"-like crackers. They are way better than Cheez-Its though, so I call them Cheez-Thats. Hee.

Mine are punched up with chipotle chili powder, so they have a spicy, smoky flavor. You can use a variety of spices to enliven these. Mustard powder and/or seeds would be an interesting addtion as would finely minced chives or cumin seeds. They're just fine plain too.

If you put them in a pretty bag, box or jar they make a lovely hostess gift. Package them alongside a bottle of red wine and you have a charming gift.

Cheez-Thats
(adapted from Paula Deen's Zesty Cheese Straws)
  • 4 ounces (1 stick) butter, at room temperature
  • 8 ounces sharp Cheddar cheese, shredded
  • 1 1/2 cups flour
  • 1/2 teaspoon salt
  • 1/4 teaspoon chipotle chili powder, or cayenne, or smoked paprika (depending on how spicy you want these to be - taste the dough to see if you've put enough spice in)
  • 1/4 teaspoon finely ground black pepper

Put all the ingredients into a food processor and process until you have a smooth dough. (Use a combination of pulsing and steady processing to make sure everything is well combined.)

You can do this without a food processor too - just cream the butter and cheese together with a spatula and then work in the flour and seasonings until you have a dough. In this method, you may have some threads of shredded cheese throughout the dough - that's a fine option as well

You can use a cookie press to form the crackers: Scoop the dough into a cookie press fitted with a ridged plate. Pipe out long strips of dough onto a baking sheet and then cut the strips into squares.

or

You can use the chill and slice method to form the crackers: Form the dough into a log (give it a square cross-section if you want to keep the Cheez-It metaphor going). Chill until firm and then slice into 1/8" thick pieces. Lay crackers on baking sheet.

Bake at 325 for about 10 minutes, or until gently browned. Your kitchen will be perfumed with the fragrance of toasted Cheddar cheese. The cheese flavor really shines at room temperature though, so hold off devouring them until they cool off.

Wednesday, December 10, 2008

Garlic Confit and What to do With It

Hi, it's me. Back again. I hope y'all are, like me, being swept up in holiday planning and fun and haven't really noticed that I haven't posted in nearly two weeks (eek!).

As penance for my lag in posting, I thought I would give you not one recipe, but two! The first recipe isn't really a recipe, more a technique, but anyhoo ...

Garlic Confit is a really nice treat to have on hand. Technically a confit is some sort of animal protein (like chicken, duck or turkey) slowly cooked in its own fat until tender. In recent years, the term confit has been extended to cover vegetables slowly cooked in oil (usually olive oil) until tender and silky. So, this method is for garlic confit but you can apply the same principles to onions, shallots, tomatoes, peppers, etc.

Garlic Confit
  • Garlic cloves, peeled (as many as you want - I cooked up about three cups)
  • Sprigs of fresh herbs or a few dried chilies, optional
  • Olive oil, to cover
Put the garlic into a heavy saucepan with herbs and chilies, if using. Pour enough olive oil over to just cover. Place the saucepan over low heat and let garlic cook until soft. The oil will sputter a little as the moisture in the garlic cooks off. Depending on the heat and the age of the garlic, the confit will be done in 30 minutes to an hour. The cloves will be a light golden brown and tended enough to provide no resistance when you try to stick a toothpick through one.

Let the confit cool and then transfer to clean glass jars. The confit should be stored covered with oil and stored in the refrigerator - any extra oil should be strained and stored in the refrigerator. Use your confit and garlic oil within a week. (See the comments below for why.)

Now you have a jar full of garlic confit in your fridge, so what do you do with it? You can spread the cloves on grilled or toasted bread, use them in a roast beef sandwich, bake them into foccacia or add them to pasta. I used some of my confit to make this soothing, warming bean stew:

Cannellini Bean Stew with Garlic Confit
Serves 4 to 6
  • 1 onion, chopped
  • 1.5 cups dried cannellini beans, cooked or 3 cans cannellini beans, drained with some liquid reserved
  • 6 canned tomatoes, chopped
  • 1-2 cups chicken broth, canned is fine
  • 1/2 cup garlic confit
  • minced rosemary, optional
  • 1 cup breadcrumbs
  • 1-2 pieces of pancetta or bacon, chopped fine
  • handful grated parmesan
Over medium heat, saute the onion in a little olive oil until tender, about 10 minutes. Add the cooked beans, tomatoes, confit and a little chicken broth (you want the mixture to be a little soupy). Simmer until the tomatoes break down, adding more chicken broth or canned bean liquid to keep the mixture from drying out. The goal is a thick stew-like mixture. Season to taste with salt and pepper and add some minced rosemary, if using.

While the stew is cooking, make the crispy breadcrumb topping: Saute the bacon or pancetta until crispy. Toast the breadcrumbs with a little olive oil until golden brown (do this in a skillet or on a baking sheet in your oven). Toss the breadcrumbs, bacon and cheese together.

When the bean stew looks and tastes right to you (the tomatoes should have broken down and are part of the sauce binding the beans and confit together - think Italianate baked beans). Served, topped with a handful of the breadcrumb mixture.

This is a really soul-satisfying dish. The beans are super-creamy and each smooth bite is punctuated with hits of garlic and crunchy bites of breadcrumb. It's super-easy to make this dish vegetarian by leaving out the bacon.

Monday, December 1, 2008

Thanksgiving Dinner Wrap-Up: Stuffing

Another major first at our Thanksgiving table this year was cornbread stuffing (the smoked turkey being the other first). I'm more of a bread stuffing/dressing kind of gal and I thought the idea of cornbread stuffing was great: the sweetness of cornmeal, the briny hit of the olives, porky sausage, etc. etc. Well, yeah, no ...

This stuffing had good flavor, but the texture was just off. The cornbread just absorbed the broth I used to moisten the stuffing and it got sorta mushy. The stuffing ended up being more pudding-like than stuffing-like.

Now I will admit that several million Southerners can't be wrong about the wondrousness of cornbread dressin' but my mother, who is quite the accomplished cook herself, made a similar stuffing for this Thanksgiving and had a response that was similar to mine.

Any cornbread stuffing lovers out there? Tell me what I missed, 'cause I have a rather open mind on this topic. At this point, I'm going back to my traditional bread stuffing for next year.
Blog Widget by LinkWithin