Showing posts with label beans. Show all posts

Friday, June 25, 2010

Use Your Booty: Chickpea, Kale & Butternut Squash with Tahini Dressing

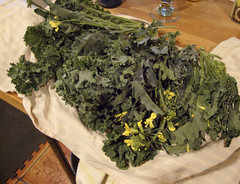
Ah kale, I do love it, but it certainly seems like kale and I are going to have to become good friends for me to survive this CSA. Fortunately, that's not really hard to do: First, my CSA is growing nine types of kale this season. Second, kale is pretty versatile - it can be used in so many different ways: bruschetta, a hearty soup, pesto, etc.

This salad's original recipe did not include kale, but since it's such a natural partner to chickpeas and butternut squash, I thought everyone would play nice together. The tahini dressing is nice on its own over roasted vegetables, lamb burgers, or as a dip for vegetables.

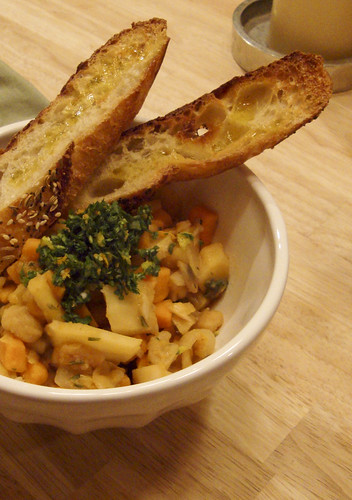
Chickpea, Kale and Butternut Squash Salad with Tahini Dressing
Serves 2-3 as an entrée salad, more as a side.
The original recipe, from Moro Restaurant, is here on Orangette, Molly Wizenberg's lovely blog. The recipe is super adaptable: make it work with what you have in the fridge. If you have leftover cooked squash or sweet potatoes, this is a great way to use it.

Enjoy this salad warm, as we did, or cold. If you're going to have it cold, add the dressing right before serving.
  • olive oil
  • 2 cups of cubed butternut squash or sweet potatoes
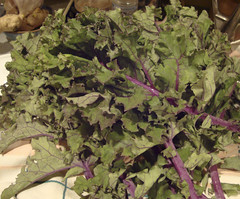
  • 1 bunch kale, stripped off stiff stems and cut into bite-sized pieces or thin strips
  • 2 cups cooked chickpeas (1 15 oz. can chickpeas, drained and rinsed)
Dressing
  • 1 garlic clove, pressed or minced
  • 3 tablespoons tahini (sesame paste)
  • 3 tablespoons lemon juice
  • 2 tablespoons water
  • 2-4 tablespoons olive oil
  • salt and pepper
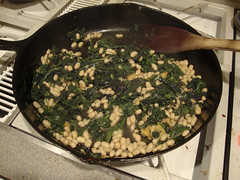
Sauté the squash with a little olive oil in a large skillet over medium-high heat. Cook until the squash is tender. Add the kale to the pan and sauté until wilted, adding a little water to help it steam through. Cook until kale is wilted down, about 5-7 minutes. Add the chickpeas to the pan. Season with salt and pepper to taste.

Make the dressing: Whisk together all the dressing ingredients except the oil and salt & pepper. Whisk until the dressing looks smooth and creamy. Add a little water if it seems too thick. Whisk in the smaller amount of olive oil. Taste the dressing: if it's too sour add more olive oil. Taste again and adjust salt and pepper to your liking. Whisk in a few drops of water if it still seems too thick; it should the consistency of heavy cream.

Divide the salad among plates and drizzle with dressing.

This Summer, I am chronicling my first CSA (Community Supported Agriculture) experience. My CSA share is from Arrowhead Farm, a farm based in Newburyport, MA. Each week, I am posting about what was in my share and what I'm doing with it. By way of full disclosure, I won my share through a raffle and am not paying for it. However, Arrowhead did not know I was entered in the raffle, and I received no special consideration because of this blog. I paid for my livestock share. A full set of all the photos I've taken of this share is here.

Tuesday, June 15, 2010

Use Your Booty: Bruschetta with Kale & White Beans

Let's get one thing out the way right up front: broo-SKET-a, not brooshetta. Feel free to tell your waitress.

Ok then, that said, let's move on to the recipe.

Bruschetta is a great way to use up slightly stale rustic-style bread (like this kind of bread). Slice it thickish - I like between 1/2" - 3/4" thick. Grill or broil it, rub with garlic and drizzle with olive oil. Top with sautéed vegetables and eat like an open-faced sandwich. I like this version a lot. You might think beans and bread is a lot of starchiness, but the beans add a lovely creaminess to the dish without adding fat.

Kale & White Bean Bruschetta
Serves 2
This is easily doubled, tripled or quadrupled. We eat it for dinner, but if you cut the bread into smaller pieces it would be a nice first course or nibble for a summer party.
  • 2 ounces pancetta, cubed or bacon, chopped (optional)
  • olive oil
  • 3-4 cloves garlic, sliced thin
  • 1 big bunch kale, leaves removed from the stems and coarsely chopped or torn (you need a lot of kale - it really cooks down)
  • 1 can white beans, drained and rinsed (about 1-1.5 cups cooked beans)
  • 4 slices rustic-style crusty bread (you know what you'll eat, so the number of slices will depend on the size of your loaf)
  • 1 clove garlic
In a large skillet, cook the pancetta or bacon (if using) until it's crisp and browned. Remove the pancetta from the pan and set aside. If the pan is too dry (or if you didn't use the meat, or if you don't want to cook in bacon fat) add enough olive oil to generously film the bottom of the pan.

When the oil is hot, add the garlic. When it just starts to color, add the kale to the pan (it will sputter - watch out for flying oil droplets!). Stir the kale as it wilts and softens. If it starts to stick add a little water to the pan. When the kale is wilted down and softened, add the beans and heat them through. Add salt and pepper to taste, remembering that if you're using pancetta or bacon they will add salt to the dish too.

Meanwhile heat your grill or broiler. Brush the slices of bread with oil and grill or broil, turning once until browned and toasty (I like mine on the brown side of incinerated, whereas Dave prefers his a little more tan/blond). Rub the slices of bread with the other clove of garlic. Place the bread on dinner plates and drizzle with a little more oil. Top the bread slices with the kale & bean mixture and sprinkle the pancetta over the kale. Drizzle with a wee bit more oil (you don't want this plate dripping with oil, so use a teaspoon or two per drizzle).

Mangia!

This Summer, I am chronicling my first CSA (Community Supported Agriculture) experience. My CSA share is from Arrowhead Farm, a farm based in Newburyport, MA. Each week, I am posting about what was in my share and what I'm doing with it. By way of full disclosure, I won my share through a raffle and am not paying for it. However, Arrowhead did not know I was entered in the raffle, and I received no special consideration because of this blog. I paid for my livestock share.

Tuesday, January 26, 2010

Detox: Stat!

So Dave and I went to Providence, Rhode Island this weekend. I'm sure Providence has a lot to offer: museums, great architecture, shopping, etc. but we went for the food. I'll be recapping the whole weekend shortly, but let's leave it here for now: we ate a lot. A. LOT.

When we got home Sunday, we felt a little, well ... bilious. I decided to go 100% vegetarian for dinner and make a vegetarian stew for us. This was a much better detox than a smoothie or juice-base dinner. We felt satisfied but not overly full. The gremolata made it taste really fresh.

Weekend Detox Winter Vegetable Stew
Modify this based on what vegetables you have on hand. I used chickpeas in this version, but you could use another bean, or lentil, or leave the beans out altogether.
Serves 3-4
  • olive oil
  • 1 onion, chopped
  • 1 sweet potato, peeled and chopped into bite-sized pieces
  • 3-4 baby turnips, chopped into bite-sized pieces
  • 4 parsnips, peeled and chopped into bite-sized pieces
  • 2 carrots, peeled and chopped into bite-sized pieces
  • 2 cups low-sodium chicken broth or water
  • 2 cups cooked chickpeas (1 large can drained and rinsed)
  • juice of 1 lemon (reserve the zest for the gremolata, below)
  • juice of 1 orange (reserve the zest for the gremolata, below)
  • salt and pepper
Saute the onion with some olive oil in a large skillet until softened. Add the sweet potato, turnips, parsnips and carrots. Sprinkle with a pinch of salt. Stir the vegetables in the skillet, over medium-high heat until starting to brown. Add the chicken broth and let the stew simmer until the vegetables are softened (but they should still have a little bite to them). Add a little water if the stew starts to stick. How much time this takes will depend on the size of your vegetables - the smaller the pieces, the shorter the cook time.

Stir in the chickpeas. Stir in the juices and check the seasoning. Add salt and pepper to taste. Serve topped with gremolata.

Blood Orange Gremolata
This was a nice fresh topper for the stew. It would be lovely over some broiled or grilled seafood too. Gremolata is traditionally made only with lemon zest, but the orange zest gave this a really interesting new dimension.

Yields about 3/4 cup of gremolata.
  • 2 cloves garlic, peeled
  • 2 cups parsley leaves
  • zest of 1 lemon
  • zest of 1 blood orange (or an orange if no blood oranges are to be found)
  • olive oil
  • salt
Either by hand, or in a mini food processor, chop together the parsley, garlic and zests until they are finely minced together. Stir in a little olive oil to loosen up the puree and make it more saucy. Season to taste with salt.

Thursday, January 21, 2010

Black Bean Soup with Savory Cream

Boy, do I like bean soups:
  • they're cheap to make
  • they're easy to make (once that pot's bubbling, you can head off to do whatever else you want
  • they're satisfying
  • they freeze exceptionally well, so you can always have a dinner on hand in the freezer
  • they taste better the day after they're made - perfect for a weekend cook day that results in a weeknight dinner
I didn't think I'd posted a black bean soup recipe before, but I did - almost three (!) years ago. This recipe is a little different from that one. To garnish, I'm using a savory whipped cream that I flavored with lime zest and cumin. It was a nice switch from sour cream and I usually have heavy cream on hand. The lovely ladies at food52 posted on this idea a few weeks ago. I recommend a visit to their site to learn about other savory whipped cream ideas.

Weekends are perfect for whipping up a batch of bean soup, so here are a few others to try:
Black Bean Soup
serves 4-6 - the soup doubles (or even quadruples!) really well
  • 1 onion, chopped
  • olive oil
  • 4 cloves of garlic, minced
  • 2 teaspoons freshly ground cumin
  • 1 pound black beans, picked over (sometime there's a stone or two in that bag) and rinsed until water runs clear
  • 1 cup diced tomatoes (optional)
  • juice of 1 lime
  • salt and pepper to taste
  • 1/4-1/2 cup heavy cream
  • zest of 1 lime
  • 1 teaspoon ground cumin
Saute onion over medium-high in a a little oil until softened. Add the garlic, cumin and a healthy sprinkle of salt. Stir and saute a few minutes until fragrant. Add black beans, tomatoes (if using) and cover with water by 1". Bring to a boil and then reduce heat to a simmer. Let soup simmer until beans are very soft. Depending on the age of the beans you're using, this could take anywhere from 1-3 hours. Stir the soup occasionally to make sure it's not sticking to the bottoom of the pot. Also, add water as needed, to keep things "soupy".

When the beans are cooked down the soup is pretty much done. Taste the soup for salt and pepper and adjust the seasoning as needed.

To garnish with the whipped cream: whip the heavy cream, lime zest and cumin with a whisk or electric mixer until it forms soft peaks.

Serve the soup topped with the cream - I sprinkled a little cilantro across our soup, but that's not required of course.

Saturday, January 16, 2010

Borrachos

Delicious. That's all I gotta say. This recipe for borrachos (drunken beans) is from Jen at Last Night's Dinner. Her blog is loaded with gorgeous pictures of the food she prepares for herself and her husband.

Until recently, Jen only posted pictures of her dinners and we had to live without her recipes. But she is one of the contributors to the recipe site Food52 and posted this recipe in the "Best Bean Dish" category. Her recipe and its history can be found here. Check out her other recipes while you're there: her dishes are interesting and delicious.

I made a few small changes to this recipe based on what I had on hand: I used a can of Ro-Tel tomatoes and green chilies instead of diced tomatoes, and I used Greek oregano instead of Mexican. I also used my own home-cured bacon instead of store-bought slab bacon. I'm sure it will be just as good with store-bought bacon, but this was a great way to showcase my homemade stuff!

The beans made a filling and satisfying dinner: I served them as an entree with a quick slaw (finely shredded cabbage with lime, cilantro and salt) and homemade corn tortillas. I drizzled some creme fraiche over the top of the beans and sprinkled some fresh cilantro over the top. As expected, they were even more fabulous the next day.

Monday, May 4, 2009

Easy Eating: White Bean Salad

I put this salad together for the Encased Meats Festival that Linsey over at Cake and Commerce hosted a few weeks ago. I wanted something to provide a contrast to a gyro-style sausage that I'd made. The creaminess of the white beans is set off really nicely by chunks of cherry tomatoes, Kalamata olives and dill. I used a simple red wine vinaigrette as a dressing but a lemon-based dressing would be great too.

I recommend that you cook your own beans for the salad if you can: they'll be a little creamier than canned and you'll be able to control the saltiness a little better. That said, if you want to use canned beans, go right ahead and feel no guilt about it. Of course, feel free to vary the ingredients based on what you have on hand.

This salad is best if you make it a few hours ahead. It makes a great side with grilled meat or vegetables. For an easy vegan dinner pair it with a green salad and a grilled portobello mushroom.

White Bean Salad
Serves 4-6
  • 4 cups cooked white beans (about 1 1/2 cups dry beans cooked or 2 large cans of beans, rinsed and drained)
  • 1 pint cherry tomatoes, sliced in quarters
  • 3/4 cup Kalamata olives, pitted and torn in halves
  • 1 bunch of scallions, sliced
  • handful of dill, chopped
  • red wine or sherry vinegar
  • olive oil
  • salt and pepper
In a bowl, toss together the beans, tomatoes, olives, scallions and dill. Drizzle about 2 tablespoons vinegar and 3 tablespoons olive oil over the salad. Toss the salad and taste. Add salt and pepper as needed (if you're using canned beans, you might not need much salt). Add more vinegar or oil as needed to ensure the beans are well flavored and moistened with oil and vinegar.

Thursday, March 5, 2009

Ugly but Good

Can we agree that sometimes really ugly food tastes pretty good? This lentil salad is a perfect entry into that category (in fact I just made a tag for it - ugly food deserves respect). It's another one of the dishes I made for the WBUR meet up. Clearly, even I wasn't enamored of its looks - this is the only picture I took of it.

Lentils are a great budget-conscious food. But they can also be jazzed up with some pretty elegant ingredients. In addition to lentils (just regular green ones from the supermarket), this salad contains roasted kohlrabi pieces, caramelized onions, parsley and feta cheese. It's seasoned with a toasted cumin and red wine vinaigrette.

Treat this recipe as more of a guideline. Hold back some lentils when you're mixing everything together - add more in as you: you want a nice blend of lentils and vegetables. You'll know when it looks right. Keep checking your seasoning: shoot for a nice contrast between salty and sour. If you're adding feta, keep that in mind and don't oversalt before you add it to the salad. To make this a full meal, add a hard boiled egg to each serving and serve the salad over or alongside a green salad with some pita bread or foccacia.

Lentil Salad with Kohlrabi and Caramelized Onions
Serves about 8
  • 1 pound lentils (pick through them for stones and give them a good rinse before cooking them)
  • 2 large onions, peeled and cut into thin slices
  • 2-4 cups of "roastable" vegetables, cut in chunks (I used kohlrabi, but you could broccoli or butternut squash or peppers or mushrooms or what have you - left over cooked vegetables would be great in this)
  • 1/2 - 1 cup chopped parsley
  • 1/2 teaspoon ground cumin
  • 1/4 pound feta (or goat cheese or farmer cheese)
  • red wine vinegar
  • olive oil
  • salt and pepper
Cook the lentils: In a large saucepan (the lentils will nearly double in volume) place the lentils are cover them with 2" of water. Add a generous pinch of salt. Bring to a simmer and cook until the lentils are tender. Depending on how old the lentils are, it will take between 30-45 minutes for them to cook. When they are cooked, drain them and set them aside.

Make the rest of the vegetables: Saute the sliced onions over medium heat until dark brown (not burned) and caramelized. Roast the chopped vegetables in a 400-degree oven until they are cooked through to your taste.

Put the onions and roasted vegetables in a large bowl with the parsley and cumin. Add half of the lentils and stir gently to combine. Add more lentils until you get the proportions you want. Drizzle the salad with vinegar and oil (about equal amounts of each). Sprinkle with salt and a good amount of freshly ground pepper. Add the feta and stir to combine. Taste and adjust for acid and salt as needed.

This is good right away, but also holds really well so you can make a day or so in advance. It tastes best at room temperature.

Wednesday, February 4, 2009

Eatchergreensnbeans!

I love greens and beans. When I do know what to make for dinner a "greens 'n' beans pile" usually fits the bill. Ideally, I have fresh greens on hand (1 big bunch per person being served), but if I don't I have no compunction about pulling a big bag of chopped spinach or collards out of the freezer.

I serve "the pile" over rice, quinoa or millet and sprinkle it with grated cheese (if I'm really under the gun, I serve over toasted bread: it's becomes a big, sloppy bruschetta). Depending on the night, I might top the dish with a fried or poached egg. It's a satisfying dinner that is quite good for you too.

This version was made with a bunch of dandelion greens, a bunch of beet greens and chickpeas and topped with some grated aged goat cheese. I served it over quinoa.

Beans 'n' Greens
Serves 2-3
  • Quinoa, rice, millet or any other grain of choice or several slices of hearty bread, toasted
  • 1 onion, peeled, cut in half and sliced into half circles
  • 2 bunches of greens (chard, beet greens, kale, collards, spinach), stemmed and chopped or 1 bag (16 oz.) of chopped spinach or collards
  • 1 can of beans (your choice), drained
  • cheese for sprinkling
Start cooking your grains by whatever method you use (I like a rice cooker).

Saute the onion over medium-high heat in a little oil in a large skillet. When it is golden brown (about 10 minutes), add the chopped greens to the skillet. Using tongs or two spoons, turn the greens over and over as they wilt down (this can take about 10 minutes). If the pan gets too dry, add a little water to keep things "saucy".

Add the beans. Taste for salt and pepper.

When the grain is done, dinner is ready.

Serve the greens and beans on a bed of grain (or over toast), sprinkle the dish with cheese. Provide hot pepper flakes, lemon wedges and a fruity olive oil for garnishing.

Tuesday, January 27, 2009

A Pantry Pasta

Another pantry-staple pasta dish. You can pull this together using what you have in the pantry and refrigerator. The only have-to-haves are some kind of pasta (shells or orchiette are preferred - stay in the short and chunky family), canned beans and tuna (I used ultra fancypants Italian oil-packed tuna last night, but a can of Starkist is fine too).

For crunch, I used some celery (you could use fresh bell peppers or turnip or jicama or what have you ...) and I had some scallions and dill in the fridge, so they got thrown in for freshness. Finally, I tossed in some capers for tang (try olives, giardinera or pickled onions) and chopped almonds (sub in breadcrumbs or toasted pinenuts) for crunch.
This recipe is a common fall-back for me: it's easy to adjust based on what I have on hand, and it's fast (by the time the pasta ia cooked it's just about finished). I looked back through my archive and found this tuna and bean salad (which is basically this dish, sans pasta). Here's a version where I used orzo (violating my chunky pasta rule).

So, at the risk of repeating myself, here's how you do it:

Pasta with Tuna and Beans
Serves four
  • 1 pound pasta
  • 1 8 ounce jar of oil-packed tuna, or 2 cans of tuna (olive-oil packed is best, but water-packed is ok)
  • 4 ribs celery, chopped
  • 1 can of beans
  • 3 tablespoons capers
  • 4 scallions, chopped
  • 2 handfuls chopped dill
  • 1 handful chopped toasted almonds
  • olive oil
  • salt and pepper
Boil the pasta.

While the pasta is cooking, make the sauce: Saute the celery until a little softened. Add the beans, capers and scallions. When the pasta is cooked, drain it (reserving about a cup of cooking water) and add two-thirds of the pasta to the skillet (you may not need it all - add more until you have a pleasing combination of pasta and the other ingredients). Toss in the dill and almonds. Heat everything together, drizzling in a little cooking water to make the dish saucier if needed.

Season to taste with salt and pepper. Serve hot or warm.

Any leftover pasta can be used in a frittata.

Wednesday, January 7, 2009

Black Bean Chili

Dinner Tuesday night was this black bean chili. I was inspired by Lighter Quicker Better (a book by Richard Sax and Marie Simmons) and their recipe for black bean chili over a baked sweet potato. I'm not a huge fan of sweets on their own, but in this combo, they were great. I suppose you could also chop up the sweet potatoes and add them right into the chili, but then you'd miss out on the gorgeous contrast of the black beans against the bright orange sweet potatoes.

Black Bean Chili with Sweet Potatoes
This recipe makes enough for 4 to 6 servings - I'd suggest making a double batch if you have room in the freezer.
  • small sweet potatoes, one per serving
  • oil for sauteing
  • 2 cups chopped onion, about 2 medium
  • 2 carrots, chopped
  • 3 or 4 small zucchini, chopped
  • 1-2 tablespoons chili powder
  • 2 teaspoons ground cumin
  • 1/2 teaspoon cayenne (more or less, to taste)
  • 4 garlic cloves, minced
  • 4 cups cooked black beans, with some of their cooking liquid (cooked from about 1 1/2 cups dry beans, or 2 19 ounce cans of beans, undrained)
  • 1 large can (28 ounces) diced tomatoes
  • lime
  • cilantro
  • sour cream (lowfat is fine, not nonfat though, please!)
Wash the sweet potatoes, poke each one a few time with a fork, and place on a baking sheet in a 350 degree oven. Let bake while you are making the chili. Depending on the size and age of your potatoes, this will take anywhere from 45 minutes to an hour. Give a potato a gentle squeeze: if it feels yielding and baked through, they're done.

Make the chili: In a small stockpot, saute the onions with a sprinkle of salt in olive oil over medium-high heat. Saute them until they are softened and turning translucent, about ten minutes. Add the carrots, zucchini, chili powder, cumin and cayenne. Saute until fragrant, about five minutes (you'll smell the chili powder and cumin as they cook). Add the garlic and saute another two minutes.

Add the black beans and tomatoes and bring chili to a simmer. Let the chili simmer, over low heat, for 20-30 minutes, until it looks thickened and stew-like. Stir occasionally to make sure the chili isn't sticking. Taste and add salt and pepper, as needed.

Serve the chili alongside a split sweet potato, garnished with chopped cilantro, a squeeze of lime, a dollop of sour cream.

Wednesday, December 10, 2008

Garlic Confit and What to do With It

Hi, it's me. Back again. I hope y'all are, like me, being swept up in holiday planning and fun and haven't really noticed that I haven't posted in nearly two weeks (eek!).

As penance for my lag in posting, I thought I would give you not one recipe, but two! The first recipe isn't really a recipe, more a technique, but anyhoo ...

Garlic Confit is a really nice treat to have on hand. Technically a confit is some sort of animal protein (like chicken, duck or turkey) slowly cooked in its own fat until tender. In recent years, the term confit has been extended to cover vegetables slowly cooked in oil (usually olive oil) until tender and silky. So, this method is for garlic confit but you can apply the same principles to onions, shallots, tomatoes, peppers, etc.

Garlic Confit
  • Garlic cloves, peeled (as many as you want - I cooked up about three cups)
  • Sprigs of fresh herbs or a few dried chilies, optional
  • Olive oil, to cover
Put the garlic into a heavy saucepan with herbs and chilies, if using. Pour enough olive oil over to just cover. Place the saucepan over low heat and let garlic cook until soft. The oil will sputter a little as the moisture in the garlic cooks off. Depending on the heat and the age of the garlic, the confit will be done in 30 minutes to an hour. The cloves will be a light golden brown and tended enough to provide no resistance when you try to stick a toothpick through one.

Let the confit cool and then transfer to clean glass jars. The confit should be stored covered with oil and stored in the refrigerator - any extra oil should be strained and stored in the refrigerator. Use your confit and garlic oil within a week. (See the comments below for why.)

Now you have a jar full of garlic confit in your fridge, so what do you do with it? You can spread the cloves on grilled or toasted bread, use them in a roast beef sandwich, bake them into foccacia or add them to pasta. I used some of my confit to make this soothing, warming bean stew:

Cannellini Bean Stew with Garlic Confit
Serves 4 to 6
  • 1 onion, chopped
  • 1.5 cups dried cannellini beans, cooked or 3 cans cannellini beans, drained with some liquid reserved
  • 6 canned tomatoes, chopped
  • 1-2 cups chicken broth, canned is fine
  • 1/2 cup garlic confit
  • minced rosemary, optional
  • 1 cup breadcrumbs
  • 1-2 pieces of pancetta or bacon, chopped fine
  • handful grated parmesan
Over medium heat, saute the onion in a little olive oil until tender, about 10 minutes. Add the cooked beans, tomatoes, confit and a little chicken broth (you want the mixture to be a little soupy). Simmer until the tomatoes break down, adding more chicken broth or canned bean liquid to keep the mixture from drying out. The goal is a thick stew-like mixture. Season to taste with salt and pepper and add some minced rosemary, if using.

While the stew is cooking, make the crispy breadcrumb topping: Saute the bacon or pancetta until crispy. Toast the breadcrumbs with a little olive oil until golden brown (do this in a skillet or on a baking sheet in your oven). Toss the breadcrumbs, bacon and cheese together.

When the bean stew looks and tastes right to you (the tomatoes should have broken down and are part of the sauce binding the beans and confit together - think Italianate baked beans). Served, topped with a handful of the breadcrumb mixture.

This is a really soul-satisfying dish. The beans are super-creamy and each smooth bite is punctuated with hits of garlic and crunchy bites of breadcrumb. It's super-easy to make this dish vegetarian by leaving out the bacon.

Wednesday, April 16, 2008

An Ugly, Easy, Delicious Dinner Salad

So this is not the prettiest thing I've ever put on a plate, but it's insanely easy to pull together and a great healthy, weeknight dinner.

All the ingredients in this lentil salad can be lovely prepared from scratch, however, you can get great results from jarred, bagged and canned ingredients. It could also be much prettier served over or alongside a green salad.

Easy Lentil Salad (as a main course for two)
  • 2 cups of cooked lentils (make your own or use the precooked bagged ones from Trader Joe's)
  • 1/3 cup of chopped roasted red and/or yellow peppers
  • 1/3 cup of chopped hearts of palm or artichoke hearts
  • handful of parsley, chopped
  • 1 lemon
  • olive oil
  • salt and pepper
Gently mix the lentils, peppers, hearts of palm (or artichoke hearts) and parsley together. Squeeze the juice of one lemon over the salad and drizzle the salad with olive oil. Season with salt and pepper. Gently stir everything together.

Wow, tough huh? Even better, it tastes great after a night in the fridge, so it's a great make ahead for picnics, plane trips, and other such events.

Serve this with nice bread and a few pieces of cheese, or a hardboiled egg, or the aforementioned green salad. Vary the herbs and vegetable mix-ins to taste (another nice option is chopped beets and celery with chopped dill and sherry vinegar).

Tuesday, January 1, 2008

Happy New Year!

A gracious welcome to 2008.

Every culture has a New Year's Day food tradition. Many of them are similar in spirit if not in ingredients. A common tradition, and one I heartily endorse, is the eating of lentils (preferably with something porky). The shape of lentils is similar to that of coins (well it is if you squint and suspend disbelief for a moment) and therefore eating them on New Year's Day should lead to a prosperous New Year. They taste good too.

This is the lentil dish we ate for lunch today. In addition to the lentils, it includes sauteed chorizo "coins", shallots and garlic. We ate it with a salad of radicchio and parsley and a whole wheat baguette spread with St. Andre cheese.

New Year Lentils
  • 1 cup lentils (lentilles du Puy please)
  • 1 bay leaf
  • 1/2 cup sliced chorizo (I used hard chorizo, but a soft chorizo or another cured pork product can be used)
  • 2 shallots, sliced
  • 3 cloves garlic, chopped
  • 2 tablespoons mustard
  • 2 tablespoons sherry vinegar
  • 4 tablespoons olive oil
Rinse the lentils and put them into a 2-3 quart saucepan. Cover with water by 2 inches, toss in the bay leaf, a pinch of salt. Bring the water to a boil and then reduce the heat to a simmer.

Simmer the lentils under tender (taste one or two to see). Check on them occasionally to make sure they are covered with water, adding more if they get too dry. Depending on the age of your lentils, this could take anywhere from 25 to 50 minutes.

Drain the lentils in a colander or strainer and transfer to a bowl (they do not have to be bone-dry, it's ok to leave them a little damp). Discard the bay leaf.

In a dry skillet, saute the chorizo over medium high heat until it just starts to crisp. Add the shallots to the pan and saute in the fat given off by the chorizo (add some olive oil to the pan if your sausage doesn't render enough fat). After the shallots start to soften (about 5 minutes) , add in the garlic. Saute for another minute and then add the contents of the skillet to the bowl with the lentils (if there's a lot of fat in pan you may want to spoon some of it off first).

Make a quick dressing by whisking the mustard, vinegar and olive oil together. Pour it over the lentil mixture and toss gently. Taste for salt, acid (vinegar) and oil and add more of whatever is needed.

Serve warm or at room temperature. Serves 4 as part of a meal.

Fresh herbs such as thyme, parsley or savory would be great in this.

Monday, April 16, 2007

*&@#!! Baked Beans

I love baked beans but I usually resort to the canned kind from the supermarket. B&M and Van de Camp make a good product, so why bother making my own? Sometimes, I do doctor up plains cooked beans into a quick baked bean-y side dish.

I saw a recipe for Boston Baked Beans in Cook's Illustrated and thought I'd give it a try. I had some great triple-smoked bacon from Karl's Sausage Kitchen in Saugus and what a great way to use it.

Mistake #1: I did not read the recipe all the way through or with adequate attention to detail. I discovered after I'd started cooking (had already committed the bacon to the dish) that this recipe was to take SIX HOURS! Sweet fancy Moses ...

Mistake #2: I doubled the recipe. Seven hours into cooking, my beans were still swimming in too much liquid. Ack. I had to drain off the beans and then boil down the excess liquid which took another half hour.

These were good, but goodness ... next time, I will do myself a favor and make Melissa Clark's Fake Baked Beans instead.

Saturday, February 3, 2007

Ingredient Spotlight: Lentils

After reading the Lentil Soup recipe, I got questions from a few folks on what lentilles du Puy are. So I thought I would put lentils in the spotlight so people could see how the types differ and what (and what not) to use them for.

Here's a photo of the four types you're most likely to see. They are described, left to right, below the picture.


Green Lentils
This is the traditional lentil that is most commonly used for soup. To be honest, I never use this type of lentil. Advantages: they're cheap, readily available and cooks quickly. Disadvantages: when you overcook them (easy to do) they fall apart and get mushy, and to me the flavor is muddy and not very pleasant.

So, with that endorsement, these are best used in lentil soup where the mushiness can dissolve into the soup. I brighten the flavor of a green lentil soup with lemon juice, sherry vinegar or balsamic vinegar.

Lentilles du Puy
These are a French lentil. They have a deep, rich flavor and have the advantage of not falling apart when you cook them. As a result, they can be used in soups and warm or cold salads. They are excellent in the Lentil Soup recipe on this site.

You can make a really warming dinner of warm cooked lentilles du Puy tossed with a mustardy vinaigrette, sauteed onions and black pepper. Serve this alongside browned kielbasa or other ham or sausage. Another nice thing to do is toss the cooled lentils with diced beets, crumbled goat cheese and a sherry vinegar and walnut oil vinaigrette. Serve over lettuces with some toasted rustic bread (walnut bread would be nice).

David Lebovitz has a really nice discussion of these lentils (and a good method for cooking them for salad) on his web site at this link: http://www.davidlebovitz.com/archives/2006/11/cheap_caviar_1.html

Black "Beluga" Lentils
These lentils are little smaller than lentilles du Puy. Cook them in the same way though. They are best in salads and they are so pretty on the plate. They stay very dark in color and look beautiful against roasted yellow peppers, white goat cheese, purplish radicchio and rich greens.

Red Lentils
These are for soups or purees only. Red lentils fall apart when cooked. This is a great advantage when you know what's going to happen. If the first time you met these and you were expecting them to behave like a green lentil, you may have learned this lesson the hard way.

I will be posting an Indian-style soup recipe for these later this week. They are also easily cooked for a side dish: For four people, use 1 cup of red lentils. Put them in a saucepan and cover them by 1/2" with chicken broth or water or both. Toss in a crushed clove of garlic, a pinch of cayenne, and salt and pepper. Bring to a simmer, stirring occasionally. When they are done, the lentils will have turned into a soft orange puree. (To keep the color bright, add a pinch of turmeric when you start the cooking.) Season to taste with salt and pepper (white pepper is nice) and a squirt of lemon or lime juice.


What is a lentil? http://en.wikipedia.org/wiki/Lentil

Blog Widget by LinkWithin