Showing posts with label dessert. Show all posts

Sunday, July 18, 2010

Amanda Hesser's Peach Tart


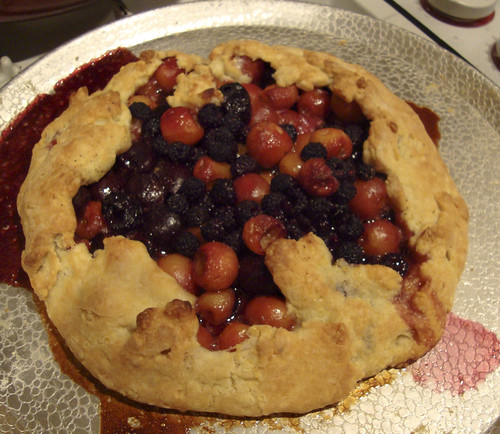
Except I didn't make a peach tart. Instead, I made a fig and blueberry tart. I was turned on to this recipe by my friend Lynn. She told me how her young son (like 10 years oldish?) made these tarts himself.

See, these are his in the oven:

This is not meant to be intimidating. This recipe is super easy and super adaptable. Use the fruit you have on hand and you'll be fine. It's fast too - I had the tart ready to go in the oven before the end of the oven's preheat cycle.

I'm going to use this tart recipe in a savory application too: I'll fill the tart shell with chopped fresh tomatoes, cooked Swiss chard and goat cheese. Will let you know how it goes.

I don't normally post other people's recipes, especially when I don't own the cookbook (a situation I'm about to remedy), but this recipe is all over the interwebs, so I'm a little more comfortable posting it.

Fruit Tart
Based on Amanda Hesser's recipe for Peach Tart from Cooking for Mr. Latte.
Makes 1 tart (I used an 8" tart pan, but I think you could use a 9" or 10" pan - you can see my crust was sorta thick, which I prefer)
  • 1 1/2 cups (6.75 ounces) flour
  • 1/2 tsp salt
  • 1 tsp sugar
  • 1/2 cup (4 ounces) olive oil
  • 2 tbs (1 ounce) milk
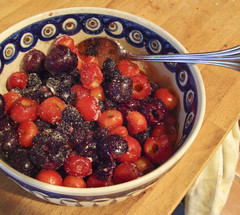
  • Fruit or other filling of your choice - I used about 3 cups of fruit but a lot depends on the size of your tart pan
  • 3/4 cup (5.25 ounces) sugar
  • 2 tbs flour
  • 1/4 tsp salt
  • 2 tbs (1 ounce) cold butter
Preheat the oven to 425.

Mix the dry ingredients together. Mix the wet ingredients together. Combine the dry with the wet. It'll become a dough, right under your fingertips - I promise. When the tart dough has come together, press it into the tart pan. Make sure you press it in evenly, so the crust is evenly distributed across the bottom and sides.

Fill your tart with the fruit or other vegetables you've prepared.

In a small bowl, use your fingers to combine the sugar, salt and butter. Pinch and rub until you have a crumbly sugar mixture. Sprinkle the mixture over the top of the tart. (Obviously, omit this step if you're making a vegetable tart.)

Bake the tart until crust if well browned and the fruit is cooked and bubbly. This took me about 40 minutes in my oven.

Enjoy!

Monday, July 5, 2010

Fresh Fruit Galette

I do a ton of baking for my clients, but recently I feel like I'm been too busy to do any baking for us! Last night I wanted a tart for dessert and I had some gorgeous cherries from Arrowhead Family Farm and some black raspberries from our yard.

The crust in this recipe is a Flo Braker recipe from Baking With Julia. It's a great addition to your baking repertoire and works well in sweet and savory applications. Make sure you give yourself time to let the dough chill - I didn't and pushed it: the results were fine, but the dough was a lot more challenging to work with than it should have been.

Substitute any mixture of fresh fruit that you have on hand. You can layer the fruit daintily into the crust or just tumble it in like I did. If your fruit is super juicy, you can put a tablespoon or two of breadcrumbs or cookie crumbles into the crust before you add the fruit.

Fresh Fruit Galette
Serves 4-6
  • 1 recipe cornmeal galette dough (below)
  • 1 1/2 - 2 cups cut up fresh fruit - I used a mixture of yellow and red cherries and black raspberries
  • 1-3 tablespoons sugar (depending on the sweetness of your fruit)
  • 1 tablespoon butter
On a lightly floured surface, roll the galette dough into a 12" circle (it's okay if it's not a perfect circle, galettes can be "rustic"). Transfer the round of dough to a parchment-lined or non-stick baking sheet.

Stir the fruit and sugar together and spoon the fruit onto the center of the dough, leaving a 3-4" margin of dough. Dot the fruit with the butter.

Lift the dough up and over the fruit, forming a pleated edge (see the picture up there).

Bake for 20-30 minutes until fruit is juicy and the crust is nicely browned.

Cornmeal Galette Dough
From Flo Braker in Baking with Julia
  • 3 tablespoons yogurt or sour cream
  • 1/4 cup ice water
  • 1 cup flour
  • 1/4 cup cornmeal - I like a coarse-grind cornmeal, but you can use a finer grind if you don't want a crunchier crust
  • 1-2 teaspoons sugar
  • 1/2 teaspoon salt
  • 7 tablespoons butter, cut into 1/2" cubes
Whisk together the yogurt and water, set aside in the fridge so it stays cold.

Whisk the flour, cornmeal, sugar and salt together. Toss in the butter and cut the butter in (with your fingers, 2 knives, a pastry cutter or in the food processor - your choice) until you have a mixture that looks like like cornmeal with some pea-sized pieces in it.

With a rubber spatula, fold in the water/yogurt mixture. If the dough seems too dry, add more water, a tablespoon at a time until the dough holds together. Wrap in plastic and chill in the fridge for 2 hours or so at a minimum. The dough freezes really well, so make a double or triple batch and freeze the dough for later.

Sunday, March 28, 2010

Tahini Cake for Lent

Recently I hosted a Greek Independence Day dinner (see full post here). For dessert I offered grapes and a parfait of yogurt, honey (from our own hives) and toasted pistachios, but I also wanted to offer a baked item as well. The challenge is that I needed to offer an item that fit within the dietary requirements of Greek Orthodox Lent: no dairy or eggs (yes I know the yogurt is dairy, but I knew I breaking the rules for that one).

I made this tahini cake, not quite knowing what to expect. For those not familiar with it, tahini is sesame paste. You've probably eaten it in hummus and maybe in that creamy sauce you sometimes get with falafel, but it's not something many people (myself included) think of as a dessert ingredient.

So this cake was an exciting discovery. It tasted like peanut butter (but without peanut butter allergy issues, for those who are concerned about that)! The recipe called for candied fruit, so I used some candied kumquats I made earlier this year. If you have good quality candied fruit, use it, but if not, double the amount of dried fruit instead.

Tahini Cake
Makes one 9x12 baking pan - this is a pretty dense "cake" (it's more like a bar cookie), so you'll likely want to cut it into small 2"x 2" pieces. This recipe is adapted from the cookbook The Complete Book of Greek Cooking. This cookbook is a great resource for Greek food lovers: it's a community cookbook professionally published in 1990 by a Greek Orthodox church in Hempstead, NY.

Make sure your tahini is fresh: Taste it, do you want to eat it? Then it's fine for cooking. Tahini can go "off" or turn rancid pretty easily. Store your tahini in the fridge to ensure longer life.

  • 1 cup (12 ounces by weight) tahini
  • 1 cup (7 ounces) sugar
  • 2 tablespoons brandy or bourbon (a new world touch for sure)
  • 1 teaspoon baking soda
  • 1 1/2 cup (6.75 ounces) flour
  • 2 teaspoons ground cinnamon
  • pinch salt
  • 1 cup orange juice (I used grapefruit juice and didn't notice a grapefruit-y flavor)
  • 1 cup chopped toasted walnuts
  • 1/2 cup golden raisins (I used dried cherries)
  • 1/2 cup glacĂ© fruit (I used candied kumquats - don't use that super sweet stuff from the supermarket. If you don't have access to great candied fruit, use dried fruit instead)
Preheat your oven to 350. Prepare a 9" x 12" pan: grease the bottom and sides and line the pan with parchment or waxed paper.

Beat the tahini with a mixer to aerate it a little (it won't fluff up like butter would, just soften it up). Pour in the sugar and keep beating to combine. Add the baking soda to the brandy and then pour the mixture into the tahini. Beat to blend.

Whisk together the flour, cinnamon and salt.

Beat in the flour mixture and orange juice alternately to the tahini. When all the flour and orange juice have been added, add the fruit and nuts. The batter will be very thick.

Spread the batter into the prepared pan.

Bake for about 45 minutes until deep golden brown. Cool in the pan on a rack. When cool, cut into small pieces and dust with confectioner's sugar if desired.

Monday, April 27, 2009

Daring Bakers April: Cheesecake Centerpiece

The April 2009 challenge is hosted by Jenny from Jenny Bakes. She has chosen Abbey's Infamous Cheesecake as the challenge.

This month's Daring Bakers post was centered on cheesecake. We were given a free hand to flavor and decorate the cheesecake as we desired. I have to confess to not being a huge cheesecake fan, so I decided to highlight what I really enjoy about cheesecake: its tanginess and the contrast of the crust against the creamy cheese cake.

I've posted the recipe below for those who want to try it at home. I wasn't 100% happy with the recipe; I thought the result was too sticky and didn't cut cleanly, but based on the other cheesecakes I've seen posted others didn't have the problems I did (I'm still adjusting to my new oven and that may have been a factor.). My taste testers were extremely happy with the results however, so I consider the whole operation to be a success.

I did not make many changes to the recipe other than adding 3 lemons' worth of zest to the cheesecake batter.

I topped the cheesecake with a thick layer of lemon curd and then piped meringue over the top. I pulled out my handy-dandy bruleeing torch and toasted the top for a lemon meringue pie look.

Here are all recipes I used:

Abbey's Infamous Cheesecake
crust:
  • 2 cups / 180 g graham cracker crumbs
  • 1 stick / 4 oz butter, melted
  • 2 tbsp. / 24 g sugar
  • 1 tsp. vanilla extract

cheesecake:

  • 3 sticks of cream cheese, 8 oz each (total of 24 oz) room temperature
  • 1 cup / 210 g sugar
  • 3 large eggs
  • 1 cup / 8 oz heavy cream
  • 1 tbsp. lemon juice
  • 1 tbsp. vanilla extract (or the innards of a vanilla bean)
  • 1 tbsp liqueur, optional, but choose what will work well with your cheesecake

1. Preheat oven to 350 degrees F (Gas Mark 4 = 180C = Moderate heat). Begin to boil a large pot of water for the water bath.

2. Mix together the crust ingredients and press into your preferred pan. You can press the crust just into the bottom, or up the sides of the pan too - baker's choice. Set crust aside. (My note: TRIPLE wrap the pan with foil with save it from encroachment by the water bath.)

3. Combine cream cheese and sugar in the bowl of a stand-mixer (or in a large bowl if using a hand-mixer) and cream together until smooth. Add eggs, one at a time, fully incorporating each before adding the next. Make sure to scrape down the bowl in between each egg. Add heavy cream, vanilla, lemon juice, and alcohol and blend until smooth and creamy.

4. Pour batter into prepared crust and tap the pan on the counter a few times to bring all air bubbles to the surface. Place pan into a larger pan and pour boiling water into the larger pan until halfway up the side of the cheesecake pan. If cheesecake pan is not airtight, cover bottom securely with foil before adding water.

5. Bake 45 to 55 minutes, until it is almost done - this can be hard to judge, but you're looking for the cake to hold together, but still have a lot of jiggle to it in the center. You don't want it to be completely firm at this stage. Close the oven door, turn the heat off, and let rest in the cooling oven for one hour. This lets the cake finish cooking and cool down gently enough so that it won't crack on the top. After one hour, remove cheesecake from oven and lift carefully out of water bath. Let it finish cooling on the counter, and then cover and put in the fridge to chill. Once fully chilled, it is ready to serve.

Prep notes: While the actual making of this cheesecake is a minimal time commitment, it does need to bake for almost an hour, cool in the oven for an hour, and chill overnight before it is served. Please plan accordingly!

Lemon Curd
This recipe is taken from Elinor Klivans and I love it, check out the Fine Cooking post for helpful photos. The technique of whipping everything together and then heating it save you from whipping up a batch of lemon-scented scrambled eggs.

You'll end up with about two cups, which will be a little too much for the cheesecake, but leftovers are great on toast or scones or ice cream.
  • 6 tablespoons unsalted butter, at room temperature
  • 1 cup sugar
  • 2 large eggs
  • 2 large egg yolks (save the whites to use in the meringue)
  • 2/3 cup fresh lemon juice
  • 1 tsp. grated lemon zest

In a large bowl, beat the butter and sugar with an electric mixer, about 2 min. Slowly add the eggs and yolks. Beat for 1 min. Mix in the lemon juice. The mixture will look curdled, but it will smooth out as it cooks.

In a medium, heavy-based saucepan, cook the mixture over low heat until it looks smooth. (The curdled appearance disappears as the butter in the mixture melts.) Increase the heat to medium and cook, stirring constantly, until the mixture thickens, about 15 min. It should leave a path on the back of a spoon and will read 170°F on a thermometer. Don't let the mixture boil.

Remove the curd from the heat; stir in the lemon zest. Transfer the curd to a bowl. Press plastic wrap on the surface of the lemon curd to keep a skin from forming and chill the curd in the refrigerator. The curd will thicken further as it cools. Covered tightly, it will keep in the refrigerator for a week and in the freezer for 2 months.

Meringue topping

  • 4 egg whites
  • pinch salt
  • pinch of cream of tartar
  • 2 tablespoons sugar
Start whipping the egg whites, salt and cream of tartar with a beater, as the egg whites fluff up to soft peaks, slowly add the sugar. Whip the egg whites to firm peaks. Spoon with whites into a pastry bag.

Assembling the cheesecake
Spread a layer of lemon curd over the top of the cheesecake. Pipe the egg white meringue over the top the cheesecake. Using a bruleeing torch toast the meringue until golden. If you don't have a torch, you can run the cheesecake under the broiler to brown the top.

Store in the refrigerator until ready to serve.

Saturday, February 28, 2009

Daring Bakers February: For the Love of Chocolate

The February 2009 challenge is hosted by Wendy of WMPE's blog and Dharm of Dad ~ Baker & Chef. We have chosen a Chocolate Valentino cake by Chef Wan; a Vanilla Ice Cream recipe from Dharm and a Vanilla Ice Cream recipe from Wendy as the challenge.

For this month's Daring Bakers challenge we all made chocolate valentino cakes. We were to serve our cake with an ice cream of our choice. I made a buttermilk-vanilla ice cream to go with my cake.

The ice cream was a real experiment for me. I am going to be teaching a class later this year on making ice cream without an ice cream maker and so I experimented with David Lebovitz's method for machine-free frozen treats. It's pretty simple: put your ice cream base in a container. Stick in the freezer and stir vigorously about every half hour until it looks like ice cream. The advantage of this method is that is gives you very dense, almost gelato-like ice cream (and you don't need another appliance in the kitchen). That said, I think I prefer the smoother, churned texture I get from my ice-cream maker. But if I didn't have the equipment on hand, the "freeze and stir" method would be a very good fall back technique to have in your arsenal.

The recipe I developed doesn't contain any eggs: I wanted it to be super fast to pull together. I also scaled the recipe for a small quantity (about 2 cups worth).

Creamy Buttermilk Ice Cream
  • 1 cup buttermilk
  • 1 cup heavy cream
  • 1/2 cup sugar
  • pinch salt
  • 2 teaspoons vanilla extract
In a small saucepan, heat the sugar and about 1/2 cup of the cream together. Heat, stirring, until the sugar dissolves. Add the vanilla and salt. Pour the sweetened cream into a storage container and add the rest of the cream and the buttermilk. Stir to combine. Chill for at least four hours if you are going to use an ice cream maker. If you use the "freeze and stir" method, you can start that right away.

----------------------------------------
This flourless chocolate cake is fairly similar to the Cook's Illustrated version I make. The only material difference in the two recipes is the CI version has you whip the whole eggs until very thick. I made a half-batch of the recipe and baked it in a 6" springform. It makes a very dense, fudgy cake. I think I overbaked mine a tiny bit as it was the tiniest but dry (ice cream can cover that sin pretty well however). To account for the smaller pan, I reduced the oven temp to 350 and the baking time to 20 minutes, but I should have pulled it out at 17 minutes, methinks. The full recipe is reprinted below.

Chocolate Valentino Cake
  • 16 ounces (454 grams) of semisweet chocolate, roughly chopped
  • ½ cup plus 2 tablespoons (146 grams total) of unsalted butter
  • 5 large eggs, separated
Put chocolate and butter in a heatproof bowl and set over a pan of simmering water (the bottom of the bowl should not touch the water) and melt, stirring often.

While your chocolate butter mixture is cooling, butter your pan and line with a parchment circle then butter the parchment.

Separate the egg yolks from the egg whites and put into two medium/large bowls.

Whip the egg whites in a medium/large grease free bowl until stiff peaks are formed (do not over-whip or the cake will be dry).

With the same beater beat the egg yolks together.

Add the egg yolks to the cooled chocolate.

Fold in 1/3 of the egg whites into the chocolate mixture and follow with remaining 2/3rds. Fold until no white remains without deflating the batter.

Pour batter into prepared pan, the batter should fill the pan 3/4 of the way full, and bake at 375F/190C.

Bake for 25 minutes until an instant read thermometer reads 140F/60C. (Note – If you do not have an instant read thermometer, the top of the cake will look similar to a brownie and a cake tester will appear wet.)

Cool cake on a rack for 10 minutes then unmold.

Friday, January 30, 2009

Daring Bakers January: Extra Credit

I was so inspired by the savory nori tuiles over at Cafe Nilson, that I immediately had to try a sweet version. I made the tuiles, using the same recipe in this post with a few tablespoons of black cocoa powder for color (King Arthur sells it). I filled them with rice pudding and used a piece of blood orange as "tuna" and some pomegranate seeds as "salmon roe".

Thursday, January 29, 2009

Daring Bakers January: Tuiles

This month's challenge is brought to us by Karen of Baking Soda and Zorra of 1x umruehren bitte aka Kochtopf. They have chosen Tuiles from The Chocolate Book by Angélique Schmeink and Nougatine and Chocolate Tuiles from Michel Roux.

So this is my first experience with Daring Bakers. I have been watching Daring Bakers posts pop up over the last few years and thought it was finally time to join the fray.

This month's challenge was to make tuiles from the provided recipe and pair them with something light. The recipe suggested that the tuiles could be decorated with a little batter that was colored with a "food coloring of my choice". So I pulled out some beet powder and made a pink batter to provide contrast. I prepared a leaf-shaped batch and a batch of "twirlies". I had never really attempted tuiles before, so this was a great kick in the pants to give them a try.

I paired the tuiles with a buttermilk panna cotta and pomegranate gelee. I made the gels in little 1/4 cup ramekins. I used some pomegranate seeds for garnish.

What is wonderful about tuiles is their lightness and delicacy. They taste of butter and sugar and that's about it. If you add a flavoring like vanilla or a fruit liqueur, it will be a major component of the cookie's flavor, so use good quality flavors.

Here's the tuile recipe I used for the challenge. It's taken from a book called “The Chocolate Book”, written by female Dutch Master chef AngĂ©lique Schmeinck.


Buttermilk Panna Cotta (from Claudia Fleming)
Makes about 6 full servings, a lot more if you are making layered desserts (for this challenge, I made a half recipe and ended up with 10 gels total)
  • 2 cups buttermilk
  • 1 1/2 teaspoons powdered gelatin (about half an envelope, but measure directly)
  • 2/3 cup heavy cream
  • 1/2 cup sugar
  • pinch salt
Measure out 1/2 cup of buttermilk. Sprinkle the gelatin over the buttermilk. When the gelatin is softening, heat the cream and sugar in a small saucepan. When the sugar is dissolved and the cream is hot, stir in the buttermilk/gelatin mixture. Stir over low heat until the gelatin is dissolved (not long, about 2-3 minutes).

Pour the hot mixture into the remaining 1 1/2 cups buttermilk. Stir to combine. Pour the panna cotta into molds or serving dishes. Put in refrigerator to set.

The panna cotta is ready to serve when it has set, about 2-3 hours. To unmold, if desired, dip the molds into warm water to loosen. Or run a thin-bladed knife around the edge of the mold to loosen and release the panna cotta.

Pomegranate Gelee
Makes 2-4 servings
  • 1 cup pomegranate juice
  • 2 teaspoons powdered gelatin
  • 2 - 4 tablespoons sugar (depending on how sweet your juice is)
Measure out 1/4 of juice, sprinkle it with gelatin. While the gelatin is softening, heat remaining juice with sugar. When sugar is dissolved, stir in the juice/gelatin mixture. Stir over low heat to melt the gelatin (about 2-3 minutes).

Pour into molds or serving dishes. Let rest in refrigerator to set, about 2-3 hours. To unmold, if desired, dip the molds into warm water to loosen. Or run a thin-bladed knife around the edge of the mold to loosen and release the gelatin.

Tuiles
About 10-20 cookies, depending on the size
  • 1/4 cup softened unsalted butter (make sure it is very soft, but not melty and greasy)
  • 1/2 cup sifted confectioner’s sugar
  • 1/8 teaspoon vanilla extract
  • pinch of salt
  • 2 large egg whites, whisked
  • 1/2 cup ounces sifted all purpose flour
  • 1 tablespoon cocoa powder/or food coloring of choice (I used beet powder)
Preheat the oven to 350.

Cream butter, sugar, salt and vanilla to a paste using a hand mixer. With the mixer on low, slowly add the egg whites. Make sure the mixture is homogeneous - no clumps of butter should be visible. Add the flour slowly until the batter is smooth. Take a large spoonful of batter, and in a separate bowl, blend in the food coloring you are using. Chill the batters, covered, for at least 30 minutes. You can make the batter a day or so ahead, just take it out of the fridge 30 minutes before you make the cookies.

To form the cookies you'll need a stencil (made out of a yogurt lid or some other stiff plastic) or you can pipe the dough directly onto the baking sheet. If you're using a stencil, just lay it on the baking sheet and use a spatula to spread the dough within the stencil. Lift the stencil, place it on an empty area on the sheet and repeat spreading the batter. You'll probably get about 6 cookies per sheet. Until you're used to forming the tuiles, only do one sheet at a time.

If you are using the piping method, you can just put the batter into a ziploc bag and squeeze strips of batter out on the baking sheet.

Decorate the tuiles with the colored batter. You can use a piping bag or a ziploc with a small hole cut in it.

Bake the tuiles in a preheated oven for about 5-10 minutes or until the edges turn golden brown. Lift the cookies off the baking sheet and gently curve them over a rolling pin of bottle to shape them. To make my twirlies, I wrapped the piped cookies around a spoon handle.

Friday, July 11, 2008

Cornmeal Cookies with Pastis Glaze

These cornmeal cookies are a staple on my list of "go-to" cookies. The original recipe comes from Martha Stewart Living and is flavored with lime zest. I've modified the recipe several times to use different citrus flavors and herbs. I've also changed the baking method to make it a slice and bake cookie (instead of rolling little balls of dough and squashin' them as the original recipe requested).

When Cookthink made Pastis the subject of a Root Source Challenge, I thought this cookie would be a good candidate for "pastis-ification."

I used freshly ground anise seed to pump up the pastis flavor without making the cookie too boozy. My tasters and I were pleased with the results. These would be great with fresh fruit or vanilla ice cream - or both!

Cornmeal and Pastis Cookies
Makes about three dozen cookies
  • 1 cup room-temperature butter (2 sticks)
  • 1 cup sugar
  • 1 large egg
  • 3 tablespoons pastis (I used Ricard Pastis)
  • 1/2 teaspoon ground anise seed
  • 1/4 teaspoon salt
  • 1 1/2 cups flour
  • 1 cup cornmeal
Glaze:
  • 1 cup sifted confectioner's sugar
  • 2-4 tablespoons pastis
  • crushed anise seed for sprinkling
Make the cookie dough:
With a hand mixer, cream together butter and sugar until light and fluffy. Blend in the egg, pastis and anise seed.

With the mixer on low speed, blend in the salt, flour and cornmeal.

Divide the dough into two portions and roll each into a log (about 1 1/2 to 2 inches) wrapped in parchment or wax paper. Chill in the refrigerator for several hours, preferably overnight (you can also wrap the dough and freeze it at this time).

Bake the cookies:
Preheat the oven to 350.

Slice the cookie dough into 1/4" slices. Lay them 1 1/2" apart on a parchment lined baking sheet. Bake 10-14 minutes, until the cookies are browned on the edges and bottom.

Let the cookies cool while you make the glaze.

Make the glaze:
Stir 2 tablespoons of pastis into the confectioner's sugar. Stir in more as needed to bring the glaze to a pourable consistency.

Spoon or drizzle the glaze over the cookies and sprinkle with crushed anise seed.

Sunday, February 17, 2008

A Springtime Dessert: Tart and Flowery

This is the lemon tart I made for dessert on Valentine's Day. Megan from Hey Meg, What's for Dinner? asked that I post the recipe, so here you go ...

I didn't really have a recipe for this dessert, but I wanted a really lemony tart, topped or combined with lavender. I also adore the textural contract of silky against crispy, so I knew that this would have a crisp pie crust and the foundation.

This dish is pulled together in four steps, almost all of which can be done a day (or more) ahead:

Step One: Crust
Make a pie or tart crust (I used this recipe from Melissa Clark). Bake the crust in tartlet shells or tart rings (I have some square ones I used for this) until golden - they will not be baked again, so make sure they are as dark as you like.

Step Two: Lavender Honey
Take about 1/3 cup of honey (clover or wildflower are fine) and 2 tablespoons of dried lavender blossoms (be sure they are suitable for culinary use and aren't treated with any fixatives or other icky non-edible substance) and heat them over medium heat for about 5 minutes (or until the honey is bubbling hot).

Let the lavender steep in the honey for at least an hour (longer is fine). Heat the honey back up and then pour the honey through a strainer to remove the blossoms.

If you have lavender honey in your possession, feel free to skip this step.

Step Three: Lemon Curd
Make lemon curd via your favorite recipe. I strongly endorse this method by Elinor Klivans. It's unconventional, but works really well.

Step Four: Assembly
Warm the honey a little bit if it's too thick to drizzle (in my kitchen it was almost solid at room temp). Whip 1/2 cup of heavy cream and as the cream starts to thicken, drizzle in 1 to 2 tablespoons of honey (check for sweetness). Whip the cream until it forms soft peaks.

Spoon lemon curd into the baked tart shells. Dollop each tart with the whipped cream and sprinkle a few lavender blossoms over the top.

Variations: I am going to try this with other citrus / herb combos: lemon curd and minted cream, grapefruit curd and rosemary cream, lime curd and coconut cream (not an herb, I know).

Thursday, December 6, 2007

Brown Sugar Butter Cake

Okay, finally. I have been promising people this recipe for a looooong time.

The original recipe for this cake comes from Gourmet magazine. That version has you make blackberry jam and frosts the cake with an Italian buttercream (marshmallow-like frosting). I tasted this cake at my mother's house. Instead of the buttercream, she used cream cheese frosting and it was a great combination.

I have adopted this cake wholeheartedly and it has become an active part of my repertoire. A few major points in its favor:
  • Everybody loves it. Seriously, not one person has expressed anything but absolute delight about this cake.
  • It's easy to make.
  • It freezes really well. You can make layers in advance and thaw them as you need them.
This first picture is of the wedding cake I made with this recipe. It took 4 batches of the recipe to make and was really enjoyed by everyone at the party where it was served.

Later, I made a mini-cake batch. One batch of batter will fill 6 4" mini cake pans. This picture is of what happens when you only use 4 4" mini cake pans and pretend that it won't matter. Ah well, I trimmed off the messiness and went onward.

Further down in this post is a shot of an ice cream cake I made with one of these 4" layers. I cut it in half, put softened ice cream in the center and then covered it with a chocolate ganache. Into the freezer and to serve when it's firmed up. Yum.

Brown Sugar Butter Cake
  • 1/2 cup almond meal (find it at Trader Joe's, or pulse almonds with the 1/2 cup sugar in a food processor until finely ground)
  • 1/2 cup sugar
  • 2 cups all-purpose flour
  • 1 1/4 teaspoons baking soda
  • 3/4 teaspoon salt
  • 2 sticks (8 oz.) unsalted butter, softened
  • 1/2 cup sugar
  • 1 cup packed light brown sugar
  • 1 cup well-shaken buttermilk
  • 2 teaspoons vanilla
  • 1 teaspoon finely grated lemon zest
  • 2 large eggs

Makes 3 8" or 9" layers, 1 12" layer, 6 4" mini-cakes

Preheat oven to 350°F.

Mix together the almond meal with 1/2 cup sugar. (Or, if using whole almonds, pulse nuts with sugar in a food processor until finely ground.)

Generously butter cake pans and divided nut mixture between pans. Shake each pan to cover sides and bottom with nut mixture. Leave any extra nut mix in the bottom of each pan.

Sift together flour, baking soda, and salt in a bowl. Stir together buttermilk, lemon zest and vanilla in a small bowl or pitcher.

Beat together butter, brown sugar, and 1/2 cup sugar in bowl of mixer with paddle attachment at medium-high speed until pale and fluffy, about 5 minutes. Add eggs, 1 at a time, beating well after each addition. Reduce speed to low and add flour and buttermilk mixtures alternately in batches, beginning and ending with flour mixture and mixing just until batter is smooth. Divide batter among your cake pans.

Bake, switching position of pans halfway through baking, until a wooden pick or skewer inserted in centers of cakes comes out clean and edges begin to pull away from sides of pans. About 30 minutes for 8" or 9" pans, 20 for 4" pans, and 45 minutes for one large 12" layer.

Cool in pans on racks 15 minutes, then run a thin knife around edge of each pan. Invert racks over pans, then flip cakes onto racks to cool completely, about 1 hour.

If freezing your layers, wrap them well in plastic wrap before freezing. When thawing, put the layers into the refrigerator and let them thaw 24 hours before using.

To serve: Make a batch of cream cheese frosting. Try one from Joy of Cooking or the Silver Palate. A really good version is here.

Tuesday, November 6, 2007

Gingersnappy Snack

I made the gingersnaps from David Lebovitz's website on Sunday. They are quite delicious (although I think my ginger was a little old - so they aren't quite hot enough. Sounds like it's time for a trip to Penzeys!)

This is a "slice and bake" cookie recipe, which means you don't need to make all the cookies at once. Perfect for the holidays.

Go to David's site for the recipe. You won't be disappointed.

Monday, July 2, 2007

A Scoopendous Trifecta

The ice cream puns are just going to keep coming, sorry 'bout that. Here's a pic of the three frozen treats I made from The Perfect Scoop this weekend. There were all fantastic in their own ways.

The Vanilla Frozen Yogurt was really the star (it's in the 3:00 position in the picture). It took no effort at all to make. You whisk together yogurt, sugar and vanilla. Chill and freeze. That simple. Phenomenally good. I used Stonyfield Farm whole milk yogurt.

Also extremely good, but requiring a little more effort was the Honey Lavender Ice Cream. You steep lavender blossoms in honey and strain. Make a custard with yolks, milk and a little sugar. Add the honey and cream.

The Strawberry Rhubarb Sorbet is also great. You cook rhubarb with a little sugar and then puree it with ripe strawberries. Done.

Now come the really easy part: eating all this ice cream! Everything is wonderful solo; you can really taste each flavor's nuances. But, if I was going to be combining flavors ... the sorbet and yogurt are almost better when eaten together. The honey ice cream eaten with the yogurt reminds me of yogurt drizzled with honey. The only not-so-great pairing was the sorbet with the honey ice cream. The sorbet's bright flavors clobbered the honey flavors over the head.

Go buy yourself a copy of the book and get freezing!

Monday, April 23, 2007

Salted Butter Caramel Ice Cream

Holy crap. Wow. This is good ice cream. I am serious. Do yourself a favor and make a batch, like now. I mean it.

Find the recipe here on David Lebovitz's blog.

We absolutely inhaled our bowls of this ice cream. It's sweet, but not too sweet; salty, but not too salty. The depth of the flavor is incredible - due to the caramelized sugar, there's a richness in the flavor that you just can't get any other way. The praline mix-in is super easy and a very nice addition to the ice cream.

In the picture, the ice cream looks sort of melty. I do think the batch needed another few hours in the freezer to freeze up and ripen, but we couldn't wait. Chef David points out that due to the high-hat, high-sugar levels in this recipe, it will alway stay sort of soft and gelato-y. I don't see how that is a problem ... at all.

Happy Spring!

Tuesday, April 3, 2007

Dessert: French Yogurt Cake

This is just a lovely cake. It's from Dorie Greenspan's great book Baking and it is swiftly becoming my go-to cake when I need something easy with showy potential.

The recipe below is Greenspan's. I have made it both with the ground almonds and without. I am going to try it with different ground nuts meals - I looking forward to trying it with ground pistachios for Easter.

I have baked it in a 9" springform and an 8x4 loaf pan. The springform makes for a more elegant presentation, especially when you split it and put lemon curd in between the layers. The orignal recipe calls for a marmalade or jam glaze.

French Yogurt Cake
  • 1 cup all purpose flour
  • 1/2 cup ground almonds (or if you have no almonds, use another 1/2 flour)
  • 2 teaspoons baking powder
  • pinch salt
  • 1 cup sugar
  • zest of 1 lemon
  • 1/2 cup plain yogurt
  • 3 large eggs
  • 1/4 t vanilla
  • 1/2 cup light-flavored oil
Preheat the oven to 350 and lightly grease your baking pan (I have used a small loaf pan or a 9" springform pan).

Mix together the flour, ground almonds (if using), baking powder and nuts.

In a medium bowl, rub the sugar together with the zest (this will perfume the sugar with lemonyness). Whisk the yogurt, eggs and vanilla into the sugar. Whisk the flour mixture in until just blended. Fold in the oil with a rubber spatula.

Scrape the batter into your pan. Depending on your pan, it will take from 35-45 minutes (springform pan) to 50-55 minutes (loaf pan). The cake will pull from the sides of the pan and a toothpick inserted into the center of the cake will come out with only one or two crumbs clinging to it.

Let the cake cool on a rack for 5 minutes, then remove it from the pan to continuing cooling.
Blog Widget by LinkWithin