Monday, July 5, 2010

Make This Please: Scallop Roll

The lobster roll is a staple of the summer dining menu: chunks of lobster meat cloaked in mayonnaise, and accompanied by chopped celery and herbs. When Dave asked for a scallop roll for dinner he was thinking of what we see at the clam shacks around here: deep fried, breaded scallops in a hot dog bun. Somehow I had a brain fade and thought lobster roll instead. Happy accident.

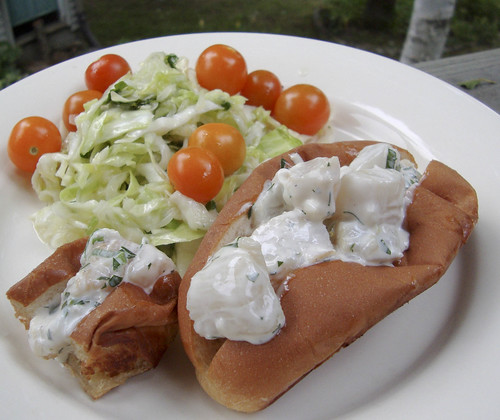
I dressed chunks of cooked scallops with mayonnaise, whisper-thin slices of onion, chopped parsley and scallions and a squeeze of lemon juice. The scallops then got spooned into a butter-grilled hot dog bun.

I cut the richness of the scallop roll by serving it with a lemony slaw and some sun gold tomatoes.

Saturday, July 3, 2010

CSA Booty - Week 7

This week's share (week SEVEN? Wow Summer is starting to fly isn't it?) included:
  • 1 bunch Swiss chard
  • 1 bunch amaranth
  • 1 bunch kale
  • 1 small box of tomatoes - yay!
  • 2 lettuces
  • 2 bunches of broccoli
  • 2 bunches of spring onions
  • 1 bunch of bok choy
So here's what I think I'm doing with these items:
  • The lettuces are going to be used as wraps for pork larb (a salad of ground pork and herbs).
  • The tomatoes are going into either a salad or a quick tomato sauce for fresh pasta.
  • I have a bushel of lettuce that I'll turn into lettuce soup.
  • I'm pickling the spring onions and using the long scallion-like leaves as scallions.
  • The kale will be turned into a white bean and kale pesto spread.
  • I'm going to use the amaranth to make callaloo again.
  • The broccoli will be steamed and sauced with lots of garlic, anchovy and parsley.
  • Bok choy becomes a stir fry (with last week's still unused bok choy).
  • I'll probably make some sort of tabouli-ish salad with the chard.
So how'd I do with last week's haul? Here's what we ate (and what CSA items were used) last week:
This Summer, I am chronicling my first CSA (Community Supported Agriculture) experience. My CSA share is from Arrowhead Farm, a farm based in Newburyport, MA. Each week, I am posting about what was in my share and what I'm doing with it. By way of full disclosure, I won my share through a raffle and am not paying for it. However, Arrowhead did not know I was entered in the raffle, and I received no special consideration because of this blog. I paid for my livestock share.

Friday, July 2, 2010

Use Your Booty: Torta d'Erbe

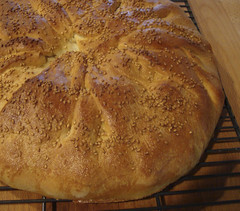
In Italian cuisine, a torta is a pie or tart. This one is a greens pie with a yeasted dough crust. For those of you afraid of pie crust, a yeasted dough might be a nice gateway pastry: you can't overwork the dough like you can with a short crust, the dough provides a firm case for the filling and doesn't get soggy like a pastry crust can.

To make for easy assembly, make the dough when it's convenient for you and after it rises, punch it down and refrigerate until you're ready to assemble the tart. Make your filling ahead as well - a warm filling will make the dough harder to work with. I made my tart in a free-form gallette style with a pleated top but you could easily make your tart in a tart, cake or pie pan if you wish.

Torta d'Erbe
Makes 1 large tart, 6-8 entrée servings
  • 1 recipe yeasted tart dough, below
  • 4-6 cups cooked, chopped greens (I used kale and Swiss chard in this tart)
  • 4 ounces mozzarella, cubed
  • 1 ounce parmesan cheese
  • 1/4 cup chopped pitted Kalamata olives
  • salt and pepper to taste
  • red wine vinegar
  • 2 eggs, beaten
  • 1 egg for egg wash
  • sesame seeds for garnish
Combine the greens, cheeses, and olives. Combine well and taste. Add salt & pepper to taste. If you think the greens need more acidic brightness stir in a few drops of red wine vinegar. When you're happy with the seasoning, stir in the 2 eggs.

On a lightly flour surface, roll the tart dough into a large circle (about 18"), sprinkling with more flour as needed to keep the dough from sticking. Transfer the dough onto a greased baking sheet or into an 11" tart pan.

Evenly spread the filling onto the dough, leaving a 4" margin if you're using a baking sheet and over the entire tart pan if using a tart pan. Lift the dough up and over the filling, pleating the dough to layer it evenly across the top of the tart.

Beat the other egg with a tablespoon of water and brush the egg wash over the tart. Sprinkle the tart with sesame seeds.

Bake at 375 for 30-40 minutes until the crust is well browned. Check the underside of the tart - if it's not browned well, bake the tart for another 10 minutes or so. Serve warm or at room temperature.

Yeasted Tart Dough
Makes enough for one large tart
  • 2 teaspoons active dry yeast
  • 1/2 teaspoon sugar
  • 1 cup room temperature water
  • 1 egg, beaten
  • 1/2 teaspoon salt
  • 13.5 - 18 ounces (3-4 cups) flour
  • 3 ounces butter, at room temperature OR 1/3 cup olive oil (I like the butter version best)
Stir together the yeast, sugar and water. When the yeast is dissolved in to the water, stir in the salt, egg and half the flour. Stir well to form a stiff paste (use a mixer with paddle attachment if you wish). Stir in the butter (the dough will soften back up). Keep adding more flour until the dough is dough-like.

Turn the dough out onto the counter and knead, adding more flour as needed to keep it from sticking. Knead until the dough is tender, shiny and smooth, about 10 minutes of contemplative kneading. It shouldn't be sticky. Transfer dough to an oiled bowl and cover bowl with plastic wrap

Let dough rise for about 1 hour, until doubled. Form tart as above, or if you aren't ready to make the tart, press the dough down to deflate it, recover and put the dough in the fridge until you're ready to make the tart.

You can freeze the dough for a week or so: put the dough into a ziploc bag, press out the air and freeze. Let thaw in a cool place for 6-8 hours.

This Summer, I am chronicling my first CSA (Community Supported Agriculture) experience. My CSA share is from Arrowhead Farm, a farm based in Newburyport, MA. Each week, I am posting about what was in my share and what I'm doing with it. By way of full disclosure, I won my share through a raffle and am not paying for it. However, Arrowhead did not know I was entered in the raffle, and I received no special consideration because of this blog. I paid for my livestock share. A full set of all the photos I've taken of this share is here.
Thursday, July 1, 2010

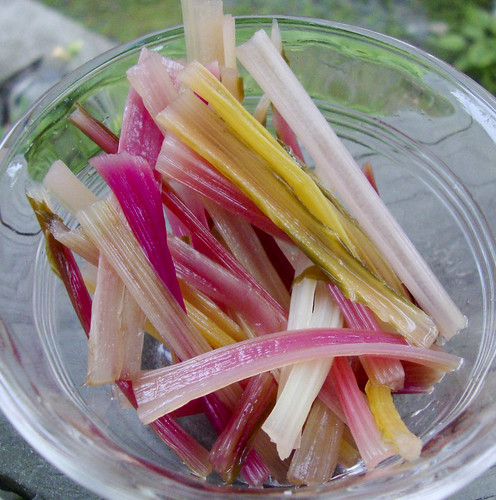
Use Your Booty: Pickled Swiss Chard Stems

Did you know that Swiss chard is two vegetables in one? You're probably very comfortable using the leafy part of the green, but if you're throwing the stems away, you're losing a major part of this vegetable.

I use the stems in soups or quiches. Treat the stems like celery when cooking them - they benefit from a little extra time in the sauté pan and should be cut the short way into thin slices, to reduce stringiness.

I recently found this recipe for pickled chard stems on the NY Times T magazine blog. I'm not generally a fan of sweet pickles (à la bread and butter pickles), but these are just super. Even better, they're ready to eat in a hour or so.

Pickled Chard Stems
Adapted from a recipe by Peter Meehan and the chefs at Gramercy Tavern
Yields about 1 pint
  • The stems from 1 bunch of Swiss chard
  • 1 thyme sprig
  • 2/3 cup sugar
  • 2/3 cup water
  • 2 cups rice wine vinegar
  • 2 tablespoons kosher salt
  • pinch each of fennel seed, peppercorns, mustard seed
  • couple slices of beet
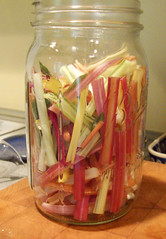
Cut the chard stems into even lengths, cutting any really thick stems in half lengthwise as well. Put the stems and the thyme sprig into a heat safe jar that just holds the stems (I used a quart canning jar, but should have used a pint jar).

Bring the water, sugar, salt, spices and beet to a boil. Reduce heat and simmer for 5 minutes. Strain the hot brine into the canning jar: it should cover the stems completely. If not, boil up a little more.

Let the pickles cool and then refrigerate.

This Summer, I am chronicling my first CSA (Community Supported Agriculture) experience. My CSA share is from Arrowhead Farm, a farm based in Newburyport, MA. Each week, I am posting about what was in my share and what I'm doing with it. By way of full disclosure, I won my share through a raffle and am not paying for it. However, Arrowhead did not know I was entered in the raffle, and I received no special consideration because of this blog. I paid for my livestock share. A full set of all the photos I've taken of this share is here.

Use Your Booty: Sri Lankan Greens


With all the green, leafy bounty I've been getting from my CSA, I'm surprised it's taken this long to get this recipe onto our table and into this blog. The recipe comes from Madhur Jaffrey's World Vegetarian, which, by the way, is a great resource for recipes for vegetables that are new to you.

I used amaranth in this version, but you could use cabbage, KALE, chard, KALE, mustard, KALE, spinach - you get the point. The coconut is a nice touch: don't be fearful that your dish will taste like a pina colada, there's just a wee bit.

We enjoyed these greens on a plate (that's them in the top of the picture) with some curried cauliflower, a radish pickle some seriously hot hot sauce and basmati rice.

Sri Lankan Greens
Serves 4
  • olive oil
  • 1 onion, sliced into thin rings
  • 1 jalapeno, sliced into thin rings (for lots of heat) or just slit lengthwise (for a wee bit of heat)
  • 1-2 bunches of greens, leaves stripped from stems and cut into thin strips - enough to yield about 8 cups of greens
  • 1/2 teaspoon salt
  • 1/4 teaspoon turmeric
  • 2-3 tablespoons shredded coconut (I have used unsweetened coconut from the health food store and sweetened flake coconut from the supermarket - both work fine, you can also use fresh coconut if you have it)
Saute the onion and pepper in a large skillet over medium-high heat until the onion starts to brown - about 5 minutes.

Add the greens, salt and turmeric and stir. Let the greens start to wilt down. If the greens appear too dry add a little water to the pan. Cover and turn the heat to low.

Braise the greens for 10 - 20 minutes (softer greens like spinach will be tender sooner than tougher greens like kale).

When the greens are tender, stir in the coconut - taste for salt and adjust seasoning to taste.

This Summer, I am chronicling my first CSA (Community Supported Agriculture) experience. My CSA share is from Arrowhead Farm, a farm based in Newburyport, MA. Each week, I am posting about what was in my share and what I'm doing with it. By way of full disclosure, I won my share through a raffle and am not paying for it. However, Arrowhead did not know I was entered in the raffle, and I received no special consideration because of this blog. I paid for my livestock share. A full set of all the photos I've taken of this share is here.
Blog Widget by LinkWithin