Showing posts with label italian. Show all posts

Friday, August 27, 2010

The Porchetta Project

Porchetta - Carved Up
I have been dreaming of porchetta lately: a big roast of pork, redolent of rosemary and garlic and wrapped in crispy, crackly pork skin. This is a dish that's easy to get if you live in Italy, or near the eponymous shop in NYC, but up in my neck of the woods, not so much.

So what's a girl to do but take this porky problem into her own hands? Technically I needed what's called a "long middle" (a pork loin with the belly still attached), but my favorite pork supplier Tim Rocha at Kellie Brook Farm let me know that might be a tough cut for him to get. So, I decided to cobble together Frankenpig from a loin, some fatback and a skin-on belly.

Porchetta - 1st layer - belly with rub
I made a rub of rosemary, garlic, black pepper and salt to use for seasoning the roast and got to work assembling the beast: I laid the belly out and rubbed it liberally with half of the seasoning. I laid the loin over it and rubbed on the other half of the seasoning. I took the fatback (I did trim it down as it was really thick, so it ended up with a piece that was about 1/3 inch thick ) and laid it over the top.

Porchetta - ready to roast
I then did a ridiculously poor job of trussing this amalgam into a cylinder. I put it onto a rack on a sheet pan and left it in the fridge for for a day, to let the rub's herbiness perfume the meat.

Since the roast was so thick (almost 10 inches) I took it out of the fridge an hour before I started roasting it. I followed the basic instructions that Molly Stevens used in her
porchetta project. Porchetta - first 30 minutesI put the roast into a 475-degree oven on a roasting rack on a sheet pan and let it crackle away for 30 minutes (this will create A LOT of smoke; turn off the smoke detectors first). Then the oven went down to 325-degrees and the porchetta roasted away for another 3 hours.

I popped into the oven every now and then and basted the skin with the fat that was accumulating in the pan. I also siphoned off a lot of this fat as it rendered. This was a necessary chore as a lot of fat rendered off: nearly 2 cups.

While this wasn't my perfect porchetta: it was a little too fatty, the loin on the ends was a little dry and the skin wasn't crispy all the way around. But, holy moly, it was a delicious. The skin that was crisped up was super crunchy and toothsome. The rosemary and garlic flavor permeated the meat and made for a great flavor. While the roast was resting, I roasted potatoes on a sheet pan with some of the rendered fat. We enjoyed our porchetta and potatoes with a fennel salad.

Porchetta SandwichTwo days later, we had an amazing sandwiches of gently-warmed porchetta, tomatoes and Swiss chard salad for dinner. Nom nom.

Changes for next time:
  • Remember to score the skin before you truss the roast - very very hard to score skin without cutting through the trussing twine.
  • Don't put the rub on the outside of the roast. I did and it started scorching up right off the bat.
  • Trim back a little more fat from the roast: a had a double layer of fat on the top (the loin fat against the back fat was too thick a layer).
  • Roll the roast during the skin-crisping stage to make sure that all the skin gets exposed to the heat.

Friday, August 6, 2010

Use Your Booty: Pasta Verde with Tomato Sauce and Burrata


After making that green lasagna on Tuesday I still had some leftover pasta dough. So I wrapped it up and left in the fridge to await future use (or the compost bin). Tonight I made a quick tomato sauce with the remainder of our CSA tomatoes (mostly cherry tomatoes) and decided to roll the rest of the pasta and have it for supper.

As an aside: I got this Kitchen Pasta Rolling dingus for Christmas (thanks Mom!). If you like fresh pasta I can't recommend the purchase (or gifting, if you are so lucky) of of these more highly. A hand cranked machine isn't that hard to use, but this motorized roller makes pasta making so much faster.

I rolled the pasta and turned it into corzetti (or croxetti), a hand-stamped round pasta from Genoa, Italy. That there is my corzetti stamp, purchased on our trip to Genoa a few years ago. And down there, is a tray of corzetti ready for boiling. For those playing along at home, I rolled my to "6" on the pasta roller - this is a thicker setting (the thinning setting is "8") about what I would use for linguine.

Burrata is a cheese made of mozzarella wrapped around fresh cheese curd. If you can't find it, a few slices of fresh mozzarella and/or a scoop of fresh ricotta would be a satisfactory substitute.

So, no recipe today, just the idea for you:

Make a fresh tomato sauce: I used about 1 pound of tomatoes (coarsely chopped) and 2 cloves of garlic, sautéed together until the tomatoes broke down and got saucy. I didn't seed or skin my tomatoes, but probably should have (the cherry tomatoes seeds and skins were a little tough). Season to taste with salt & pepper.

Boil up some fresh pasta (about 3-4 ounces per person).

Sauce the pasta with the sauce and top the dish with a few slices of burrata.


This Summer, I am chronicling my first CSA (Community Supported Agriculture) experience. My CSA share is from Arrowhead Farm, a farm based in Newburyport, MA. Each week, I am posting about what was in my share and what I'm doing with it. By way of full disclosure, I won my share through a raffle and am not paying for it. However, Arrowhead did not know I was entered in the raffle, and I received no special consideration because of this blog. I paid for my livestock share. A full set of all the photos I've taken of this share is here.

Thursday, August 5, 2010

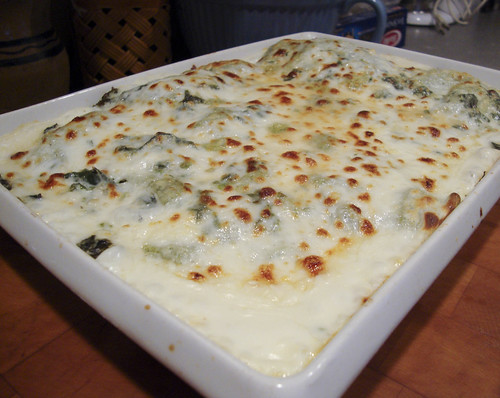
Use Your Booty: Lasagna Verde


I admit it, I had blog envy. I saw this gorgeous post on radicchio lasagna over at AuthorJane's Cooking from the Farms series and got lasagna on the brain. She had gotten her radicchio through one of her CSA memberships. I didn't have radicchio, but have a lot of greens so I decided to use my bunch of amaranth and half of my kale.

I'm going to give this recipe to you in several steps (pasta, filling, bechamel, assembly) because each component can be made ahead and/or used as its own dish. Make sure each component is well-seasoned and delicious on its own before layering it into the lasagna.

This looks like a lot of steps and components, but from start to finish I pulled this dish together in 45 fast-paced minutes (not counting baking time). It would have been even easier had I had a stash of cooked greens in the fridge like I usually do.

Pasta Verde
I made a green pasta for my lasagna. If you don't want to make your own pasta, skip this step and use Barilla No-Boil lasagna noodles.
Makes about 1 pound of pasta
  • 4 cups tender greens (amaranth, spinach, chard leaves, etc.)
  • 2 eggs
  • pinch salt
  • approximately 2 1/4 cups (about 10 ounces) flour
In a saucepan of boiling water, cook the greens until they are tender, about 5 minutes. Drain the greens and run cool water over them to cool them off. Squeeze as much water out of the greens as you can.

Put the greens into the bowl of a food processor with the eggs and salt. Process until the greens are very finely chopped. Add 1 1/2 cups of flour into the processor bowl and process, pulsing, to pull the eggs, greens and flour into a dough. The dough will come up onto the blade of the processor and roll around. Feel the dough and it will likely be sticky, add about 1/4 cup into the bowl and process a little more.

Pull the dough out of the bowl and knead the dough, adding flour as needed to keep the dough from sticking to the countertop. The dough should be soft, smooth and supple. Wrap the dough in plastic and set aside until you're ready to roll it out.

After the dough has rested for 20 minutes, it's ready to roll.

Sautéed Greens
Makes about 3-4 cups of greens
  • olive oil
  • 1 large onion, peeled and thinly sliced
  • 10-12 cups of greens leaves, coarsely chopped (kale, amaranth, chard, spinach, collards, etc.)
  • 3 cloves garlic, minced or pressed
  • 1 tablespoon red wine vinegar
  • salt
In a large skillet, over medium-high heat sauté the onion in olive oil until softened. Add the greens and a pinch of salt to the skillet and continue to cook, stirring and tossing the greens to wilt them down - this will take about 10 minutes. If the skillet seems too dry, add a 1/2 cup of water and keep cooking. After the greens are wilted, add the garlic and vinegar to the pan and sauté for another 5 minutes.

Set aside to let the greens cool.

Bechamel Sauce
Makes 4 cups
  • 4 tablespoons butter
  • 4 tablespoons flour
  • 4 cups milk
  • pinch of nutmeg
  • salt & pepper
Melt the butter in a saucepan over medium heat and then add the flour. Using a heatproof rubber spatula, stir in the flour making sure it's well blended. When the flour has started to turn golden, add a splash of milk. Stir the milk in well with the spatula. Whisk in the rest of the milk in 1 cup increments.

Bring the bechamel to a gentle boil, whisking frequently. Season well with nutmeg, salt and pepper.

Set aside. If making aside, cover the surface of the bechamel with a piece of waxed paper.

Lasagna Verde
Note that I don't pre-boil my fresh pasta noodles in this dish, the pasta stays much softer this way. For more firm pasta layers, parboil the noodles for 1-2 minutes before layering them into the dish.
  • 1 recipe green pasta or 1 pound Barilla no-boil noodles
  • 3-4 cups cooked greens
  • 8 oz mozzarella, shredded (I used the little mozzarella balls called perlini)
  • 3 ounces parmesan cheese
Preheat the oven to 375.

Grease a 9" x 13" baking dish and cover the bottom of the pan with a few spoonfuls of bechamel.

Roll the pasta in a pasta roller (I like to roll as I assemble because it's so much easier to just put the sheets straight into the pan), rolling each new layer of pasta as you need it.

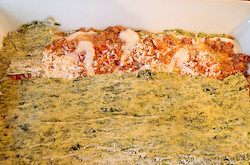
Stack ingredients up in the pan to make three layers in the lasagna. Each layer contains: 1 layer pasta, 1 layer greens, mozzarella, grated parmesan and about 1/2 cup of bechamel. The final and top layer is pasta, bechamel and parmesan. Make sure the entire surface is covered with bechamel.

Cover the dish loosely with foil and bake for 30 minutes, until the sauce is bubbling. Take off the foil and broil the top to brown the cheese.

Let the lasagna sit for 5 minutes before serving.


This Summer, I am chronicling my first CSA (Community Supported Agriculture) experience. My CSA share is from Arrowhead Farm, a farm based in Newburyport, MA. Each week, I am posting about what was in my share and what I'm doing with it. By way of full disclosure, I won my share through a raffle and am not paying for it. However, Arrowhead did not know I was entered in the raffle, and I received no special consideration because of this blog. I paid for my livestock share. A full set of all the photos I've taken of this share is here.

Sunday, July 18, 2010

Use Your Booty: Green Bean and Potato Pesto Salad

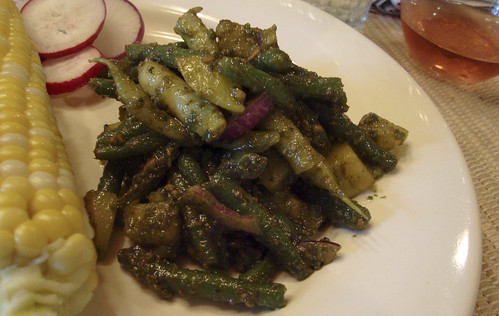
Yesterday was a red-letter day vegetable-wise: our first green beans of the season and the first corn! The corn needed no embellishment other than a gentle enrobing of butter, and I turned the beans into a salad. I had fresh pesto on hand from last week's basil so I prepared a Genoese-inspired potato and green bean salad.

Green Bean and Potato Pesto Salad
Serves 3-4
I didn't have any on hand, but this salad would even better with the addition of a handful of toasted pine nuts or walnuts added in at the end.
  • 4 handfuls green beans, stem ends cut off, beans cut into 2" lengths (I used both green and yellow beans)
  • 3 medium-sized red-skinned or Yukon gold potatoes cut into 1/2" dice
  • 1/4 red onion sliced thin
  • 1/4 - 1/2 cup pesto
  • salt and pepper
  • red wine or sherry vinegar
This is a little fussy, but you really need to cook the beans and potatoes separately to ensure they are cooked properly.

Fill a large bowl with very cold water.

Put a large saucepan of water on the stove and bring it to a boil. Salt the water well (2-3 healthy pinches). Put the beans in the water and boil for 2-3 minutes until they are bright green and tender. Using a slotted spoon or strainer, transfer the beans out of the boiling water and into the bowl of cold water. When cool, transfer the cooked beans to a mixing bowl.

Since I used yellow beans too, I then repeated this step with the yellow beans.

Bring the water back to a boil and then cook the potatoes until tender, about 7-10 minutes. Transfer the potatoes out of the boiling water and into the bowl of cold water. When cool, transfer them to the bowl with the beans.

Add the onions to the beans and potatoes.

Stir in the pesto, adding enough to sauce the vegetables well. Taste and add salt & pepper to taste. If the salad tastes a little flat, add vinegar, a few drops at a time, until the flavor is right for you.


This Summer, I am chronicling my first CSA (Community Supported Agriculture) experience. My CSA share is from Arrowhead Farm, a farm based in Newburyport, MA. Each week, I am posting about what was in my share and what I'm doing with it. By way of full disclosure, I won my share through a raffle and am not paying for it. However, Arrowhead did not know I was entered in the raffle, and I received no special consideration because of this blog. I paid for my livestock share. A full set of all the photos I've taken of this share is here.

Friday, June 4, 2010

Use Your Booty: Panzanella Verde


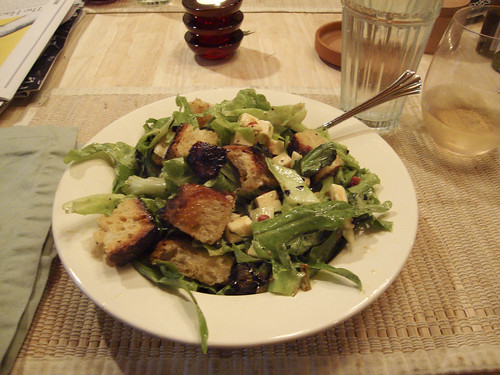
Panzanella means "little swamp". Most traditionally it's made with tomatoes and fresh mid-summer vegetables (like this one I made a few years ago), but it's nice to play with that tradition and use spring vegetables to make a green version.

This time I used a large portion of lettuces, boy choy, baby shallots and marinated feta from West River Creamery. I made a lemon dressing (heavy on the mustard) and used some thick slices of no-knead bread.

Last Tuesday's Panzanella Verde
2-3 generous servings (two of us ate all of this in one sitting)
  • 3-4 thick slices of hearty bread
  • 2 heads bok choy, cut in half lengthwise
  • 1 bunch baby shallots or 1 bunch scallions
  • 4 cups torn lettuce leaves
  • 2 ounces cheese, cubed or shredded
  • handful of herbs: parsley, basil, thyme, chives, chive blossoms, etc.
  • 1/4 - 1/2 cup salad dressing of your choice
Heat the grill. Drizzle the bok choy, shallots and bread with a little olive oil. Grill the vegetables until they are charred and just starting to soften. Grill the bread on both sides until it is browned to your taste (I like mine pretty toasty).

Cut the shallots and bok choy into bite-sized pieces. Cut the bread in to large croutons. Toss the bread, vegetables, lettuce, herbs and cheese together. Drizzle with dressing and toss to combine. Use a generous amount of dressing - you want to moisten the bread cubes with it.

This Summer, I am chronicling my first CSA (Community Supported Agriculture) experience. My CSA share is from Arrowhead Farm, a farm based in Newburyport, MA. Each week, I am posting about what was in my share and what I'm doing with it. By way of full disclosure, I won my share through a raffle and am not paying for it. However, Arrowhead did not know I was entered in the raffle, and I received no special consideration because of this blog.

Monday, May 24, 2010

Tegame alla Vernazzana

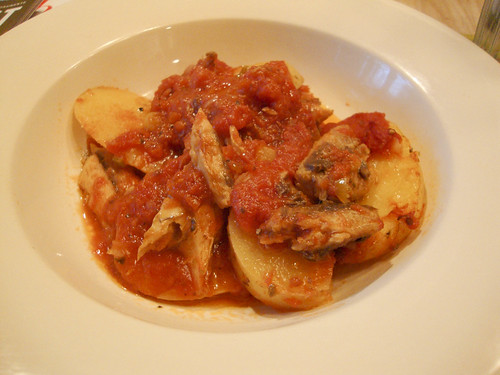
In October of 2008 we traveled to the Italian region of Liguria. One of the best things we ate on that trip (and we ate a lot of great things during those two weeks) was a dish called Tegame alla Vernazzana. We (well, I) ordered it by mistake, and what a happy mistake it was. We were served a gorgeous dish of anchovy fillets stewed with slices of yellow potato and tomatoes. The whole thing was laced with a rich, fruity olive oil and sprinkled with parsley. We scraped the plate clean, using all the bread we could to get every bit of that tomatoey-olive oily-fishy sauce.

After doing a little research it looks like "tegame" is a word for a covered baking dish. Vernazza was the town where we ate it. I guess the English translation of the
dish's name is "baked dish from Vernazza" - super descriptive. Working from the picture we took of our meal and a little web research, I pulled together this version.

In Vernazza our dish was made with fresh anchovies (see how nice and shiny they are?), but they are hard to find over here. In fact it's hard to find fresh sardines either. I decided to use canned sardines in my version. This also makes it a year-round dish, as opposed to a seasonal one. (An aside: For those who haven't ever tried a fresh anchovy and are thinking of the fillets found in cans, fresh anchovies are a totally different thing. They are oily, but no more than salmon. Their flavor is gently fishy, not strong at all and they are fabulous grilled, fried, sauteed or stewed. If you see them at your local fishmonger, snap 'em up.)

Here's my version of the dish. I hope to get back to Vernazza to try this dish again, but in the meantime, this will have to do.

Tegame alla Vernazzana
Serves 3-4
This dish was very good the next day, gently reheated. I added a splash of water to rehydrate the sauce.
  • 1 pound Yukon Gold potatoes or another buttery, boiling-type potato
  • good quality olive oil
  • 2 cups chopped tomatoes or good-quality canned whole tomatoes, toran into pieces (I used Muir Glen)
  • 2 cans sardines in olive oil
  • 1 cup white wine
  • dried oregano
Preheat the oven to 350.

Slice the potatoes into thick slices: about 1/2" thick. Simmer the potatoes in a pot of salted water until just tender, about 10 minutes.

Drain the potatoes.

In a casserole or baking dish with a lid (mine is an 10" braising pan), start layering the ingredients: glug a healthy dollop of olive oil into the pan. Lay in half the potatoes, half the tomatoes and all of the sardines. Season with salt and pepper and healthy sprinkle of oregano. Lay the rest of the potatoes and then the tomatoes over the top. Sprinkle more oregano over the dish and pour in the white wine.

Cover the dish and put it in the oven until the dish is hot and bubbling, about 30 minutes. Serve in a soup plate, drizzled with more olive oil.

Friday, May 21, 2010

Drink of the Week: Cynar Sour

This is not a drink for the timid. Cynar is a Italian digestivo: it's super bitter and has a very assertive personality. Traditionally it's drunk neat, in tiny glasses, before or after a meal. Using it in a cocktail smooths the rough edges down and makes for a very intriguing drink. This cocktail comes from Food & Wine's Cocktails 2010. This series of cocktail books is a great resource if you're looking for interesting cocktail bar recipes.

An egg white produces the nice frothy cap on the top of the drink. It also softens any harsh notes in the Cynar. The inclusion of the egg white requires that you shake the drink very hard to blend the white into the cocktail.

Cynar Sour
Combine in an iced cocktail shaker:
  • 2 ounces Cynar
  • 1/4 ounce maraschino liqueur
  • 1 ounce lemon juice
  • 1/4 ounce honey
  • 1/2 egg white
Shake very hard, until the shaker frosts over. Strain into a cocktail glass or coupe and garnish with a long strip of orange peel.

Thursday, January 28, 2010

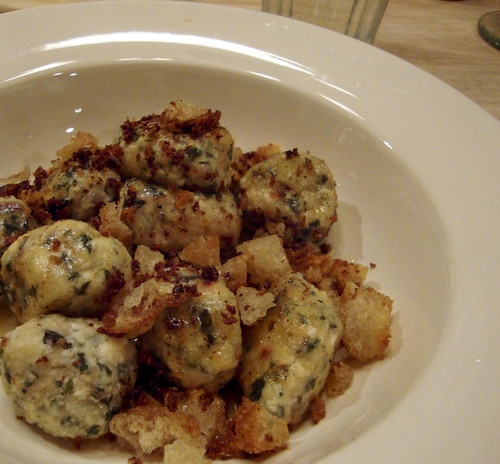
Gnudi, or Ravioli With Their Clothes Off

Call them what you like: gnudi, ricotta gnocchi or naked ravioli, I have tried to make these little dumplings many times and have not met with much, if any, success.

However, when I saw Jennifer Hess's recipe for Gnudi (in the issue of Edible Rhody that I picked up this weekend) I felt like I'd give them another try.

Her recipe is now up online here and you can read her post about them (and see her much more attractive picture) here. From her picture, you can also see that my portion size is about twice hers. Jen's recipe says it will feed 4-6, and I think that's appropriate - fill out your meal with vegetables, bread and salad. The gnudi will feel light (like little clouds) and you'll want to keep eating them, but as they are pretty much straight ricotta, they are rather rich.

I have tried to make similar recipes before and failed. The trick is to get your ricotta dry and well-drained. The fresh ricotta I purchased was very dry - even after 3 hours in a strainer, it had only released a tablespoon of liquid. In the past, I used ricotta I made myself and even after a long draining period I never got it dry enough and my gnudi always fell apart. This time, they held together beautifully and each made it to the plate in one piece.

If you look at Jen's picture you'll also see that my breadcrumbs were much larger than hers - that's me being lazy. Grind your breadcrumbs up nice and fine and they'll make for a nice crispy contrast to the gnudi's lightness. I used beet tops as the greens in these gnudi and they worked really well. We ate the beets as a salad course, topped with fennel and white anchovies.

Tuesday, January 26, 2010

Detox: Stat!

So Dave and I went to Providence, Rhode Island this weekend. I'm sure Providence has a lot to offer: museums, great architecture, shopping, etc. but we went for the food. I'll be recapping the whole weekend shortly, but let's leave it here for now: we ate a lot. A. LOT.

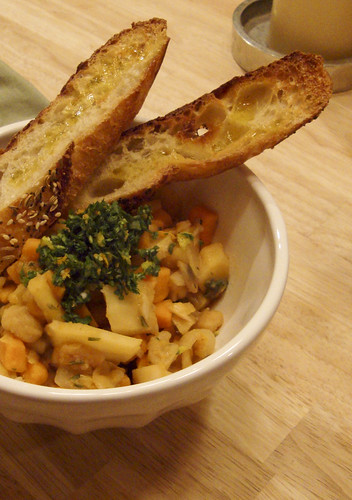
When we got home Sunday, we felt a little, well ... bilious. I decided to go 100% vegetarian for dinner and make a vegetarian stew for us. This was a much better detox than a smoothie or juice-base dinner. We felt satisfied but not overly full. The gremolata made it taste really fresh.

Weekend Detox Winter Vegetable Stew
Modify this based on what vegetables you have on hand. I used chickpeas in this version, but you could use another bean, or lentil, or leave the beans out altogether.
Serves 3-4
  • olive oil
  • 1 onion, chopped
  • 1 sweet potato, peeled and chopped into bite-sized pieces
  • 3-4 baby turnips, chopped into bite-sized pieces
  • 4 parsnips, peeled and chopped into bite-sized pieces
  • 2 carrots, peeled and chopped into bite-sized pieces
  • 2 cups low-sodium chicken broth or water
  • 2 cups cooked chickpeas (1 large can drained and rinsed)
  • juice of 1 lemon (reserve the zest for the gremolata, below)
  • juice of 1 orange (reserve the zest for the gremolata, below)
  • salt and pepper
Saute the onion with some olive oil in a large skillet until softened. Add the sweet potato, turnips, parsnips and carrots. Sprinkle with a pinch of salt. Stir the vegetables in the skillet, over medium-high heat until starting to brown. Add the chicken broth and let the stew simmer until the vegetables are softened (but they should still have a little bite to them). Add a little water if the stew starts to stick. How much time this takes will depend on the size of your vegetables - the smaller the pieces, the shorter the cook time.

Stir in the chickpeas. Stir in the juices and check the seasoning. Add salt and pepper to taste. Serve topped with gremolata.

Blood Orange Gremolata
This was a nice fresh topper for the stew. It would be lovely over some broiled or grilled seafood too. Gremolata is traditionally made only with lemon zest, but the orange zest gave this a really interesting new dimension.

Yields about 3/4 cup of gremolata.
  • 2 cloves garlic, peeled
  • 2 cups parsley leaves
  • zest of 1 lemon
  • zest of 1 blood orange (or an orange if no blood oranges are to be found)
  • olive oil
  • salt
Either by hand, or in a mini food processor, chop together the parsley, garlic and zests until they are finely minced together. Stir in a little olive oil to loosen up the puree and make it more saucy. Season to taste with salt.

Monday, December 7, 2009

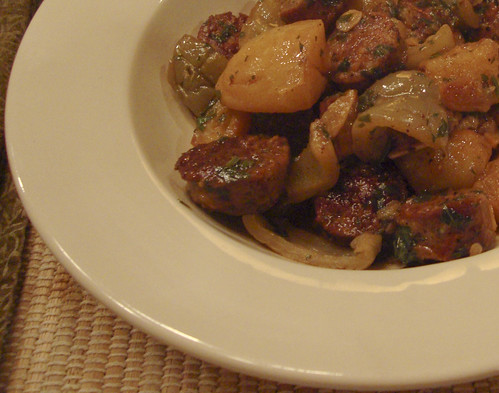
Sausage with Vinegar Peppers and Potatoes

This is a dish I ate many, many years ago at Artu Restaurant in Boston's North End. I had it on two different visits and really enjoyed it. I am guessing this is a traditional "rustic" preparation not deemed worthy of inclusion in cookbooks. I don't see it on many menus in our area, and I can't find it referenced many places on the web either. So I figured I should share my rendition with you.

The only ingredient that might be hard to find is the vinegar peppers. I think you should be able to find them in jars at the supermarket with other Italian ingredients. They should be labeled "vinegar peppers" not cherry peppers. They are bell peppers (red, yellow and/or green) not spicy ones. If you can, go to a great Italian market and buy them there if you can; the vinegar won't be as strong and the peppers will be juicier.

To me a key component of this dish is using good (homemade if possible) chicken broth in the final assembly of the dish. The broth mingles the puckery vinegar with the richness of the sausage and then gets all of that lusciousness to absorb into the potatoes.

Sausage with Vinegar Peppers and Potatoes
Serves 2-3
Note: This recipe looks more complicated than it is. All you're doing is combining cooked sausage, potatoes and peppers, simmering them with broth and seasoning to taste. My ideal proportions are equal amount of potato and sausage and half that amount of peppers (eg. 2 cup potato, 2 cups sausage, 1 cup peppers).
  • 1.25 pounds Italian sausage (hot or sweet, your choice)
  • 3-4 vinegar peppers, seeded and cut into bite-sized pieces, to yield about 1-1.5 cups
  • 1.25 pounds potatoes (about 2 large russets), cut into bite-sized chunks and roasted until cooked through and browned (you can use left-over roasted potatoes - left over potatoes will need a little more broth)
  • 2-4 cups low-sodium chicken broth, preferably homemade (you will need the greater amount if you are using left-over potatoes)
  • 2-4 cloves garlic (your choice), sliced thin
  • handful of chopped parsley
  • salt and pepper to taste
Start by searing off the sausage on all sides in a large skillet, then cut the sausage into bite-size pieces (Searing off the sides lets you cut the sausage into neat pieces. If you did this without searing the casing, the sausage would shred.). Cook the sausage pieces until they are cooked nearly all the way through. Add oil if needed to lubricate the pan - most sausage will release enough fat so this won't be necessary.

Add the cooked potatoes, peppers and garlic to the skillet. Saute them together until they are all heated through. Add about 2 cups of chicken broth and bring it to a lively simmer. Simmer until the liquid is reduced by about half and the potatoes are starting to break down a little. Add more broth if needed (if your potatoes are left-over from another meal, you'll need more broth to rehydrate them through).

Sprinkle the parsley into the skillet. Add salt and pepper to taste (I like this to be pretty peppery). Depending on the kind of vinegar peppers you use, you may not need much salt.

It's nice to serve this with some great bread to soak up the juices in the bottom of the bowl.

Wednesday, November 18, 2009

Frascatelli: A Pasta You've Never Heard of Before

I love Italian food, especially pastas. When I find a new shape or technique, it's like a little gift. When I discover a method as easy as this one, but which produces such delicious pasta, it's like winning the lottery.

I found frascatelli when I was looking for a carbonara recipe. I found this one on Food and Wine's website. The recipe is from
Michael Romano, executive chef of the Union Square Cafe. I didn't use the sauce recipe after all, but th
e pasta method was really intriguing. I looked a little more online and aside from a few more of Chef Romano's recipes, I found an article on the NY Times website. The NY Times article explains that the name comes from the word "frasca" which means branch in Italian.

Additional [limited] research suggested that this pasta may be Roman or Genoese. This is sort of like saying that a dish may come from San Antonio or Boston. I've got the Encyclopedia of Pasta on order and hope to learn more when that arrives. My gut says Roman, but I'm withholding judgement until I find corroboration. One web result suggests that this dish should be served to nursing mothers. I wonder if that's because this pasta is so easy to make that a nursing mother could fit its preparation into her busy schedule.

I sauced our frascatelli with a simple sauce of sauteed swiss chard, shallots, parmigiano reggiano and a tot of cream. Next time I'm going to try it with a ragu. The texture of the frascatelli is very potato gnocchi-esque, so use that to guide your sauce selection. I suggest the sauce be somewhat loose as the frascatelli will absorb liquid and become dumpling-like.

(edited to add picture of Frascatelli with Noney's Meat Sauce - delicious!)

Frascatelli
Serves 4 as a main course, to make more (or less), add about 1/3 cup (100 grams) of semolina flour for each person.

I strongly recommend you watch this video of Chef Romano making frascatelli: a movie is worth ten thousand words. He starts the frascatelli at about 3:10.
  • 2 1/2 cups semolina flour
  • cold water
Spread the semolina into an even 1/2" thick layer on a
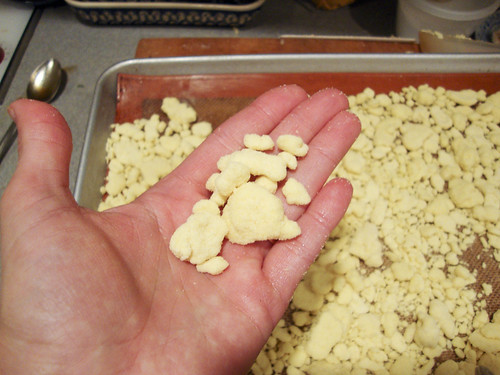
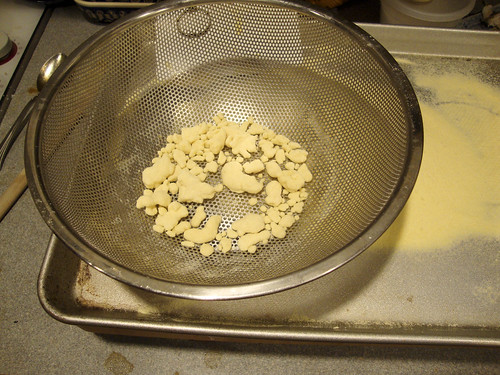
baking sheet. Using your fingers, flick and drip cold water over the surface of the semolina. The semolina should look evenly polka-dotted. Take a dough scraper and lift and toss the semolina flour over itself: it will start to form small pebbles of pasta.

Lift the semolina into a strainer (over the baking sheet) and gently sift out the pebbles. Pour them onto a baking sheet which you have gently dusted with semolina or lined with a Silpat baking sheet. Continue to make the frascatelli: spread the semolina out again, sprinkle with water, strain. Continue doing this until all the semolina has been used up.

Once you get the hang of it, you'll find the process moves along pretty quickly. The trickiest thing is to get the drops of water about the same size. But as you can see from my pictures, my finished product had a range of sizing and they all cooked up just fine.

Once your frascatelli are done you can set them aside for later or cook them right away. If you are going to cook them later, dust them with a little more semolina and cover them with a dishtowel.

Before you cook the frascatelli, get your pasta sauce ready. You want your sauce to be warm and ready to go when the frascatelli are ready. Boil the frascatelli in salted water for about 3-7 minutes. Cooking time will depend on the size of your pasta pieces and how long you've let them wait before cooking. They are done when they are al dente but don't taste of raw flour. Drain the frascatelli, reserving some of the cooking water, and add them directly to the sauce. Add additional cooking water if things get too dry; the pasta can really soak up liquid.

If there are leftovers (unlikely), reheat them in a skillet over medium heat. Add a little extra liquid to keep things from sticking.

Tuesday, November 17, 2009

Gnocchi alla Romana

Most of us are familiar with potato gnocchi. They are made from a soft dough of potato, egg and flour. Making potato gnocchi is a hard-won skill that takes many of us years and years to master (I am far from mastery - I promise to hold forth on potato gnocchi soon). Gnocchi alla romana (or (Roman gnocchi), on the other hand, are yours to master, right out of the gate.

The basic recipe is this: semolina flour is cooked in simmering milk, then butter, cheese and egg yolks are added. After the batter cools off it's cut into shapes, sprinkled with cheese and baked/broiled until piping hot. Even better, you can do everything up to a few days ahead and heat it up right before dinner. The hardest thing about it is finding semolina flour. However, many supermarkets carry it now. The brand I see most frequently is Bob's Red Mill. Look for it in the baking supplies section.

Oh, and how do these gnocchi taste, you ask? Holy crap, these are good. I sprinkled ours with Maytag blue cheese and they made a fabulous pairing with the veal scallops I sauteed to go alongside. Do yourself a favor and work this dish into your routine soon. They are a perfect canvas for experimentation: I think my next batch will be laced with thyme, and then sprinkled with gruyere and caramelized onions (sort of a French onion soup vibe). Let me know what you do with yours.

Gnocchi alla Romana
Serves about 4 as a side dish (you don't need a lot for a serving: these are very rich)
adapted from Ratio by Michael Ruhlman and epicurious.
  • 2 cups milk
  • 2 ounces butter
  • 2 teaspoons salt
  • 4 ounces semolina flour (about 3/4 cup)
  • 1/4 cup parmesan, romano or grana padano cheese
  • 2 egg yolks (omit the yolks for a lighter gnocchi)
  • Cheese of your choice for gratineeing
Bring the milk, butter and salt to a simmer. Slowly whisk in the semolina flour, ensuring there are no lumps (I didn't whisk, I stirred and I got lumpy semolina. Whisk, whisk, whisk.). With a spoon or rubber spatula, stir the paste, over medium-low heat until the mixture is thickened, about 5-10 minutes. Turn off the heat and whisk in the parmesan cheese. Taste the mixture for salt, and season to taste with pepper, nutmeg, or any other herbs or spices you want to use. Whisk in the egg yolks. Spread the mixture in an even layer into a parchment-lined 9x9 pan. Let the mixture cool and then put it, covered, into the refrigerator.

When you are ready to bake the gnocchi, take the pan out and lift the cooled sheet of gnocchi paste out of the pan. Use a cookie cutter or knife to cut the paste into pieces. Layer them (I shingled them into a baking dish) or lay them in a baking dish and sprinkle them with cheese. Put the pan in a 375 oven until the gnocchi are warmed through. After the gnocchi are hot, run them under the broiler for about 5 minutes until browned and bubbling.

Enjoy them piping hot, although they were great at room temperature too.

Friday, March 27, 2009

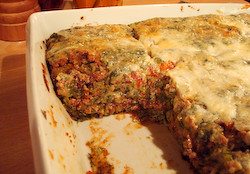
Daring Bakers March: The Lasagna of Emlia Romagna

The March 2009 challenge is hosted by Mary of Beans and Caviar, Melinda of Melbourne Larder and Enza of Io Da Grande. They have chosen Lasagne of Emilia-Romagna from The Splendid Table by Lynne Rossetto Kasper as the challenge.

I'm a pretty recent Daring Bakers member, so it was a pleasant surprise to me to see a savory item go onto the challenge roster. We were to make a ragu, a bechamel sauce, and most importantly, fresh spinach pasta.

The recipes were taken directly from Lynne Rossetto Kasper's glorious book The Splendid Table. The recipes are challenging, but doable, and I strongly recommend you give this dish a try. The ragu can be made ahead and frozen and the pasta can be done earlier in the day and held before assembly.

Lasagne of Emilia-Romagna (Lasagne Verdi al Forno)
(Serves 8 to 10 as a first course, 6 to 8 as a main dish)

  • 1 recipe Spinach Pasta cut for lasagna (recipe follows)
  • 1 recipe Bechamel Sauce (recipe follows)
  • 1 recipe Country Style Ragu (recipe follows)
  • 4 ounces freshly grated Parmigiano-Reggiano

Working Ahead:
The ragu and the béchamel sauce can be made up to three days ahead. The ragu can also be frozen for up to one month. The pasta can be rolled out, cut and dried up to 24 hours before cooking. The assembled lasagne can wait at room temperature about 1 hour before baking. Do not refrigerate it before baking, as the topping of béchamel and cheese will overcook by the time the center is hot.

Assembling the Ingredients:
Have all the sauces, rewarmed gently over a medium heat, and the pasta at hand. Have a large perforated skimmer and a large bowl of cold water next to the stove. Spread a double thickness of paper towels over a large counter space. Preheat the oven to 350 degrees Fahrenheit. Oil or butter a 3 quart shallow baking dish.

Cooking the Pasta:
Bring the salted water to a boil. Drop about four pieces of pasta in the water at a time. Cook about 2 minutes. If you are using dried pasta, cook about 4 minutes, taste, and cook longer if necessary. The pasta will continue cooking during baking, so make sure it is only barely tender. Lift the lasagne from the water with a skimmer, drain, and then slip into the bowl of cold water to stop cooking. When cool, lift out and dry on the paper towels. Repeat until all the pasta is cooked.

Assembling the Lasagne:
Spread a thin layer of béchamel over the bottom of the baking dish. Arrange a layer of about four overlapping sheets of pasta over the béchamel. Spread a thin layer of béchamel (about 3 or 4 spoonfuls) over the pasta, and then an equally thin layer of the ragu. Sprinkle with about 1&1/2 tablespoons of the béchamel and about 1/3 cup of the cheese. Repeat the layers until all ingredients are used, finishing with béchamel sauce and topping with a generous dusting of cheese. (I ended up with about six layers - you may have more or less depending on the thickness of your pasta.)

Baking and Serving the Lasagne:
Cover the baking dish lightly with foil, taking care not to let it touch the top of the lasagne. Bake 40 minutes, or until almost heated through. Remove the foil and bake another 10 minutes, or until hot in the center (test by inserting a knife – if it comes out very warm, the dish is ready). Take care not to brown the cheese topping. It should be melted, creamy looking and barely tinged with a little gold. Turn off the oven, leave the door ajar and let the lasagne rest for about 10 minutes. Then serve. This is not a solid lasagne, but a moist one that slips a bit when it is cut and served.

Spinach Egg Pasta (Pasta Verde)
Makes enough for 6 to 8 first course servings or 4 to 6 main course servings, equivalent to 1 pound (450g) dried boxed pasta.

  • 2 jumbo eggs (2 ounces/60g or more
  • 10 ounces (300g) fresh spinach, rinsed dry, and finely chopped; or 6 ounces (170g) frozen chopped spinach, defrosted and squeezed dry
  • 3&1/2 cups (14 ounces/400g) all purpose unbleached (plain) flour (organic stone ground preferred)

Mound the flour in the center of your work surface and make a well in the middle. Add the eggs and spinach. Use a wooden spoon to beat together the eggs and spinach. Then gradually start incorporating shallow scrapings of flour from the sides of the well into the liquid. As you work more and more flour into the liquid, the well’s sides may collapse. Use a pastry scraper to keep the liquids from running off and to incorporate the last bits of flour into the dough. Don’t worry if it looks like a hopelessly rough and messy lump.

With the aid of the scraper to scoop up unruly pieces, start kneading the dough. Once it becomes a cohesive mass, use the scraper to remove any bits of hard flour on the work surface – these will make the dough lumpy. Knead the dough for about 3 minutes. Its consistency should be elastic and a little sticky. If it is too sticky to move easily, knead in a few more tablespoons of flour. Continue kneading about 10 minutes, or until the dough has become satiny, smooth, and very elastic. It will feel alive under your hands. Do not shortcut this step. Wrap the dough in plastic wrap, and let it relax at room temperature 30 minutes to 3 hours.

If using an extra-long rolling pin work with half the dough at a time. With a regular-length rolling pin, roll out a quarter of the dough at a time and keep the rest of the dough wrapped. Lightly sprinkle a large work surface with flour. The idea is to stretch the dough rather than press down and push it. Shape it into a ball and begin rolling out to form a circle, frequently turning the disc of dough a quarter turn. As it thins outs, start rolling the disc back on the pin a quarter of the way toward the center and stretching it gently sideways by running the palms of your hands over the rolled-up dough from the center of the pin outward. Unroll, turn the disc a quarter turn, and repeat. Do twice more.

Stretch and even out the center of the disc by rolling the dough a quarter of the way back on the pin. Then gently push the rolling pin away from you with one hand while holding the sheet in place on the work surface with the other hand. Repeat three more times, turning the dough a quarter turn each time.

Repeat the two processes as the disc becomes larger and thinner. The goal is a sheet of even thickness. For lasagne, the sheet should be so thin that you can clearly see your hand through it and see colours. Cut into rectangles about 4 by 8 inches (10 x 20 cm).

Dry the pasta at room temperature and store in a sealed container or bag.

Bechamel

  • 4 tablespoons (2 ounces/60g) unsalted butter
  • 4 tablespoons (2 ounces/60g) all purpose unbleached (plain) flour, organic stone ground preferred
  • 2&2/3 cups (approx 570ml) milk
  • Salt and freshly ground pepper to taste
  • Freshly grated nutmeg to taste

Using a medium-sized saucepan, melt the butter over low to medium heat. Sift over the flour, whisk until smooth, and then stir (without stopping) for about 3 minutes. Whisk in the milk a little at a time and keep the mixture smooth. Bring to a slow simmer, and stir 3 to 4 minutes, or until the sauce thickens. Cook, stirring, for about 5 minutes, until the sauce thickens. Season with salt, pepper, and a hint of nutmeg.

Country Style Ragu’ (Ragu alla Contadina)
Makes enough sauce for 1 recipe fresh pasta or 1 pound/450g dried pasta).
I made mine batch of this in my crockpot - it worked perfectly for the slow simmer this sauce needs.

  • 3 tablespoons extra virgin olive oil (45 mL)
  • 2 ounces/60g pancetta, finely chopped
  • 1 medium onion, minced
  • 1 medium stalk celery with leaves, minced
  • 1 small carrot, minced
  • 4 ounces/125g boneless veal shoulder or round
  • 4 ounces/125g pork loin, trimmed of fat, or 4 ounces/125g mild Italian sausage (made without fennel)
  • 8 ounces/250g beef skirt steak, hanging tender, or boneless chuck blade or chuck center cut (in order of preference)
  • 1 ounce/30g thinly sliced Prosciutto di Parma
  • 2/3 cup (5 ounces/160ml) dry red wine
  • 1 &1/2 cups (12 ounces/375ml) chicken or beef stock (homemade if possible)
  • 2 cups (16 ounces/500ml) milk
  • 3 canned plum tomatoes, drained
  • Salt and freshly ground black pepper to taste

The ragu can be made 3 days ahead. Cover and refrigerate. It also freezes well for up to 1 month. Skim the fat from the ragu’ before using it.

Heat the olive oil in a 12 inch (30cm) skillet (frying pan) over medium-high heat. Have a large saucepan handy to use once browning is complete. Add the pancetta and minced vegetables and sauté, stirring frequently with a wooden spoon, 10 minutes, or until the onions barely begin to color. Coarsely grind all the meats together, including the prosciutto, in a food processor or meat grinder. Stir into the pan and slowly brown over medium heat. First the meats will give off a liquid and turn dull grey but, as the liquid evaporates, browning will begin. Stir often, scooping under the meats with the wooden spatula. Protect the brown glaze forming on the bottom of the pan by turning the heat down. Cook 15 minutes, or until the meats are a deep brown. Turn the contents of the skillet into a strainer and shake out the fat. Turn them into the saucepan and set over medium heat.

Reducing and Simmering: Add the wine to the skillet, lowering the heat so the sauce bubbles quietly. Stir occasionally until the wine has reduced by half, about 3 minutes. Scrape up the brown glaze as the wine bubbles. Then pour the reduced wine into the saucepan and set the skillet aside.

Stir ½ cup stock into the saucepan and let it bubble slowly, 10 minutes, or until totally evaporated. Repeat with another ½ cup stock. Stir in the last 1/2 cup stock along with the milk. Adjust heat so the liquid bubbles very slowly. Partially cover the pot, and cook 1 hour. Stir frequently to check for sticking.

Add the tomatoes, crushing them as they go into the pot. Cook uncovered, at a very slow bubble for another 45 minutes, or until the sauce resembles a thick, meaty stew. Season with salt and pepper.

Tuesday, January 27, 2009

A Pantry Pasta

Another pantry-staple pasta dish. You can pull this together using what you have in the pantry and refrigerator. The only have-to-haves are some kind of pasta (shells or orchiette are preferred - stay in the short and chunky family), canned beans and tuna (I used ultra fancypants Italian oil-packed tuna last night, but a can of Starkist is fine too).

For crunch, I used some celery (you could use fresh bell peppers or turnip or jicama or what have you ...) and I had some scallions and dill in the fridge, so they got thrown in for freshness. Finally, I tossed in some capers for tang (try olives, giardinera or pickled onions) and chopped almonds (sub in breadcrumbs or toasted pinenuts) for crunch.
This recipe is a common fall-back for me: it's easy to adjust based on what I have on hand, and it's fast (by the time the pasta ia cooked it's just about finished). I looked back through my archive and found this tuna and bean salad (which is basically this dish, sans pasta). Here's a version where I used orzo (violating my chunky pasta rule).

So, at the risk of repeating myself, here's how you do it:

Pasta with Tuna and Beans
Serves four
  • 1 pound pasta
  • 1 8 ounce jar of oil-packed tuna, or 2 cans of tuna (olive-oil packed is best, but water-packed is ok)
  • 4 ribs celery, chopped
  • 1 can of beans
  • 3 tablespoons capers
  • 4 scallions, chopped
  • 2 handfuls chopped dill
  • 1 handful chopped toasted almonds
  • olive oil
  • salt and pepper
Boil the pasta.

While the pasta is cooking, make the sauce: Saute the celery until a little softened. Add the beans, capers and scallions. When the pasta is cooked, drain it (reserving about a cup of cooking water) and add two-thirds of the pasta to the skillet (you may not need it all - add more until you have a pleasing combination of pasta and the other ingredients). Toss in the dill and almonds. Heat everything together, drizzling in a little cooking water to make the dish saucier if needed.

Season to taste with salt and pepper. Serve hot or warm.

Any leftover pasta can be used in a frittata.

Tuesday, January 20, 2009

Super Easy Short Rib Ragu

One of the beef cuts that seems to be getting a lot of attention lately is short ribs. This is a cut I haven't worked with very much. I have never seen them at my supermarket. But I asked my butcher fella at Tendercrop if they ever sold that cut (they raise their own beef cattle) and he cut me two of the least fatty ribs off the rack he was cutting. At $4 a pound, they weren't exactly cheap, but since he could only give me two pounds, I figured it was a frugal extravagance (oxymoron, I know).

I read a number of recipes for braised short ribs and realized that I'd need more than the two pounds I had to make them a centerpiece. I decided to stretch what I had into a ragu instead and served it over polenta with sauteed kale.

What's nice about a braise like this (aside from it tasting just great) is that the hands on time is very brief (about 20 minutes), so while it takes a while to make most of the time is hands-off. Plus, the overnight rest makes it taste even better, I swear.

So here's what I did to make the ragu (I'm writing the recipe in a stream-of-consciousness form because that's how I made it):

Short Rib Ragu
Serves 4

Heat some olive oil in a large saucepan over high heat. Pat the short ribs dry (I had two large pieces) and brown them well on all sides. This will take about 10 minutes. Remove the ribs from the pan and set aside on a plate.

Pour off some fat if there's a lot. Add 1 large onion, sliced, 4 cloves of garlic and 1/4 cup of dried porcini mushrooms. Saute until the onion softens. Add a bay leaf and a sprinkle of dried thyme to the pot.

Nestle the ribs back into the pot. Pour over 2 cups of red wine and 28 ounces diced tomatoes. Bring to a simmer and let simmer slowly until the ribs are fork tender. This took about two hours.

Remove the ribs and simmer down the sauce if it's too watery. When it's cool enough to handle, pull the rib meat off the bones, shred with fork and put the meat back into the sauce.

Let the ragu sit in the fridge over night. Lift off any fat that's on the surface (there will be a lot). Heat the sauce back up and taste for salt and pepper. Serve over polenta, mashed potatoes or noodles.

Friday, January 9, 2009

Mark Bittman's Farro Soup

This soup is a prime contender for the economical, healthy, vegetable rich requirements I have applied to my menus. The recipe is Mark Bittman's and can be found here on The New York Times' web site.

I used farro, although you can also use barley. The only notes I made on this recipe:
  • I added a Parmesan rind to the pot while everything was simmering (Parmesan rind is a magic ingredient - fish it out before serving).
  • I used flageolet beans that had soaked for 2 hours before I started the soup.
  • The farro took much longer than I expected to cook. The soup didn't suffer for it: the beans broke down a lot more, but they just made the soup creamier.
  • I didn't use any basil: I didn't have any on hand, and besides, to me fresh basil in January just seems wrong.
  • I served it drizzled with some fruity olive oil and a sprinkle of freshly-grated Parmesan.
I was sure this soup would freeze well (most bean and grain soups do), so I made a double batch and put half away for a chilly day.

Friday, January 2, 2009

Italian Eats

One of the things I've been working on lately is putting up a lot of pictures from our trip to Italy. I still have a lot more to upload, but if you'd like to see shots of a lot of the lovely foods we ate, you can go to my Italian Food set on Flickr and check them out.

Enjoy!

Tuesday, December 30, 2008

A Delicious Treat from the Mediterranean Coast

This is a pan of farinata (if you're on the Ligurian coast) or socca (if you're in Nice). It's basically a crepe made of chickpea flour, salt, water and a touch of olive oil. This was part of an Italian dinner that also included sauteed escarole and a few slices of salami and mortadella.

I was introduced to socca through Julia Child (one of her cookbooks of course: From Julia's Kitchen) and still use her basic proportions to make the batter. I baked mine in a very hot oven, but for a more authentic flavor you can make your farinata on a very hot grill or in your fireplace: in Liguria, we saw huge wood burning pizza ovens that were used to make farinata. There farinata is sold by weight, in huge slices scraped up from the enormous pans (30 inches across, at least) it's baked in.

I had the good fortune to dine at Rose Pistola restaurant in San Francisco several times. Rose Pistola specializes in Ligurian cuisine. The chef, Reed Hearon, prepares a traditional farinata and versions with additional flavors. I took inspiration from him for this batch and added torn oil-cured olives and chopped marjoram.

Farinata is insanely easy to make. The most challenging part of the process is finding the essential chickpea flour. Your local Italian market may have it and Indian markets definitely do. (In Indian markets it may be labeled besan flour).

Farinata
Serves 2-4 (in our house this serves two as a main-course side dish)
  • 2/3 cup chickpea flour, sifted if lumpy
  • 1 cup water
  • 1/2 teaspoon salt
  • 2 tablespoons olive oil, plus more for the pan(s)
  • additional flavorings (optional): no more than two of: chopped herbs, cut or torn olives, anchovies, shredded radicchio, etc.
Make the batter: Place the flour in a bowl (be sure to sift it if it's really lumpy). Slowly whisk in the water, making sure to whisk out any lumps. If you add the water slowly, whisking well after each addition, you should end up with a smooth (very thin) batter. Whisk in the salt and olive oil. Set the batter aside until you're ready to cook the farinata. You can make the batter as far a day ahead - store it in the refrigerator if you're making it more than half an hour ahead of time.

About 30-45 minutes before baking the farinata, select your pan(s): This quantity of batter will make a thin 12" crepe or two 8" crepes, or a thicker 10" crepe. I prefer thinner crepes, but thicker seems to be more traditional. Cast iron or steel are best, do NOT use non-stick.

Now that you've made your pan selection, heat that sucker up: Put it in a 400-degree oven and let it heat for about 30 minutes.

Pull the hot pan out of the oven and drizzle a little olive oil into the pan. Pour the batter into the pan, if necessary, swirl the pan to cover the bottom with the batter. Scatter the flavorings over the top, if you're using them. Put the pan into the oven and bake until the farinata is set, about 5 minutes. Turn on the broiler and broil until the farinata is golden brown in spots and a little burned in others, about 3 minutes (depending on your broiler).

Remove the pan from the oven and sprinkle the farniata with salt. Serve the farinata in rough slices: use a spatula or scraper to pull the slices off the pan (they shouldn't stick) - this will not be a graceful presenation.

Wednesday, December 10, 2008

Garlic Confit and What to do With It

Hi, it's me. Back again. I hope y'all are, like me, being swept up in holiday planning and fun and haven't really noticed that I haven't posted in nearly two weeks (eek!).

As penance for my lag in posting, I thought I would give you not one recipe, but two! The first recipe isn't really a recipe, more a technique, but anyhoo ...

Garlic Confit is a really nice treat to have on hand. Technically a confit is some sort of animal protein (like chicken, duck or turkey) slowly cooked in its own fat until tender. In recent years, the term confit has been extended to cover vegetables slowly cooked in oil (usually olive oil) until tender and silky. So, this method is for garlic confit but you can apply the same principles to onions, shallots, tomatoes, peppers, etc.

Garlic Confit
  • Garlic cloves, peeled (as many as you want - I cooked up about three cups)
  • Sprigs of fresh herbs or a few dried chilies, optional
  • Olive oil, to cover
Put the garlic into a heavy saucepan with herbs and chilies, if using. Pour enough olive oil over to just cover. Place the saucepan over low heat and let garlic cook until soft. The oil will sputter a little as the moisture in the garlic cooks off. Depending on the heat and the age of the garlic, the confit will be done in 30 minutes to an hour. The cloves will be a light golden brown and tended enough to provide no resistance when you try to stick a toothpick through one.

Let the confit cool and then transfer to clean glass jars. The confit should be stored covered with oil and stored in the refrigerator - any extra oil should be strained and stored in the refrigerator. Use your confit and garlic oil within a week. (See the comments below for why.)

Now you have a jar full of garlic confit in your fridge, so what do you do with it? You can spread the cloves on grilled or toasted bread, use them in a roast beef sandwich, bake them into foccacia or add them to pasta. I used some of my confit to make this soothing, warming bean stew:

Cannellini Bean Stew with Garlic Confit
Serves 4 to 6
  • 1 onion, chopped
  • 1.5 cups dried cannellini beans, cooked or 3 cans cannellini beans, drained with some liquid reserved
  • 6 canned tomatoes, chopped
  • 1-2 cups chicken broth, canned is fine
  • 1/2 cup garlic confit
  • minced rosemary, optional
  • 1 cup breadcrumbs
  • 1-2 pieces of pancetta or bacon, chopped fine
  • handful grated parmesan
Over medium heat, saute the onion in a little olive oil until tender, about 10 minutes. Add the cooked beans, tomatoes, confit and a little chicken broth (you want the mixture to be a little soupy). Simmer until the tomatoes break down, adding more chicken broth or canned bean liquid to keep the mixture from drying out. The goal is a thick stew-like mixture. Season to taste with salt and pepper and add some minced rosemary, if using.

While the stew is cooking, make the crispy breadcrumb topping: Saute the bacon or pancetta until crispy. Toast the breadcrumbs with a little olive oil until golden brown (do this in a skillet or on a baking sheet in your oven). Toss the breadcrumbs, bacon and cheese together.

When the bean stew looks and tastes right to you (the tomatoes should have broken down and are part of the sauce binding the beans and confit together - think Italianate baked beans). Served, topped with a handful of the breadcrumb mixture.

This is a really soul-satisfying dish. The beans are super-creamy and each smooth bite is punctuated with hits of garlic and crunchy bites of breadcrumb. It's super-easy to make this dish vegetarian by leaving out the bacon.

Tuesday, November 4, 2008

A Taste of Philadelphia

Full disclaimer: I have never eaten one of these sandwiches in its natural habitat of Philadelphia. But the combo of roast pork, provolone, broccoli rabe and garlic sounded so great, I couldn't wait for a trip to the city of brotherly love.

The sandwich is pretty easy to make, though I make no claims to its authenticity. You take a split roll or baguette, top it with slices of roast pork loin (great way to use leftovers), melt some provolone over it. Then you put a big ol' pile of sauteed broccoli rabe (with garlic) over the whole shebang. Fold and eat.

We scarfed these sandwiches with a side of sweet potato fries. Not Philly-traditional, but pretty darn delicious.
Blog Widget by LinkWithin