Showing posts with label whole grains. Show all posts

Saturday, September 4, 2010

Use Your Booty: Barley Salad with Burrata

Black Barley Salad

I meant to to get this post up before this holiday weekend started. This salad is a great healthy, vegetarian, colorful side dish that goes well alongside grilled meat. It also improves with age - so you can make it a day or two ahead. I fancied it up with a large chunk of burrata cheese - feel free to omit it if you prefer.

Black Barley Salad with Burrata
Serves about 8-10 as a side dish, makes a generous 4-6 main course servings.
I liked the richness added by the burrata - if you don't have any at hand, fresh mozzarella, goat cheese or ricotta salata would be great. Or go dairy-free and toss on slices of hard-boiled egg.
  • 1 cup uncooked black barley or 4 cups cooked barley (or pearl barley or "regular" barley - this salad would also work with farro or wheatberries)
  • 2-3 small zucchini, diced
  • 2 large tomatoes, diced
  • 2 handfuls purslane leaves
  • 1 small onion, sliced into thin rounds
  • red wine vinegar
  • olive oil
  • salt and pepper
  • 8 ounces burrata, left whole (preferred) or torn into shreds
Cook the barley, if needed: pick through the uncooked grains to remove any stones or bits of twig or chaff. Place in saucepan and cover with water by two inches and bring to boil. Reduce heat to a simmer, add a healthy pinch of salt and cook until the grains are tender. This will take from 45 minutes to 2 hours, depending on the grain you're cooking and how old it is. Add more water as needed to keep the barley covered.

When the barley is cooked, drain it in a colander and set aside to cool.

Toss half of the cooked barley with the vegetables. Add more barley until you have the vegetable/grain ratio you like. (You may not use all of the barley. Any leftovers can be frozen for future use.)

Sprinkle the salad with red wine vinegar and a healthy glug or two of olive oil. Season to taste with more vinegar and oil and salt and pepper. Top the salad with burrata and serve.

This Summer, I am chronicling my first CSA (Community Supported Agriculture) experience. My CSA share is from Arrowhead Farm, a farm based in Newburyport, MA. Each week, I am posting about what was in my share and what I'm doing with it. By way of full disclosure, I won my share through a raffle and am not paying for it. However, Arrowhead did not know I was entered in the raffle, and I received no special consideration because of this blog. I paid for my livestock share. A full set of all the photos I've taken of this share is here.

Tuesday, June 22, 2010

Use Your Booty: Amaranth x2

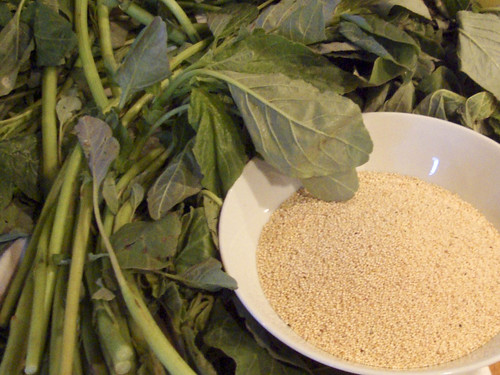
One thing that's been so great about this CSA is that I'm getting to cook with some ingredients that are new to me. A part of my pickup has been amaranth greens. I've sautéed them and made soup from them. This week I thought it would fun to pair sautéed amaranth greens with steamed amaranth grains. Here they are together in their uncooked state.

Cooking amaranth, the grain, is easy. Rinse the grain by swishing it in a bowl of water and then straining in a very fine strainer (I actually had to line mine with cheesecloth, because the holes on my strainer are so tiny). Then you bring the grain, water and a pinch of salt to simmer, cover and simmer over very low heat for 15 minutes. Turn off the heat and let the amaranth steam in the covered pot for another 10 minutes.

I used a 1 to 1.5 ratio of grain to water to cook my amaranth. (One cup grain to 1 1/2 cups water.) I ended up with a pot full of something that reminded me of polenta, but with the grains clearly defined and still pleasantly crunchy (just a little bit). If you've made amaranth grain before I'd love to hear how you cook it. Locally, you can find amaranth grain at The Natural Grocer on High Street in Newburyport. I've also seen it in Whole Foods Markets and other health food stores.

This Summer, I am chronicling my first CSA (Community Supported Agriculture) experience. My CSA share is from Arrowhead Farm, a farm based in Newburyport, MA. Each week, I am posting about what was in my share and what I'm doing with it. By way of full disclosure, I won my share through a raffle and am not paying for it. However, Arrowhead did not know I was entered in the raffle, and I received no special consideration because of this blog. I paid for my livestock share. A full set of all the photos I've taken of this share is here.
Tuesday, March 2, 2010

Quinoa Salad with Feta, Mint and Blood Oranges

This salad is being entered in one of this week's Food 52 contests: Your best recipe with feta, blood oranges and mint. You can check out all the entries in the contest here.

I used a mix of red and "regular" quinoa and chose to use pine nuts. I think pistachios would be really nice too. Another nice combo would use goat cheese and toasted hazelnuts and parsley instead of mint.

Quinoa Salad with Feta, Mint and Blood Oranges
Serves 4-6 as a side dish
Make this a main dish by topping it with a fried egg or topping it with some grilled chicken or sea scallops.
  • 1 cup quinoa
  • 1 1/4 cups water
  • 3 blood oranges
  • 1 shallot, finely chopped
  • 1/3 cup pine nuts, toasted
  • 1/4 cup chopped mint
  • olive oil
  • 3 ounces feta cheese, crumbled
  • salt and pepper to taste
Make the quinoa: Rinse the quinoa in a mesh strainer. Bring the water and a pinch of salt to a boil in a small saucepan. Add the quinoa and reduce heat to a simmer. Cover and simmer for 15 minutes until quinoa is tender.
While the quinoa is cooking, prepare the oranges. Cut the peel off of two of the oranges and then cut them into bite-sized sections, removing any really fibrous bits. (If you know how to supreme an orange - do that.)

Combine the cooked quinoa, chopped or supremed oranges, shallots, pine nuts, and mint. Squeeze the juice of the other orange over the salad and drizzle it with olive oil (about 2-3 tablespoons). Gently stir in the feta cheese. Taste the salad and add salt and pepper to taste.

Tuesday, March 17, 2009

Peanut and Pepper Stew

This soup was inspired by this North African recipe. I made some minor modifications (mainly increasing the acidity with more lime juice and the heat with a squirt of sriracha) but the technique and basic recipe stayed the same.

Feel free to adjust this to your taste too. I think it would be super served over baked sweet potatoes or (sans rice) over a fried noodle cake with sauteed bok choy.

Peanut and Pepper Stew
(as inspired by a Flickr poster who was inspired by a Moosewood cookbook)
4-6 generous servings (this freezes well)
  • 2 large onions, chopped
  • 2 celery stalks, chopped
  • 2 red peppers , chopped
  • 3 cloves garlic, pressed or minced
  • 1/4 teaspoon cayenne
  • 1 tablespoon curry powder (if your curry powder is hot, you may want to reduce or omit the cayenne)
  • 1/2 cup brown rice
  • 14 ounce can diced tomatoes
  • 1/4 cup peanut butter (smooth or crunchy, your choice)
  • juice of one lime
  • chopped cilantro, lime wedges, sliced scallions, toasted peanuts and/or sriracha for garnish
Over medium-high heat, saute the onion and celery in a large saucepan until they are soft (about ten minutes). Add the peppers and garlic and saute another five minutes more. Add in the cayenne and curry powder and saute for two more minutes.

Add the rice, tomatoes and three cups of water. Add a pinch of salt. Cover the pan and bring to a simmer. Cook until the rice is tender, about 30-40 minutes. Whisk in the peanut butter, lime juice and season to taste with salt and pepper. Whisk in more water if the stew is too thick. Bring the acid/spicy balance up to your taste with more lime juice, hot sauce, salt and pepper.

Serve with your choice of garnishes.

Monday, April 21, 2008

Sunday Night Supper: Risotto

This was Sunday night's supper, courtesy of our Russo's run. We'd had a gluttonous portion of chicken wings for lunch, so I wanted to go a little lighter for dinner.

I bought fava beans and baby artichokes at Russo's. We have a ton of baby garlic growing in the garden, so I decided to use that too. The resulting meal: Fava bean and green garlic risotto with grilled baby artichokes (Yes, Top Chef fans, that is a non-functional garnish, sorry ...).

Making risotto isn't hard, but you do get better at it the more you make it. I am not providing a recipe here, but here is a good basic method. (I strongly recommend that you find any video of Lidia Bastianich making risotto - watching her is a great learning experience).

First, I sauteed minced shallots and green garlic in olive oil. Then I added two cups of rice and sauteed it until it was "toasted" (the rice grain gets pearly and the starch core turns bright white - you know it when you see it).

When the rice is toasted, I added a splash of white wine and cooked it until it all evaporated.

Then, over the next 20 minutes or so, I ladled hot chicken stock over the rice, stirring every now and then. When the rice was tender, I stirred in the favas, some more minced green garlic, a little butter and grated parmesan cheese.

While this was all happening, I steamed the baby artichokes for 10 minutes, then grilled them for about 5 minutes.

Friday, January 4, 2008

Baked Millet

Wow. Do I know how to write catchy blog post headers or what? I do apologize, but the original name was too cute for me.

This what my version of Mark Bittman's Autumn Millet Bake (See? Cute.) I harbor no ill -will toward Mr. Bittman. His Minimalist column in the NY Times is a weekly must-read. He's a calm, reassuring voice in the my kitchen and his recipes work. Do yourself a favor and check out his column if you aren't a regular reader.

This recipe is from his new book, How to Cook Everything Vegetarian, and Heidi at 101 Cookbooks has a lovely post about it. I liked the idea of this recipe and thought it might make a really easy side dish. I ended up making a version that was rather unexciting compared to the original, but it was great for dinner tonight served with roasted green beans and fried haloumi cheese.

Go to Heidi's post for the original recipe and her helpful tips. I think this would be fabulous with tomatoes and zucchini with some feta sprinkled over the top at the end. Or puttanesca-style with tomato, black olives, capers and anchovy.

Tonight's version wasn't really exciting, but it was a great, easy method for millet (I could have made it more interesting by going middle-eastern by adding raisins and a little toasted cumin seed). The millet was cooked through perfectly and it was a very hands-off preparation. Here's what I ended up with.

A Pretty Tasty but Not So Exciting Baked Millet Dish
  • 2 tablespoons olive oil
  • 3/4 cup millet
  • 1 cup chicken broth (may need 1/4 cup more), warmed (should not be refrigerator cold)
  • 3 cups of cubed butternut squash (3/4" pieces)
  • salt and pepper
  • 1/2 teaspoon of piment espellette (or hot pepper flakes)
  • 1/2 cup shelled pistachios (chopped or halved)
Heat the oven to 375.

Toast the millet in a skillet with the olive oil. This should take about 5 minutes: the millet will not get very brown but will start to smell nutty. Put the millet into an oiled 9"x13" baking dish (It will look like there is nothing there - trust the millet. It will fluff up a lot.).

Top the millet with the squash. Season with salt, pepper and the hot pepper. Pour the broth over everything. Cover the pan with foil and put it in the heated oven for about 45 minutes.

Peel the foil back and taste the millet. If it's still crunchy, add up to another 1/4 cup of broth. Toss the pistachios over the top and put the uncovered pan back into the oven. Raise the temp to 400 degrees and let it bake for another 10 minutes.

Serves 4 as a side dish.

Thursday, November 1, 2007

Spicy Grain Soup?

This recipe is from Food and Wine magazine via Cream Puffs in Venice. I am always looking for healthy, hearty soups and stews and I am sure that this soup (and myriad versions) will frequently find a place on our table.

When made and served right away, this soup is soupy (duh), but when made ahead and held for two days, it ends up looking like this picture. It becomes a risotto-type dish which could work as a side dish too.

I modified the recipe based on what I had on hand (added quinoa, couldn't find parsnips, etc.); for the "official" recipe check the link below. I am not certain that the initial 45 minutes of simmering really needs to be that long, but everything pureed beautifully with my immersion blender (no pepper skins or unwelcome chunks of garlic).

Spicy Grain Soup (adapted from Food and Wine, November 2007)
  • 1 cup pearl barley
  • 1 cup brown basmati rice
  • 1 tablespoon olive oil
  • 3 ancho or dried mulato chiles—stemmed, seeded and broken into 2-inch pieces
  • 1 large onion, thinly sliced
  • 4 garlic cloves, halved
  • 2 quarts low-sodium chicken or vegetable broth
  • One 15-ounce can diced tomatoes
  • 6 cilantro sprigs
  • Kosher salt and freshly ground pepper
  • 1/2 pound mushrooms, stems discarded, chopped
  • One 15-ounce can black beans, drained and rinsed
  • 1 medium zucchini, finely diced (same size as mushrooms)
  • 1 lime, cut into wedges
  • chopped cilantro, about 1/4 cup
Cook the barley and brown rice (I used my rice cooker and cooked each separately. I see no reason why you couldn't use leftover brown rice that you bought at a Chinese restaurant). Have the grains cooking while you're making the rest of the soup.

In a large soup pot, heat the olive oil and add the chiles, onion and garlic. Cook over medium-high heat, stirring occasionally, until the onion is lightly browned, about 5 minutes. Add the broth, tomatoes, and cilantro sprigs and season with 1 tablespoon of salt and a pinch of pepper. Bring to a boil, then cover and simmer over low heat for 45 minutes.

Puree the soup with an immersion blender or in a blender and return to the pan.

Add the mushrooms, black beans and zucchini to the pureed soup and bring to a boil. Cover and simmer over low heat for 20 minutes. Add the barley and rice and season with salt and pepper. Ladle the soup into bowls, sprinkle with chopped cilantro, and squeeze a lime wedge over each serving.

Note: This will turn stewy and risotto-like if made ahead. If you want to keep it soupy, don't add the grains until you want to serve: keep them aside, heat the soup base and then scoop in the grains to heat through.

Wednesday, May 2, 2007

Quinoa Salad

I read a great recipe on 101 Cookbooks for a Lemon-Scented Quinoa Salad. It looked yummy and I thought I'd try something similar. I thought I'd modify the salad to include the flavors in charmoula: lemon, olive oil, garlic, cilantro, and parsley.

I made this salad with chickpeas, roasted yellow peppers, roasted mushrooms, preserved lemon, and herbs (parsley and cilantro). To make weeknight prep easier, I roasted all my vegetables on Sunday.

Tonight, I made the quinoa in my rice cooker (have I mentioned how much I love that thing?) and then tossed everything together. This was our first experience with quinoa and this was a great way to be introduced to it.

Quinoa Salad with Moroccan Flavors
  • 1 cup quinoa, rinsed well
  • 1 8 oz. package mushrooms, sliced into quarters & roasted
  • 2 yellow bell peppers, roasted, and chopped
  • 1 can chickpeas, drained and rinsed
  • 1 preserved lemon, chopped fine
  • handful parsley, chopped
  • handful cilantro, chopped
  • clove of garlic, minced
  • 1 teaspoon ground cumin
  • extra virgin olive oil
  • lemon juice (1 lemon) or rice vinegar
Make the quinoa according to the package directions (I cooked 1 cup quinoa with 1 3/4 cups water in my rice cooker).

While the quinoa is cooking, toss everything else together. When the quinoa is cooked, add it to the rest of the ingredients. Drizzle some olive oil over the salad and toss everything together. Add lemon juice or vinegar if you think the salad needs a little acid.

Serves 3-4.

Tuesday, March 20, 2007

Virtue in a Bowl

So, I didn't plan it for this reason, but this salad was an inspired choice for tonight. We have had a rather heavy start to the week what with bangers and mash and then macaroni and cheese ... lordy. So, a virtuous whole grain salad was just the ticket.

I was planning on making a salad like this, and then I heard a great story about whole grains on Good Food (a wonderful radio show on KCRW - do yourself a favor and podcast it), and then I read a great story about a barley salad on Smitten Kitchen. So really, it was Kismet, this salad. I used wheatberries, because that's what I had, but you could use another grain like barley, cracked wheat, brown rice or even a small pasta (like orzo or ditalini).

Wheatberry Salad
  • 1 1/2 cups wheatberries, cooked
  • 1 eggplant, cubed small (see pics below)
  • 1 red pepper, roasted and chopped (or use some jarred roasted peppers)
  • olive oil
  • salt and pepper
  • 1/2 lb cherry tomatoes, halved
  • 2 shallots, thinly sliced
  • handful fennel fronds, chopped
  • handful parsley, chopped
  • 1/4 pound feta cheese, crumbled
Dressing:
  • 2 tablespoons pomegranate molasses (If you don't have any of this stuff, buy some. But in the meantime, use 1 tablespoon of honey and use 3 tablespoons of vinegar instead of 2.)
  • 2 tablespoons rice vinegar
  • 4 tablespoons olive oil
  • salt and pepper
Preheat the oven to 400 degrees. In a bowl, toss the cubed eggplant with olive oil, salt and pepper. Put the eggplant on a sheet pan and roast for 10-15 minutes until well browned and soft. Set aside.

Put the wheatberries into a large bowl and with the rest of the salad ingredients.

Take a small jar and put all the dressing ingredients in. Shake-shake-shake to blend. Toss the dressing in with the salad. Check the seasoning for salt and acid. If it's too sharp add more oil, not sharp enough add more vinegar ... you get the drill.

Yield: 4-6 main dish servings, depending on the type of grain you choose.

Prepping your eggplant:

Cube size is less important than consistency - the cubes need to be the same size so they. I find it easiest to "dress" the cubes with oil if I stir them in with the oil and salt and pepper in a bowl. Then I throw them onto the sheet pan.
Blog Widget by LinkWithin