Showing posts with label bread. Show all posts

Friday, July 2, 2010

Use Your Booty: Torta d'Erbe

In Italian cuisine, a torta is a pie or tart. This one is a greens pie with a yeasted dough crust. For those of you afraid of pie crust, a yeasted dough might be a nice gateway pastry: you can't overwork the dough like you can with a short crust, the dough provides a firm case for the filling and doesn't get soggy like a pastry crust can.

To make for easy assembly, make the dough when it's convenient for you and after it rises, punch it down and refrigerate until you're ready to assemble the tart. Make your filling ahead as well - a warm filling will make the dough harder to work with. I made my tart in a free-form gallette style with a pleated top but you could easily make your tart in a tart, cake or pie pan if you wish.

Torta d'Erbe
Makes 1 large tart, 6-8 entrée servings
  • 1 recipe yeasted tart dough, below
  • 4-6 cups cooked, chopped greens (I used kale and Swiss chard in this tart)
  • 4 ounces mozzarella, cubed
  • 1 ounce parmesan cheese
  • 1/4 cup chopped pitted Kalamata olives
  • salt and pepper to taste
  • red wine vinegar
  • 2 eggs, beaten
  • 1 egg for egg wash
  • sesame seeds for garnish
Combine the greens, cheeses, and olives. Combine well and taste. Add salt & pepper to taste. If you think the greens need more acidic brightness stir in a few drops of red wine vinegar. When you're happy with the seasoning, stir in the 2 eggs.

On a lightly flour surface, roll the tart dough into a large circle (about 18"), sprinkling with more flour as needed to keep the dough from sticking. Transfer the dough onto a greased baking sheet or into an 11" tart pan.

Evenly spread the filling onto the dough, leaving a 4" margin if you're using a baking sheet and over the entire tart pan if using a tart pan. Lift the dough up and over the filling, pleating the dough to layer it evenly across the top of the tart.

Beat the other egg with a tablespoon of water and brush the egg wash over the tart. Sprinkle the tart with sesame seeds.

Bake at 375 for 30-40 minutes until the crust is well browned. Check the underside of the tart - if it's not browned well, bake the tart for another 10 minutes or so. Serve warm or at room temperature.

Yeasted Tart Dough
Makes enough for one large tart
  • 2 teaspoons active dry yeast
  • 1/2 teaspoon sugar
  • 1 cup room temperature water
  • 1 egg, beaten
  • 1/2 teaspoon salt
  • 13.5 - 18 ounces (3-4 cups) flour
  • 3 ounces butter, at room temperature OR 1/3 cup olive oil (I like the butter version best)
Stir together the yeast, sugar and water. When the yeast is dissolved in to the water, stir in the salt, egg and half the flour. Stir well to form a stiff paste (use a mixer with paddle attachment if you wish). Stir in the butter (the dough will soften back up). Keep adding more flour until the dough is dough-like.

Turn the dough out onto the counter and knead, adding more flour as needed to keep it from sticking. Knead until the dough is tender, shiny and smooth, about 10 minutes of contemplative kneading. It shouldn't be sticky. Transfer dough to an oiled bowl and cover bowl with plastic wrap

Let dough rise for about 1 hour, until doubled. Form tart as above, or if you aren't ready to make the tart, press the dough down to deflate it, recover and put the dough in the fridge until you're ready to make the tart.

You can freeze the dough for a week or so: put the dough into a ziploc bag, press out the air and freeze. Let thaw in a cool place for 6-8 hours.

This Summer, I am chronicling my first CSA (Community Supported Agriculture) experience. My CSA share is from Arrowhead Farm, a farm based in Newburyport, MA. Each week, I am posting about what was in my share and what I'm doing with it. By way of full disclosure, I won my share through a raffle and am not paying for it. However, Arrowhead did not know I was entered in the raffle, and I received no special consideration because of this blog. I paid for my livestock share. A full set of all the photos I've taken of this share is here.

Tuesday, June 15, 2010

Use Your Booty: Bruschetta with Kale & White Beans

Let's get one thing out the way right up front: broo-SKET-a, not brooshetta. Feel free to tell your waitress.

Ok then, that said, let's move on to the recipe.

Bruschetta is a great way to use up slightly stale rustic-style bread (like this kind of bread). Slice it thickish - I like between 1/2" - 3/4" thick. Grill or broil it, rub with garlic and drizzle with olive oil. Top with sautéed vegetables and eat like an open-faced sandwich. I like this version a lot. You might think beans and bread is a lot of starchiness, but the beans add a lovely creaminess to the dish without adding fat.

Kale & White Bean Bruschetta
Serves 2
This is easily doubled, tripled or quadrupled. We eat it for dinner, but if you cut the bread into smaller pieces it would be a nice first course or nibble for a summer party.
  • 2 ounces pancetta, cubed or bacon, chopped (optional)
  • olive oil
  • 3-4 cloves garlic, sliced thin
  • 1 big bunch kale, leaves removed from the stems and coarsely chopped or torn (you need a lot of kale - it really cooks down)
  • 1 can white beans, drained and rinsed (about 1-1.5 cups cooked beans)
  • 4 slices rustic-style crusty bread (you know what you'll eat, so the number of slices will depend on the size of your loaf)
  • 1 clove garlic
In a large skillet, cook the pancetta or bacon (if using) until it's crisp and browned. Remove the pancetta from the pan and set aside. If the pan is too dry (or if you didn't use the meat, or if you don't want to cook in bacon fat) add enough olive oil to generously film the bottom of the pan.

When the oil is hot, add the garlic. When it just starts to color, add the kale to the pan (it will sputter - watch out for flying oil droplets!). Stir the kale as it wilts and softens. If it starts to stick add a little water to the pan. When the kale is wilted down and softened, add the beans and heat them through. Add salt and pepper to taste, remembering that if you're using pancetta or bacon they will add salt to the dish too.

Meanwhile heat your grill or broiler. Brush the slices of bread with oil and grill or broil, turning once until browned and toasty (I like mine on the brown side of incinerated, whereas Dave prefers his a little more tan/blond). Rub the slices of bread with the other clove of garlic. Place the bread on dinner plates and drizzle with a little more oil. Top the bread slices with the kale & bean mixture and sprinkle the pancetta over the kale. Drizzle with a wee bit more oil (you don't want this plate dripping with oil, so use a teaspoon or two per drizzle).

Mangia!

This Summer, I am chronicling my first CSA (Community Supported Agriculture) experience. My CSA share is from Arrowhead Farm, a farm based in Newburyport, MA. Each week, I am posting about what was in my share and what I'm doing with it. By way of full disclosure, I won my share through a raffle and am not paying for it. However, Arrowhead did not know I was entered in the raffle, and I received no special consideration because of this blog. I paid for my livestock share.

Thursday, February 25, 2010

Storing that Great Loaf You Baked

Ok, so you have a glorious loaf of bread. Maybe it's a loaf of no-knead bread you baked, maybe it's a crunchy, rustic loaf you picked up at your favorite bakery.

How are you storing that bread? Not in plastic right? (You know better than that of course.) Maybe you're wrapping it in a paper bag. That's not bad, but it's still going to dry out pretty quickly.

This, my friends, this is how you store that loaf. Place it cut end down on your counter, or for ease of mobility, on a plate. Your bread will will stay fresh-ish for several days, as you slice it down to a crusty nub.

Monday, February 8, 2010

Jim Lahey's No-Knead Breads

Jim Lahey is the owner of Sullivan Street Bakery in New York City. He opened the bakery in 1994 and has been spreading the love of great bread since then. Lahey's no-knead bread recipe achieved amazing popularity in blog circles in November 2006 when Mark Bittman published a story about this method in the New York Times.

Since then, several books have been published (not by Mr. Lahey) about the method. This past fall, Lahey finally published his book of recipes and techniques: My Bread. I'm not going to give you any recipes from the book, because I want you to go buy it. If you want to test-drive the recipes, follow the Bittman link for a basic recipe and method.

My Bread has really revolutionized the way I'm baking bread these days. That basic principle behind this method is that of hands-off gluten formation. Gluten strength can be developed in one of two ways: by kneading the dough, or by letting the dough rest and letting the yeast do all the work. Letting the bread do the work for you makes a lot of sense.

Think about it: in ye olden tymes, back before the days of a Kitchenaid on every counter, people baked bread. Yes, they probably kneaded it by hand, but even with steady kneading the bread wouldn't have gotten worked over the way our modern mixers do it. Also, traditional baking relied on natural leavening which would have required longer rising times.

The no-knead method has one major disadvantage: it's not for the speedy baker. The dough really does need to work on its own. This means a minimum of 8-10 hours of rising time. But this also mean more flavor in the bread.

You don't need a lot of special equipment to make this bread. You do want a scale (but you should own one anyway) otherwise your results won't be consistent. Other than a scale, a big bowl, a rubber spatula and covered dutch oven are all you really need. Feel free to use this an excuse to buy a fancy Le Creuset or Emile Henry Dutch oven if you wish. I've done fine however, with a knockoff Dutch oven from Home Goods or Target, or a Lodge cast iron Dutch oven. You can also use a stainless pot with an oven-safe lid.

Now the breads (I'll be posting more pictures in this Flickr set as time goes by):

The glamour shot at the top of this post is rosemary-olive bread.

The bread in the pot is a wheat/white combo halfway through baking.

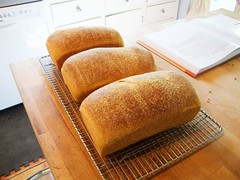
The sandwich loaf was made by gently folding the dough into a loaf shape and then placing it into a well greased loaf pan. This batch was over-proofed when it went into the oven: You can see that in the crappy oven spring (see how that slit in the top didn't really open up?). The flavor was still great and the bread made fabulous toast.

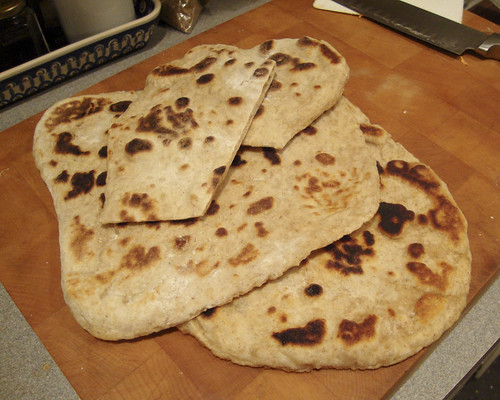
The flatbreads are made from the dough after its first rise. Take the dough, portion it into small balls (about 6 per recipe) and then roll them our into flat, tortilla-like discs. I baked them in a hot cast iron skillet. They bubbled up beautifully as you can see.

The pizza is made from a different recipe: it's much stiffer than the bread dough. It makes for a deliciously crisp-crusted pizza. You load the dough up with toppings, sliced super-thin and then blast the pizzas in a 500-degree oven. These are pictures of the tomato and onion pizzas.

Other no-knead bread posts from friends in the blogosphere
Smitten Kitchen: No-Knead Bread


Tuesday, June 2, 2009

BBA Challenge Bread: Bagels, Bread #3

I love bagels. I spent my formative high school years going to a place called the Bagel Depot. We lived close to New York City, so our bagels had the traditional chewiness of a true NY bagel. Due to the suburban clientele however, flavors as exotic as everything and blueberry were available. (I'm being a wee bit sarcastic. This was the 80s, jalapeno-cheddar and french toast bagels were still off in the shimmering future) .

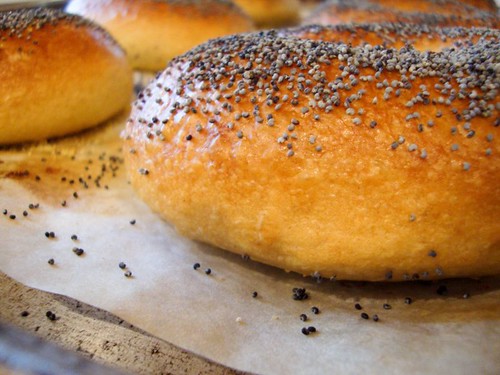
My favorite was a poppy seed bagel, twice toasted (I have always been partial to crispy, dark brown baked goods) with a slather of butter or butter and cream cheese. The Bagel Depot was infamous for giving you a 1/2" layer of butter inside your buttered bagel. It made a mess and set up a few of my classmates for early bypass surgery, but it was fantastic.

Up here in the woods north of Boston, I had given up on bagels. The ones we can find are too soft and lack a good crust (frankly, they're underbaked). They also aren't chewy enough. Well thank you Chef Reinhart! His method worked perfectly for me. While I didn't get the best chewiness, I think that was my fault in that I used regular bread flour, not the high-gluten flour he calls for.

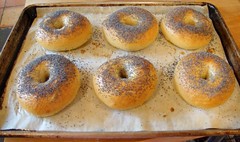
All my bagels were topped with poppy seeds because I had no other suitable toppings in the house. No worry, I'll be making these again and will have the full panopoly of toppings at hand next time. To me one of the greatest features of this recipe is that almost all the work is done the day before. On the day you want to eat your bagels, you pull the proofed dough from the fridge, boil the bagels (essential step) and then bake. I tried retarding my bagels for 24 and 48 hours. I thought the 48 hour ones had slightly better flavor when tasted plain.

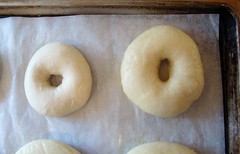
In this picture, look how much the bagels grow during boiling. On the left, a proofed bagel; on the right, a bagel post-bath. I boiled mine for two minutes a side hoping for greater chewiness. They weren't that chewy, but I think that was a result of the flour, not the boiling.

To gild the lily, I made some cured salmon as a bagel enhancement. I used the recipe here and substituted applejack (apple brandy) for the ouzo. Deelish.

Tuesday, May 26, 2009

BBA Challenge Bread: Artos, Bread #2

The second bread in the BBA challenge is Artos, a Greek celebration bread. I was raised Greek Orthodox church and while I guess I ate a lot of Artos, I never knew its official name. Artos is a leavened celebration loaf. A number of breads fall within this category: Vassilopita (eaten at New Years'), Tsoureki (at Easter), and Christopsomo (at Christmas). They are all variations on the same spiced, enriched dough. They are shaped into different loaf styles, depending on the holiday.

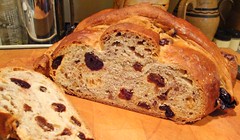
This is a Christopsomo, baked for Christmastime (due to the glaze, from certain angles I thought it looked like a big roasted chicken). The bread is decorated with a gothic cross. The spices in the bread are mahleb (or mahlepi) and cloves. Mahleb is a spice used a lot in Greek and Middle Eastern baking. It's actually the inner pit of a cherry and has a slightly sour-cherryish fragrance (very slight). I didn't have any mastic on hand, if so I would have subbed it in for the cloves. Mastic is a resin, harvested from a Pistacia lentiscus tree. These trees are found only on the Greek island of Chios. I've seen the harvest process and it's painstaking and low-yield.

The bread is further enhanced with dried cherries, raisins and toasted walnuts. Good quality dried fruit is so nice in breads like this one. Don't fall for the plastic nubbins of dried "fruit" at the supermarket. Get good stuff.

Anyway, the bread. The fragrance of the dough and baked bread immediately brought me to the holiday table; I was shocked by how strongly it evoked memories for me. The dough behaved beautifully. It's enriched with eggs and so the rise was a little slower. In fact, I am experimenting with doing extra-slow rises with most of my breads. I let this one proof in the fridge overnight before shaping and final proofing.

Changes for next time:
  • Split off the dough for the cross before I add the fruit and nuts for a neater result.
  • Make two smaller loaves. The final loaf is huge, well over 10" around. For two people this was overload and too much to eat.
Of note:
  • As a number of bakers noted, this bread makes great French toast.

Thursday, May 21, 2009

BBA Challenge Bread: Anadama, Bread #1

So because my live isn't busy enough (what's it been, like two weeks since I posted?), I have joined a group of bakers who, led by the fearless Nicole of Pinch My Salt, are baking their way through the Bread Bakers Apprentice by Peter Reinhardt. (Run on sentence much, Mary?)

The BBA Challenge group is 200 bakers strong. The group is really enthusiastic about getting though the book and has been so supportive of the newer bakers. We're working through the book in order. What's fun about that is the book is laid out alphabetically, so we jump from Anadama to an enriched Easter bread (Artos) to bagels to brioche. We aren't publishing the recipes from the book, so you'll have to pick up a copy if you want to follow along (most libraries carry it if you want to look before you buy).

The first bread we baked is Anadama. The [I am guessing apocryphal] story is that Anadama bread was invented when a man, left behind with no dinner and just a pan of cornmeal mush, cursed his wife, Anna, as he threw some bread together: "Anna, damn her!" I prefer to think differently: that after his lovely wife, Anna, made a lovely bread for supper, the man said: "Anna, damn that's some good bread!" Because it is.

Anadama is a yeast bread that includes cornmeal and molasses. The pictures make it look as if the bread contains whole wheat, but the darker tint of the bread comes from the molasses. The bread isn't too sweet, so it makes great sandwiches, but it has enough sweetness so that it's fabulous with a pat of butter too.

Friday, March 27, 2009

Trip Report: King Arthur Flour Baking Center

I've been running my own business for a year now and have been doing a lot of professional exploration and development. As part of this, I thought it would be a great opportunity to take a class at King Arthur Flour's Baking Education Center. I hoped to take a professional-level class there last year, but due to their popularity and small class sizes I got boxed out of everything I wanted to take.

I just returned from the three-day class Running a Successful Bakery and had a wonderful, educational time. (My full Flickr set from the class is here.)

The class is taught by Chef Jeffrey Hamelman. Chef Hamelman has thirty-plus years of baking experience and run his own bakeries as well as having been a CIA instructor. He's now King Arthur's Bakery Director (they run a full retail and wholesale operation at their headquarters in Norwich, Vermont).

Chef Hamelman is a great teacher: he's got extremely high standards, a tactful and direct style, an encyclopedic knowledge of all things bread and pastry, and a great sense of humor. It was a rare experience to spend three days learning from him. He has written a remarkably complete cookbook called Bread: A Baker's Book of Techniques and Recipes. (I picked up a copy while I was there and am already fermenting several starters for breads in this book.)

An additional benefit of this class was the opportunity to meet so many other passionate bakers from around the country. Our class had fourteen students and they hailed from the East coast as well as California, Texas, and Indiana. The students' broad range and variety of experiences only added to the richness of the class experience.

Class started promptly each day at 9:00. This class was unusual for the Baking Education Center in that it was about 60% lecture (about the business of running a bakery); other courses are much more hands on. That said, we still got to get deep into a french bread dough and brioche and croissant doughs as well. A number of us commented several times that one of the best aspects of the class was Chef's frequent tips and pointers on how to use product creatively and how to reduce waste. For instance, from one bread dough we made baguettes, batards (a large oval loaf), rolls and fougasse. From brioche dough, we made brioche Nanterre, tete brioche, brioche pastries with cherries, and a quiche-type dish called a flamiche.

We were also treated to lectures by Tod Bramble (Bakery Food Service Sales Manager) and Mary Bihrle (VP Finance) and Patricia [I didn't write down her last name, sorry!] (Controller). Tod spoke about the intricacies of wheat growing and flour production. He was a great resource for us; it's essential to understand your ingredients, and for such an important one, flour always gets short shrift. Mary and Patty spoke with us about the financial side of running a business and shared their experiences with us.

The class wasn't cheap (about $200 a day) but it was definitely worth the investment for the knowledge imparted by Chef Hamelman and for the opportunity to meet so many other bakers. I'm hoping to attend another class there later this year. The Norwich area is really beautiful - it's right near Dartmouth University so there are a fair number of tourist services available to area visitors.

Information about baking classes at the Center and nationwide can be found here.
Information about the Bakery is here.
My full Flickr set from the class is here.

Monday, March 16, 2009

A Savory Bread Pudding

My mother-in-law sent us home from the holidays with a whole lotta challah (L: thank you again!). One loaf went into french toast production, as to be expected, but the other loaf has been sitting in the freezer waiting for me to get my act together.

I had an exceptionally good dessert bread pudding (butterscotch with salted caramel) at Eastern Standard a few weeks ago and it got me thinking about bread puddings in general. After reviewing recipes, I thought a savory option would be nice to try. Of course, I realized that I had already made a savory bread pudding before, I had just called it "strata".

So bread pudding or strata or whatever you want to call it, this is a great way to use up bits of vegetables, stale bread and ends of cheese. I used asparagus, caramelized onions, dill and goat cheese in this one. I can vouch for the breakfasty deliciousness of a sausage, ham and cheese version (thanks Doug!).

As I mentioned, I used challah in this version, but any delicious bread will do. It should be stale to keep things from getting too soggy. If your bread is too fresh, cut it into cubes and bake it in a 300-degree oven for about 10 minutes.

Savory Asparagus and Caramelizd Onion Bread Pudding
Serves 6-8 as a main course, more if served as a side dish
  • 2 onions, peeled and sliced thin
  • 1 large bunch asparagus, ends snapped off, stalks sliced into bite-sized pieces
  • 1/4 cup minced dill or parsley
  • 4 cups of 1-inch bread cubes
  • 1/2 cup goat cheese, crumbled
  • 5 eggs
  • 2 cups milk
  • 1/4 cup parmesan cheese
Preheat the oven to 375 degrees.

In a large skillet, over medium-high heat, stirring frequently, saute the sliced onion until well-caramelized (this will take about 20 minutes). Put into a large bowl and set aside. In the same pan, saute the asparagus until cooked through and bright green. Add to the onions in the bowl.

Stir together the onions, asparagus, dill, bread cubes and goat cheese. Pour into a 9x9 baking dish (you can use a large dish, the pudding will be thinner, is all). In the same bowl, whisk together the eggs and milk. Season with a little salt and pepper. Pour the milk-egg mixture over the bread cubes in the baking dish (the dish should not be full to the top as the pudding will puff up to almost double its pre-baking height). With a spoon or spatula, push the cubes into the milk mixture. Let the dish sit for 15 minutes and then sprinkle the parmesan over the top.

Bake for about 45 minutes until browned and puffy. Let sit for about 10 minutes before serving (it will be insanely hot in the center when it first comes out).

Note: This can be made ahead (up to baking it) and held in the refrigerator overnight. The bread will soak up all the liquid, but don't worry. Cover with foil and bake at 375 for 30 minutes, then uncover and bake for another 15-30 minutes (until hot all the way through).

Wednesday, February 18, 2009

Baps: The Breakfast Bread of Scotland

In a recent post on Serious Eats, Ed Levine took one for the team and found us a collection of great sandwiches to be found in Manhattan. Even though I am far from that city, I read Ed's posts (and devour his pictures) with glee. One of his sandwiches was served on a bap, which he'd not heard of before.

Being the seriously geeked-out food-trivia maven that I am, I immediately leapt in to let him know that baps are a type of Scottish roll, traditionally eaten at breakfast (you can eat them at lunch and dinner too - they make nice sandwiches after all).

Elizabeth David's extensive volume English Bread and Yeast Cookery provides a quick discussion of baps. The traditional bap is just a yeasted roll: very plain and simple. Baps can be enhanced with potato, onion and/or herbs to liven them up. The addition of potato is a helpful one in that it keeps breads fresh-tasting.

Today I made a batch of traditional baps. The dough is not kneaded, it's just stirred together and left to rise. This dough makes a dense, finely textured bread. The crumb will be a little moist. It reminded me a little of a bagel, without as much chewiness. All the recipes I read recommended that baps be eaten right after baking. "Older" ones should be heated or toasted to refresh them.

Here's a basic recipe for baps from David's book. I strongly recommend you add this volume to your bread baking collection. It's full of great stories and anecdotes, not to mention a thorough discussion of breads (quick and yeasted) . She also provides a lot of detailed information on bread ovens, baking equipment, yeasts and flours. Sure, you've heard of scones, crumpets and muffins, but what about manchets, barmbracks or coburgs?

Basic Baps
Makes 8-10 baps
  • 2/3 cup water, warm
  • 2/3 cup milk, warm
  • 1 3/4 teaspoons yeast
  • 3 cups flour
  • 2 teaspoons salt
  • extra milk for brushing the bread
  • flour for dusting
Mix together water, milk and yeast.

Put the flour and salt in a large bowl. Stir in the liquids. Stir until the dough until it is well mixed. If the dough is too stiff, add extra milk to loosen it up (it should be doughy, but not solid). Cover the bowl and let the dough rise for 1 1/2 - 2 hours. It will not double in size.

Heat your oven to 425 degrees.

Dump the dough onto a floured counter and the cut it into 8 to 10 equal pieces. Form them into an oval, flattish roll. Place them on a baking sheet. Cover with plastic and let them rest for 30 minutes.

Brush each bap with milk and then dust them with flour. Poke your thumb into the center of each bap to make an indentation. Bake them for about 15 minutes, until light gold (they will stay fairly pale).
Blog Widget by LinkWithin