Showing posts with label Greek. Show all posts

Sunday, March 28, 2010

Tahini Cake for Lent

Recently I hosted a Greek Independence Day dinner (see full post here). For dessert I offered grapes and a parfait of yogurt, honey (from our own hives) and toasted pistachios, but I also wanted to offer a baked item as well. The challenge is that I needed to offer an item that fit within the dietary requirements of Greek Orthodox Lent: no dairy or eggs (yes I know the yogurt is dairy, but I knew I breaking the rules for that one).

I made this tahini cake, not quite knowing what to expect. For those not familiar with it, tahini is sesame paste. You've probably eaten it in hummus and maybe in that creamy sauce you sometimes get with falafel, but it's not something many people (myself included) think of as a dessert ingredient.

So this cake was an exciting discovery. It tasted like peanut butter (but without peanut butter allergy issues, for those who are concerned about that)! The recipe called for candied fruit, so I used some candied kumquats I made earlier this year. If you have good quality candied fruit, use it, but if not, double the amount of dried fruit instead.

Tahini Cake
Makes one 9x12 baking pan - this is a pretty dense "cake" (it's more like a bar cookie), so you'll likely want to cut it into small 2"x 2" pieces. This recipe is adapted from the cookbook The Complete Book of Greek Cooking. This cookbook is a great resource for Greek food lovers: it's a community cookbook professionally published in 1990 by a Greek Orthodox church in Hempstead, NY.

Make sure your tahini is fresh: Taste it, do you want to eat it? Then it's fine for cooking. Tahini can go "off" or turn rancid pretty easily. Store your tahini in the fridge to ensure longer life.

  • 1 cup (12 ounces by weight) tahini
  • 1 cup (7 ounces) sugar
  • 2 tablespoons brandy or bourbon (a new world touch for sure)
  • 1 teaspoon baking soda
  • 1 1/2 cup (6.75 ounces) flour
  • 2 teaspoons ground cinnamon
  • pinch salt
  • 1 cup orange juice (I used grapefruit juice and didn't notice a grapefruit-y flavor)
  • 1 cup chopped toasted walnuts
  • 1/2 cup golden raisins (I used dried cherries)
  • 1/2 cup glacé fruit (I used candied kumquats - don't use that super sweet stuff from the supermarket. If you don't have access to great candied fruit, use dried fruit instead)
Preheat your oven to 350. Prepare a 9" x 12" pan: grease the bottom and sides and line the pan with parchment or waxed paper.

Beat the tahini with a mixer to aerate it a little (it won't fluff up like butter would, just soften it up). Pour in the sugar and keep beating to combine. Add the baking soda to the brandy and then pour the mixture into the tahini. Beat to blend.

Whisk together the flour, cinnamon and salt.

Beat in the flour mixture and orange juice alternately to the tahini. When all the flour and orange juice have been added, add the fruit and nuts. The batter will be very thick.

Spread the batter into the prepared pan.

Bake for about 45 minutes until deep golden brown. Cool in the pan on a rack. When cool, cut into small pieces and dust with confectioner's sugar if desired.

Foodbuzz 24, 24, 24: A Greek Independence Day Celebration

March 25 is a National Holiday in Greece. It commemorates the start of Greece’s war of independence over the Ottoman Empire. Prior to the start of the revolution, The Ottoman Empire had ruled Greece for nearly 400 years. The revolution lasted from 1821 to 1832, when the treaty of Constantinople was signed.

If you live an area with a Greek population, look for Independence Day parades and celebrations on the 25th or the weekend after it.

This Saturday, with the help of Foodbuzz, I hosted a Greek Independence Day party for friends. Due to the fact that Independence Day falls during the observance of Lent, I decided to [mostly] follow the dietary restrictions that Greeks have to follow when planning my menu. This means that menu shouldn’t contain meat (although certain types of seafood are permitted), dairy or eggs.

Greek Orthodox Lent has very strict dietary restrictions. During Lent, practicing Orthodox Christians must abstain from eating meat, or meat products (so this means no dairy or eggs either) and fish (shrimp, squid, octopus and shellfish are fine). Ultimately, you consume a primarily vegan diet (except for certain types of seafood) for the entire 40 days.

There are fasting exemptions for certain feast days, particularly those celebrating the Virgin Mary (Panagia). On those days, Greeks can also include finfish in their diet. Due to its ease of storage and transport, salt cod (also known as baccala or bacalao) has become traditional on Annunciation Day, March 25th. Annunciation Day is the same date as Independence Day, so we can take advantage of the lifting of certain dietary restrictions.

One of Greece’s greatest culinary traditions is that of mezethes.
Mezethes are small dishes usually eaten with drinks – ouzo of course. They fall into the same place that tapas or antipasti do in Spanish and Italian cuisine. A great advantage for the party host us that a lot of them can be made ahead and plated up when your guests arrive so there’s less hands on work to do when folks come over.

I made a collection of dishes that would show the variety of dishes that can make up a mezethes table. In true Mediterranean fashion, I made too much to eat and everyone did a great job keeping up with the parade of plates coming out of the kitchen. I tried to keep my Independence Day menu in line with the dietary restrictions outlined by Lent and Annunciation Day.
I confess there were few dairy items on the table and I’ve noted that in the menu list below.

The Menu

  • Salt Cod Fritters with Skordalia (garlic-walnut sauce) - recipe below
  • Hearty Greens Pies
  • Olive Pies
  • Beet and Orange Salad
  • Grilled Octopus with Roasted Lemon Sauce - recipe below
  • Ktipiti (tangy cheese dip) – contains dairy
  • Tzatziki (yogurt-cucumber dip) – contains dairy
  • Melitzanosalata (eggplant spread)
  • Taramasalata (cod roe spread)
  • Pickled Artichoke Hearts
  • Fava (yellow split peas) with Tomato-Caper Sauce
  • Stuffed Grape Leaves with pistachios and currants
  • Tahini Cake with Walnuts, Candied Kumquats and Cherries
  • Yogurt Honey Cups – contains dairy
  • Fruit


The Drinks

Ouzos: Barbayianni & Ploumari (both from the island of Lesbos)
Red Wines: Notios (Peleponnese), Argyros (Santorini), Axia (Florina – thanks Dale!)
White Wines: Amethystos (Drama), San..Torini (Santorini – thanks Bill!)
Beers: Opa-Opa and Mythos (thanks again Bill)

Recipes

Salt Cod Fritters

You can find salt cod in a lot of supermarkets. It’s usually in the refrigerator case where pre-packaged seafood is sold. It may be in a bag or a little wood box. Store it in your refrigerator until you’re ready to use it. The hardest part of this recipe is remembering to start soaking your cod a day ahead.

  • 1 1/2 pounds boneless, dry-salted baccala
  • ¼ cup chopped dill
  • 1 cup beer, I used a lager
  • 1-1½ cups all-purpose flour
  • oil, for frying – I like an olive oil / vegetable oil blend
  • salt and pepper

In a large bowl, cover the baccala with cold water. Soak, refrigerated, for 24 hours. Changing the water every 6 to 8 hours.

Drain for the last time and pat dry with paper towels. Shred the baccala with your hands (you’ll have to tear it), for a finer texture in the finished dish, use a knife to cut the baccala into short lengths and then shred the pieces apart. Add the dill to the baccala.

In a separate small bowl, whisk the beer into the flour. Stir into baccala until combined. If it seems too stiff add a little more beer, too loose, add flour. You want a batter than will drop off a spoon, but still hold its shape.

Heat the oil in a deep skillet over medium-high heat. When the oil is hot (about 325-350), gently drop small amounts of batter into the oil (about a generous tablespoon). Don’t crowd the pan, you will need to make these in batches. Cook the fritters until golden brown and drain on paper towels. Sprinkle with salt and pepper and serve with skordalia.

Skordalia (Garlic-Walnut Sauce)

This version of this sauce uses stale bread as a thickener. There are also versions that use cooked potatoes, but I prefer this version. I used pita, since I had it on hand – I needed one and a half pieces to make three ounces.

  • 4 slices (about 3 ounces) stale white bread
  • 1 cup shelled walnuts
  • 6 cloves garlic, peeled
  • 1/2 cup extra-virgin olive oil
  • 1/2 teaspoon kosher salt, plus more to taste
  • juice of 1 lemon
  • 1 tablespoon red white vinegar

Soak the bread in 1/2 cup water for 2 minutes. Press excess water from the bread so that it is damp.

Put bread, walnuts and garlic in a food processor and pulse until a chunky paste forms. Add the olive oil and salt and process until well blended – it may not get completely smooth. Transfer the mixture to a bowl and stir in the lemon juice and vinegar. Adjust salt to taste.

Braised Octopus with Roasted Lemon Sauce

This dish was real star of the party. It was actually the first time I cooked octopus, and so I was more than little worried about it turning out well. I used the braising method from Michael Psilakis’s fabulous Greek cookbook How to Cook a Lamb and a modification of his roasted lemon purée as a sauce.

I found octopus in the freezer case of the supermarket. A Greek family owns one of our local supermarket chains and some of their locations carry frozen octopus (for local reference, Market Basket in Danvers, MA was where I found mine). Call around your local area, it’s probably easier to find than you think.

My octopi (I bought two) were 2.5 and 1.5 pounds respectively and provided 12 small appetizer portions as part of my meze table. The method is infinitely scalable, so I’m going to give you the technique, but feel free to scale it up or down, depending on how many people you’re feeding. Also great, you can do almost all the cooking a day ahead and just heat it right at mealtime.

  • Octopus, thawed if frozen
  • Garlic cloves, peeled
  • Chili flakes
  • Bay leaves

Your octopus will most likely be whole. (I did not cook the head I just used the tentacles.) With a pair of kitchen shears, cut the tentacles from the octopus body. Rinse the tentacles and then dry them with paper towels.

Heat the oven to 375 degrees.

Heat a large skillet over high heat. When the skillet is super hot, lay a few tentacles, sucker-side down into the pan. The tentacles will contract as they hit the pan, don’t be alarmed. Sear the tentacles for about 2 minutes, and then put them into a braising dish (a covered casserole or oven safe dish with the top covered in foil). They will turn red and will curl up a bit. Repeat the process with the remaining tentacles, making sure the pan gets superhot each time and making sure not to crowd the pan. (I seared mine in four batches.)

Add garlic cloves (I used 6 whole cloves), chili flakes (I used about 1 teaspoon) and a bay leaf to the braising dish along with the octopus. Cover the dish and put the pot into the oven. That’s right, do not add any liquid to the pan. Braise, covered for an hour to two hours, depending on the size of your octopus tentacles.

My tentacles were pretty thin, so my octopus was done in one hour. It’s done when you can slide a sharp knife easily into the flesh. If it feels tough at all, return the octopus to the oven to continue braising. (You should be able to cut it with a table knife without any sawing.)

At this point, you can put the octopus into the fridge until it’s time to serve it.

When it’s time to serve, heat a grill pan, or charcoal or gas grill to very hot. Remove the tentacles from their braising liquid (which will likely have formed a rich jelly) and lay them into the pan or onto the grill. Depending on the size of your pan, you should do this in batches. Grill until hot and slightly charred – about 1-2 minutes.

Serve with an oil and lemon salad dressing or the Roasted Lemon Purée.

Roasted Lemon Purée

This is also a method from Michael Psilakis’s fabulous Greek cookbook How to Cook a Lamb. This time I had to use “regular” supermarket lemons, but if you have Meyer lemons on hand do use them in this preparation.

Yields about 2 cups

  • 2 lemons, well scrubbed
  • 2 cloves garlic
  • 2 tablespoons Dijon mustard
  • ½ cup olive oil
  • sugar, to taste
  • salt and pepper to taste

Place a rack (roasting rack or cooling rack) into a baking dish or roasting pan.

Wrap the lemons in foil, place them on the rack and roast in a 325-degree oven for about 90 minutes. The lemons will feel super squishy. Let them cool until you can handle them comfortably

Cut or tear open the lemons and remove the seeds. Remove the lemon pulp and place it into a food processor. Scrape away as much pith as you can from the inside of the lemon and coarsely chop the peel. Add the peel and any juices to the processor. Add the garlic and mustard to the processor and purée until smooth. Continue pureeing as you add olive oil through the feed tube. Taste the puree and add sugar (this amount will vary depending on how much pith you got off your lemon peel). Add salt and pepper to taste.

You can use the puree as is (it packs quite a punch) or thin it out with mayonnaise, more oil or crème fraiche or cream.

For the octopus, I dressed the serving plate with the puree and then drizzled additional oil over its surface. I placed the octopus on top of the puree so people could scoop up a little puree with each tentacle.


More about Foodbuzz and the 24, 24, 24 program: Each month, Foodbuzz sponsors events run by 24 different bloggers. 24 Meals, 24 Hours, 24 Posts is a great way to see what folks are doing all around the world. Check out the Foodbuzz 24, 24, 24 page to see what everyone did this month!

Tuesday, May 26, 2009

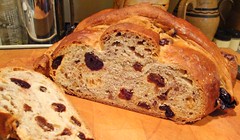
BBA Challenge Bread: Artos, Bread #2

The second bread in the BBA challenge is Artos, a Greek celebration bread. I was raised Greek Orthodox church and while I guess I ate a lot of Artos, I never knew its official name. Artos is a leavened celebration loaf. A number of breads fall within this category: Vassilopita (eaten at New Years'), Tsoureki (at Easter), and Christopsomo (at Christmas). They are all variations on the same spiced, enriched dough. They are shaped into different loaf styles, depending on the holiday.

This is a Christopsomo, baked for Christmastime (due to the glaze, from certain angles I thought it looked like a big roasted chicken). The bread is decorated with a gothic cross. The spices in the bread are mahleb (or mahlepi) and cloves. Mahleb is a spice used a lot in Greek and Middle Eastern baking. It's actually the inner pit of a cherry and has a slightly sour-cherryish fragrance (very slight). I didn't have any mastic on hand, if so I would have subbed it in for the cloves. Mastic is a resin, harvested from a Pistacia lentiscus tree. These trees are found only on the Greek island of Chios. I've seen the harvest process and it's painstaking and low-yield.

The bread is further enhanced with dried cherries, raisins and toasted walnuts. Good quality dried fruit is so nice in breads like this one. Don't fall for the plastic nubbins of dried "fruit" at the supermarket. Get good stuff.

Anyway, the bread. The fragrance of the dough and baked bread immediately brought me to the holiday table; I was shocked by how strongly it evoked memories for me. The dough behaved beautifully. It's enriched with eggs and so the rise was a little slower. In fact, I am experimenting with doing extra-slow rises with most of my breads. I let this one proof in the fridge overnight before shaping and final proofing.

Changes for next time:
  • Split off the dough for the cross before I add the fruit and nuts for a neater result.
  • Make two smaller loaves. The final loaf is huge, well over 10" around. For two people this was overload and too much to eat.
Of note:
  • As a number of bakers noted, this bread makes great French toast.

Thursday, April 16, 2009

Ouzo-Spiked Shrimp

This is a great "what the heck's the dinner tonight?" dish. Everything you need to make it comes from the freezer or kitchen cabinet, if you've got a little fresh greenery for garnish, all the better!

Ouzo-Spiked Shrimp
Serves 4
Recipe notes: I used ouzo to deglaze the pan and add a fennel flavor to the dish, but you can use white wine, rum, tequila or dry vermouth instead.

If you prefer, you can leave out the chickpeas and double the amount of shrimp.
  • 1 onion, chopped
  • 3 cloves of garlic, minced
  • 1/4 cup ouzo
  • 1 28 oz. can of plum tomatoes, tomatoes chopped or torn into pieces
  • 1 15 oz. can chickpeas, drained
  • 2 tablespoons capers
  • 1/2 pound of shrimp
  • minced herb for garnish, optional
In a large skillet, over medium-high heat saute the onion and garlic with a little olive oil until softened and a barely golden. Deglaze the pan with the ouzo, scraping any bits off the bottom of the pan. Let the alcohol boil off until the pan is almost dry.

Add the tomatoes to the pan. Bring to a simmer and let simmer until a little thickened. Taste for seasoning and add salt or pepper as needed.

Stir the chickpeas, capers and shrimp into the pan. Simmer until the beans are warmed and the shrimp are cooked through.

Serve with rice, pasta or a big hunk of fresh bread.

Friday, March 6, 2009

Beets with Garlic Sauce

One more dish from the WBUR Meet Up. I love beets and this is a great way to serve them. Even better, everything can be made ahead as this is a dish that benefits from being served at room temperature.

The garlic sauce is a Greek dish called "skordalia" (Prounounced: "score-tha-LEE-ya"). There are several versions of skordalia. At its root, skordalia is a sauce that is heavily seasoned with raw garlic. You'll see recipes that call for potatoes, bread, nuts and/or eggs as the thickener. Traditionally this sauce is made in a mortar and pounded by hand, but most modern cooks will use a blender, food processer or mixer (stand or handheld).

My version of skordalia ia adapted from The Greek Vegetarian by Diane Kochilas. I strongly recommend this book to anyone who wants to cook Greek vegetarian meals. There's more to Greek cooking than gyros and spinach pie!

To cook my beets, I use a non-traditional technique (at least it's not one I see elsewhere very often). I cut the root end and leaf end off the raw beets. Using a vegetable peeler, I peel the raw beets. Then I cut them into slices, wedges or whatever other shape I want. (The beets will be very hard, so be sure to use a sharp knife and be careful not to hurt yourself.) I lay the beets in a single layer in a baking dish and add about a 1/4 cup of water. Cover the dish with aluminum foil and bake in a 375-degree oven until the beets are tender (about 30-45 minutes depending the age and cut of the beets).

Beets with Skordalia
Serves 4-6 (more if being used as part of an appetizer spread)
  • 1-2 bunches of beets (enough for about 1-2 beets per person, depending on the size of the beet)
  • 12 ounces of potatoes (russets or yukon golds), about 2 large russets
  • 4 -6 cloves of garlic, minced or pressed in a garlic press
  • 1/2 cup of toasted walnuts or hazelnuts, chopped fine
  • juice of 1 lemon
  • approximately 1/2 cup olive oil
  • approximately 1/4 cup red wine vinegar
  • salt and pepper to taste
Cook the beets according the method above or another method of your choosing. The beets should be cut into wedges or 1/2" slices. Season with salt and pepper and a sprinkle of red wine vinegar.

Make the skordalia: Peel the potatoes and cut into chunks. Put in a pot of salted water and bring to a simmer. Cook until tender and then drain.

Put the potatoes into the bowl of a stand mixer fitted with the paddle attachement (or use a large bowl and a hand mixer). Add the garlic, nuts, and lemon juice. With the paddle, mash the potatoes together with these ingredients. With the mixer running on low, blend in half the oil and half the vinegar. Stop the mixer and taste. Add salt and pepper to taste.

Turn the mixer back on and blend in more oil until the mixture is slightly fluffy and airy (lighter than mashed potatoes). Turn off the mixer and taste again. Add in more salt or vinegar if needed: you want a blend of salty, sour and garlicky.

Serve the beets on a bed of skordalia, or with it on the side. If desired, garnish with more chopped nuts or chopped parsley or dill.

If you have any leftovers, make a quick "hash". Chop up the beets and mix them together with leftover skordalia. Put the mixture in a non-stick skillet with a wee bit of olive oil over medium-high heat. Saute on both sides until crispy. Serve with a fried egg (I also made a quick "sauce" of parsley, more garlic and red wine vinegar to spoon over the top).

Thursday, March 5, 2009

Ugly but Good

Can we agree that sometimes really ugly food tastes pretty good? This lentil salad is a perfect entry into that category (in fact I just made a tag for it - ugly food deserves respect). It's another one of the dishes I made for the WBUR meet up. Clearly, even I wasn't enamored of its looks - this is the only picture I took of it.

Lentils are a great budget-conscious food. But they can also be jazzed up with some pretty elegant ingredients. In addition to lentils (just regular green ones from the supermarket), this salad contains roasted kohlrabi pieces, caramelized onions, parsley and feta cheese. It's seasoned with a toasted cumin and red wine vinaigrette.

Treat this recipe as more of a guideline. Hold back some lentils when you're mixing everything together - add more in as you: you want a nice blend of lentils and vegetables. You'll know when it looks right. Keep checking your seasoning: shoot for a nice contrast between salty and sour. If you're adding feta, keep that in mind and don't oversalt before you add it to the salad. To make this a full meal, add a hard boiled egg to each serving and serve the salad over or alongside a green salad with some pita bread or foccacia.

Lentil Salad with Kohlrabi and Caramelized Onions
Serves about 8
  • 1 pound lentils (pick through them for stones and give them a good rinse before cooking them)
  • 2 large onions, peeled and cut into thin slices
  • 2-4 cups of "roastable" vegetables, cut in chunks (I used kohlrabi, but you could broccoli or butternut squash or peppers or mushrooms or what have you - left over cooked vegetables would be great in this)
  • 1/2 - 1 cup chopped parsley
  • 1/2 teaspoon ground cumin
  • 1/4 pound feta (or goat cheese or farmer cheese)
  • red wine vinegar
  • olive oil
  • salt and pepper
Cook the lentils: In a large saucepan (the lentils will nearly double in volume) place the lentils are cover them with 2" of water. Add a generous pinch of salt. Bring to a simmer and cook until the lentils are tender. Depending on how old the lentils are, it will take between 30-45 minutes for them to cook. When they are cooked, drain them and set them aside.

Make the rest of the vegetables: Saute the sliced onions over medium heat until dark brown (not burned) and caramelized. Roast the chopped vegetables in a 400-degree oven until they are cooked through to your taste.

Put the onions and roasted vegetables in a large bowl with the parsley and cumin. Add half of the lentils and stir gently to combine. Add more lentils until you get the proportions you want. Drizzle the salad with vinegar and oil (about equal amounts of each). Sprinkle with salt and a good amount of freshly ground pepper. Add the feta and stir to combine. Taste and adjust for acid and salt as needed.

This is good right away, but also holds really well so you can make a day or so in advance. It tastes best at room temperature.

Monday, March 2, 2009

Ouzo-Cured Salmon

Ouzo-haters, don't turn away!

I made this salmon, recipe originally found here at Kalofagas, for a Meet Up (Eat Up!) at WBUR in conjunction with their Public Radio Kitchen project. The Public Radio Kitchen provides a great aggregation of Boston-area food and restaurant blogs. The Eat Up was the first opportunity (for large a number us) to meet in person. I offered to bring along a large spread of food for the attendees. A few other folks brought treats as well, and in occurrence similar to the miracle of the loaves and fishes, we all got plenty to eat! Some pictures from the event are here.

Here's the full menu of what I provided for the event:
  • Ouzo-Cured Salmon with Carrot Tzatziki
  • Lentil Salad with Roasted Kohlrabi and Caramelized Onions
  • Roasted Beets with Skordalia (Potato-Garlic Sauce)
  • Butternut Squash Baklava (savory, not sweet)
  • Rosemary Foccacia
  • Citrus Salad with Pickled Shallots, Kalamata Olives and Arugula (Sunday's cover shot)
I thought I'd share some of the recipes with you, starting with the salmon. The hardest parts of this dish are finding really high quality salmon (let your fish guy or gal know that you'll be curing it and that you need great quality product) and slicing it thinly enough (sharpen that knife!) when you're ready to serve it. This recipe can scale (no pun intended) up or down, depending on the size of the fillet you're using. The ouzo flavor isn't prominent, it just provides a nice herbal note to the salmon.

Ouzo-Cured Salmon
For appetizer servings, plan on 2 or 3 ounces of salmon per person.
  • Salmon
For every pound of salmon you use:
  • 3 tablespoons ouzo (or vodka - if using vodka and you still want an anise flavor, add 1 tablespoon aniseseed to the cure mixture)
  • 2 tablespoons kosher salt
  • 2 tablespoons sugar
  • 2 teaspoons coarse-ground black pepper
  • zest of one orange
  • zest of one lemon
  • 1 teaspoon Aleppo pepper flakes
Put the salmon, skin-size down, on a large sheet of plastic wrap in a container large enough hold the salmon in one flat layer (The salmon will exude more liquid - make sure the dish you're using has sides high enough to contain any drips: rimmed baking sheet, roasting pan, large Tupperware container, etc.).

Drizzle the salmon with the ouzo. Mix together the remaining ingredients and rub on the flesh. Wrap the plastic around the fillet tightly, trying to keep the liquid inside the plastic. Cover the fish with a cookie sheet, plate or some other flat item (you want to weight the fillet down, so make sure it's entirely covered. Weight down the sheet with a heavy item (a can, bag of flour, cast iron skillet, etc.) . Place the salmon in the refrigerator for one to three days (the flavor gets stronger the longer it cures).

Unwrap the salmon and pat it dry. Using a very sharp knife, slice very thin slices across the fillet. Garnish with citrus (I used kumquats and some dill fronds). Serve with carrot tzatziki.

Carrot Tzatziki
This is a play on the more traditional cucumber tzatziki. To make a cucumber version, substitute 1 cup of shredded, drained cucumber (about half an English cucumber - the one that's wrapped in plastic in the supermarket). This recipe is adapted from The Greek Vegetarian by Diane Kochilas.
  • 2 cups thick Greek-style yogurt (Fage is a good brand. Trader Joe's sells one too)
  • 2 medium carrots, shredded
  • 1-2 cloves of garlic, pressed or minced
  • 1/4 cup chopped dill
  • juice of 1/2 lemon
  • salt and pepper to taste
Mix all the ingredients together. Adjust salt to taste. If you need more tartness, add a little more lemon. As the tzatziki sits, the garlic flavor will become more pronounced. For best results, make this the day you intend to serve it.

Tuesday, February 17, 2009

Mushroom Pastitio: A Taste of the Mediterranean Entry

Thanks to Tony Tahhan for starting the "A Taste of the Mediterranean" contest (sponsored by igourmet) and Peter from Kalofagas for hosting this month.

The idea is to take that month's classic dish, technique or ingredient and transform it into something new. The classic Greek dish, pastitio, is February's inspiration. Pastitio is traditionally made of layers of pasta (ziti) layered with a rich meat sauce of lamb (sometimes beef) that is spiced with cinnamon and allspice. A thick layer of bechamel (think a white sauce with eggs whisked in) is poured over the top and the dish baked to heat it through and cook the bechamel. It's not hard to make (although it's time consuming) and I've made it many times (using the recipe my mom gave me once upon a time).

The problem with pastitio is that it's pretty rich and I wanted to think of a way to lighten it up for a weeknight dinner. I decided to go vegetarian (sorta) and substitute mushrooms for the meat. To make it even lighter I made a veloute (made with broth) instead of a white sauce (made with milk). I did use a little milk in the veloute for creaminess, but the broth was the primary liquid. Instead of ziti, I used ditalini pasta for a daintier match with the mushrooms.

We were very happy with the outcome: the dish was very satisfying but didn't weigh us down. Since it wasn't super-rich I can safely include it in my weeknight meal rotation.

Mushroom Pastitio
Serves 6-8
Notes:
I used chicken broth to make the veloute. Sub in vegetable broth for a vegetarian dish. Sub in all milk for a creamier bechamel sauce.

Also, instead of sauteing my mushrooms in a skillet, I roasted them in a hot oven. This method is great for a hands-off cooking. See the before and after pictures of the mushrooms to get an idea of how much "shrinkage" there is when you cook mushrooms down.

Finally, there are a lots of steps, but you can make the components ahead of time and assemble the dish before cooking.
  • 1 pound small tube pasta: ditalini, pennette, mini ziti, etc.
  • 24 ounces mushrooms, cleaned and chopped
  • 1 onion, chopped
  • 3 cloves garlic, minced
  • 1 teaspoon cinnamon
  • 1/4 teaspoon ground allspice
  • 28 ounce can of diced tomatoes
  • 3 tablespoons chopped parsley
  • 4 tablespoons butter
  • 4 tablespoons flour
  • 3 cups chicken or vegetable broth
  • 1 cup milk
  • 3 eggs
  • 1/2 cup grated parmesan, romano or mizithra cheese
  • salt and pepper
Make the pasta:
Cook the pasta in a lot of salted, boiling water until just shy of done (you want the pasta to be a little undercooked because it will cook through a little more in the oven). Drain and set aside.

Make the mushroom sauce:
Heat the oven to 400. Spread the mushrooms on a large baking sheet. Drizzle with oil and sprinkle with salt and pepper. Roast the mushrooms in a hot oven, stirring occasionally, until they are browned and all the moisture in the pan has evaporated. They will shrink a lot - look at the before (left) and after (left) for an idea about how much the volume will decrease.

While the mushrooms are cooking, saute the onion with a little olive oil in a large skillet until softened and starting to brown. Add the garlic and spices and saute a few more minutes, until fragrant. Pour in the can of tomatoes. Keep stirring until mixture gets "saucy" (the water from the tomatoes will cook off and the mixture will look like something you'd want to sauce pasta with - a good idea BTW). Set sauce aside until the mushrooms have finished cooking. Add mushrooms to sauce. Taste for salt and pepper. Stir in parsley. Set aside.

Make "bechamel":
Over medium heat melt butter in a large saucepan and add flour. Stir in flour and cook, stirring with a wooden spoon until smooth. Whisk in 1 cup of the broth. Whisk until smooth (the mixture will get very thick). Gradually whisk in the remainder of the broth and the milk. Whisk until there are no lumps. Bring to a simmer. As the sauce starts to bubble it will thicken up. After simmering for 5-7 minutes, the sauce will be thick (about the texture of melting ice cream). Remove sauce from the heat. Taste for salt and pepper and adjust seasoning as needed.

Crack the eggs into a bowl and whisk them to break them up. Whisking rapidly, whisk the eggs into the sauce. The sauce will thicken up a little more.

Assemble the pastitio:
In a large baking dish (9x12ish), layer the ingredients as follows:
  • Enough bechamel sauce to cover the bottom of the pan.
  • A layer of pasta (about half the pasta).
  • The mushroom sauce.
  • The rest of the pasta (you may not use all of it - don't mound the pasta too high over the top of the baking pan - use leftovers in a frittata).
  • Slowly pour the bechamel over the top - use a spoon to move the pasta back and forth so the sauce seeps in between the pasta.
  • Sprinkle the cheese over the top.
Put the baking dish on a baking sheet (to protect your oven from drips) and bake at 350 for 30 minutes or so, until the dish is bubbling. Run under the broiler to melt the cheese if desired.

Let the pastitio sit for 5 minutes or so before serving.
Blog Widget by LinkWithin