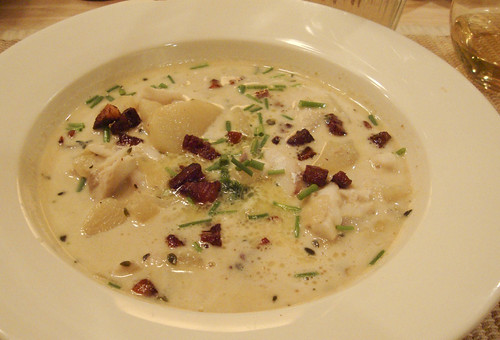
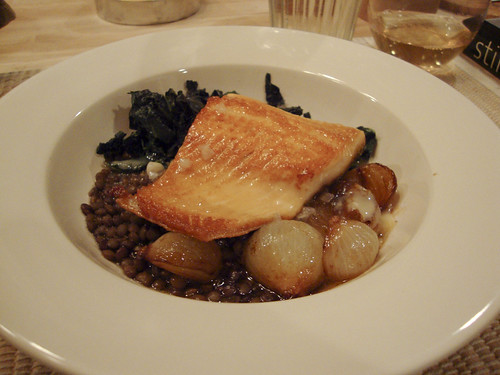
 We've lost sight of what a good fish chowder** is. Too frequently chowder is a restaurant dish: a gloppy, salty bowl of soup, lacking seafood flavor. It's usually clam chowder and it most likely comes from a can or a box in the freezer. Ironically, most of us can get reliably good seafood and a great chowder is well within our reach.
Go make this chowder. It's perfect for a cold night and we've got quite a few of those coming up. This recipe is liberally lifted from a recipe by Jasper White. For those of you who don't know Jasper White, or know of him only through his Summer Shack restaurants, I'll point out that he was a major force in Boston's restaurant scene in the '80s and '90s. When Dave and I first moved to Boston, a table at Jasper's was an experience to celebrate. We ate there a few times (in fact, we were even going to get engaged during dinner there, except I got a stomach bug and the proposal we held over until the follow day. I said yes by the way. :-) ).
Fish Chowder
Serves 4
Fish chowder seems like a rather boring name for this dish because it is fantastic. All through dinner we just kept marveling over the flavor. Use the freshest fish you can find. I used a side of pollock from our latest community supported fishery delivery and it was fabulous. I also had some fish broth (fumet) in the freezer from this summer's CSF share, but feel free to use a light chicken broth, clam broth or just plain water.
This recipe is easily doubled or tripled to feed a large group.
This looks like a long recipe, but it takes about 30 minutes, start to finish, and about 15 of that is unattended time while the potatoes are cooking.
- 2-4 ounces salt pork or bacon
- 1 medium onion, chopped (about 1 cup of chopped onion)
- 2 teaspoons fresh thyme leaves, or 1/2 tsp dried thyme
- 1 pound russet potatoes, peeled and cut into 1/3" thick slices (cut the potato slices in half or quarters if they're bigger than soup spoon size)
- 2-3 cups fish broth, chicken broth, clam broth and/or water
- 1 pound skinless fish fillets (try cod, pollock, haddock, hake, etc. any mild white fish will do)
- 1/2-1 cup heavy cream
- salt and pepper to taste
- chopped chives, parsley, fennel and/or dill
Add the onion to the pot and saute in the pork fat, adding a little butter or olive oil if the pan is too dry. Cook until the onion is soft and just starting to brown. Add the thyme and the potatoes. Add enough stock or water to just cover the potatoes (I needed only 2 cups). Bring to a boil and them reduce the heat to keep everything simmering. Cook until the potatoes are soft enough to crush against the side of the pot, about 10-15 minutes. Check the seasoning and add salt and pepper to taste.
Add the fillets to the pot and stir them gently into the soup. Keep cooking on low heat until the fish is cooked through enough to break into large flakes when you stir (the fish isn't cut into chunks before it goes in the pot - the cooking process will allow the fillet to break into bite-sized pieces). When the fish is cooked through, add the cream - adjust the amount to your taste: I used about 1/2 cup of cream in ours and it was rich enough for a weeknight dinner. Recheck the seasoning and adjust with salt and pepper to taste (I like a fair amount of pepper in this).
Ladle into bowls and garnish with the crispy pork and chopped herbs.
** An aside: I can't think or write the word "chowder" without thinking of The Simpsons episode where Freddie Quimby tries to get the family's French servant to say "chowder" properly. Dunno what I'm talking about? Here you go:


 This Saturday, December 5, is the 76th anniversary of the repeal of the Volstead Act (which prohibited the manufacture and sale of alcohol). Repeal Day is an easy holiday to celebrate: just raise a glass in celebration of the repeal of the 18th Amendment! Read more about Repeal Day at Jeffrey Morgenthaler's


 I always think it's a good idea to writeup an event right after it happens ... Or when you can get to it. Therefore, better late than never, here's a quick summary of what we did for our Thanksgiving dinner this year.


 We held our second Cooking With Julia class at


 Greg and Christian both gave their all when it came to separating the eggs we needed for the tart. Michelle showed off her great folding technique on the tart base. The fun thing about this lemon tart is that the filling is actually a lemon souffle. You get a nice lemony hit but without all the richness of a traditional lemon curd-based tart. When the tart came out of the oven it had a perfect (alas, unphotographed) domed top. It sank a little while we ate our dinner, but was still wonderfully creamy and light when we finally got down to the business of eating
  it!
it!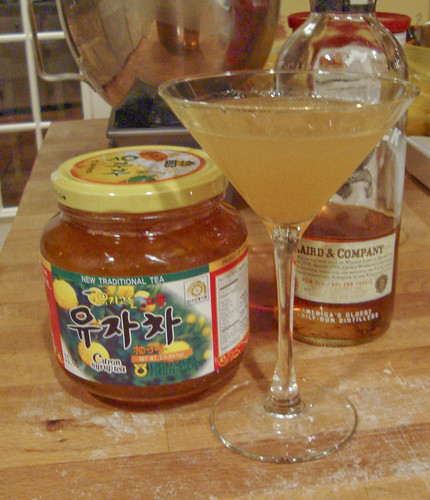


